
Garlic Butter Chicken for camping is the real test of campfire skill. Anyone can cook chicken, but creating a golden crust over uneven outdoor heat is where technique matters. This recipe is built around the Science of the Sear and how surface heat turns simple ingredients into deep flavor. You will learn how to keep the inside tender while the outside browns properly, all with a one-pan setup. This is not just dinner. It is a clear system that takes you from home prep to confident cooking at the fire
The “Home-to-Campsite” Workflow (Your Competitive Advantage)
Your Garlic Butter Chicken for camping starts before you even leave the house. Begin by marinating the chicken in garlic butter, then freeze it flat in vacuum-sealed bags. These frozen packs serve two jobs at once. They keep your cooler cold and allow the marinade to soak deeper into the meat as it thaws. For seasoning, prepare a dry spice mix in advance. Use garlic powder, smoked paprika, dried herbs, salt, and pepper. Store the mix in one small jar to save space and skip packing a dozen containers. This step trims weight and speeds up campsite prep.

Logistical Science: The Physics of the Cooler
Keeping your food safe at camp starts with how you pack your cooler. Raw chicken should always go at the bottom. That is the coldest part and keeps juices from leaking onto ready-to-eat items. Stack other ingredients in order of cooking priority, with snacks and drinks near the top for quick access.
Use a thermometer to make sure the meat stays below 40 degrees Fahrenheit. This keeps it out of the Danger Zone, the range between 40 and 140 degrees where bacteria multiply quickly. A well-packed cooler with smart layering can keep your ingredients safe for up to two days without needing fresh ice.
Hardware Dynamics: Choosing Your Camp Kitchen Weapon
The Cast Iron Skillet
Gives perfect heat for searing and handles direct fire. Ideal for Maillard reaction which builds that golden crust.
The Foil Packet Method
Great for cleanup. Pro tip: Start the chicken sealed in foil to lock in moisture. Once cooked through, open the packet and place the chicken directly on the grill for two minutes to get that Maillard sear.
The Dutch Oven
Best for group meals. Use coals on the lid and base to bake evenly.

Equipment Checklist

Ingredients Needed For Garlic Butter Chicken
For the Chicken
- Two chicken breasts about nine ounces each, brought close to room temperature for even cooking
For the Dredging Mix
- One quarter cup of plain all-purpose flour
- One teaspoon garlic powder
- One teaspoon salt with extra to taste
- Half a teaspoon black pepper with extra to taste
For the Garlic Butter Sauce
- Six tablespoons unsalted butter cut into chunks for easier melting
- Half a cup chicken stock
- Two garlic cloves finely minced or diced
- One tablespoon fresh parsley finely chopped
For Cooking
- One tablespoon olive oil for searing
For Serving
- One lemon cut into four wedges for squeezing over the finished dish

This setup gives you balanced flavor without extra gear or ingredients. Keep it simple and flavorful using items that travel well.
How to Make Garlic Butter Chicken for Camping

Step 1: Prepare the Chicken
In a shallow bowl, mix the flour, garlic powder, salt, and black pepper. Butterfly each chicken breast by slicing through the middle to create four thinner pieces. This helps the meat cook faster and more evenly at camp.
Step 2: Dredge the Chicken
Press each chicken piece into the flour mix so it is fully coated. Shake off any extra and set the pieces aside. The coating helps create a crisp outer layer during cooking.
Step 3: Heat the Pan
Place a cast iron skillet on medium-high heat. Add one tablespoon of butter along with the olive oil. Once the fat starts to sizzle, gently lay the chicken pieces into the pan.
Step 4: Sear the Chicken
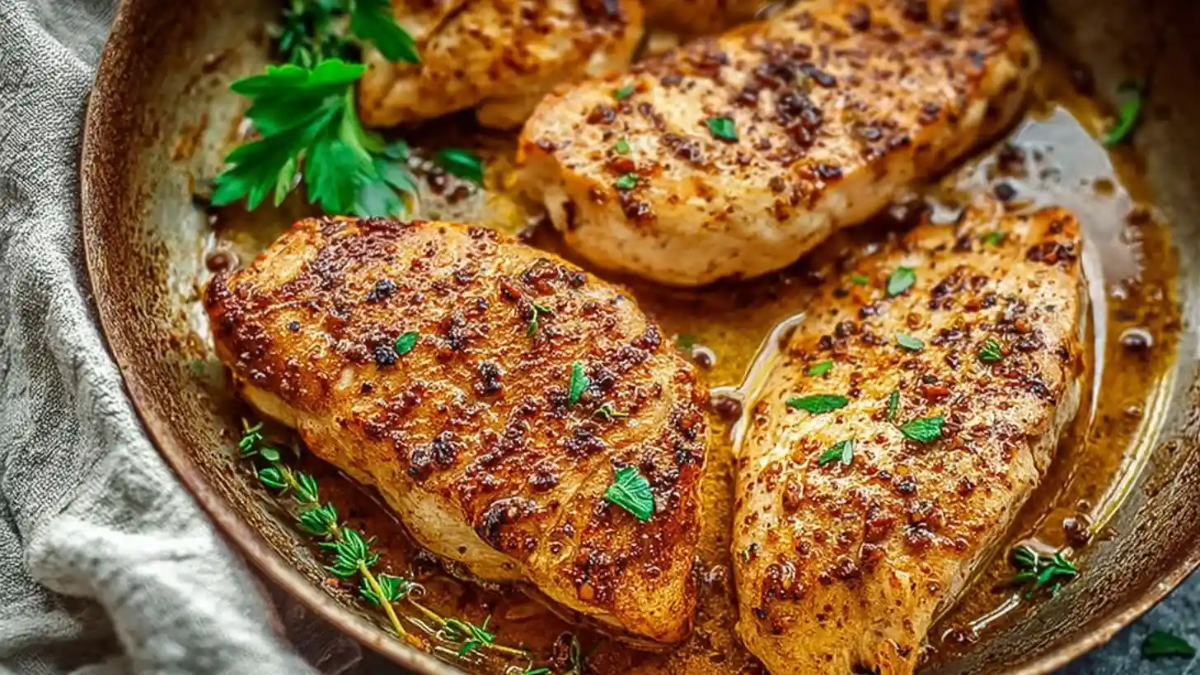
Cook each side for three to five minutes until golden brown and cooked through. The surface should feel firm, and juices should run clear. Set the chicken aside on a clean plate once done.
Step 5: Cook the Garlic
Lower the heat to medium. Add the minced garlic to the leftover fat in the pan. Stir it for about one minute until it softens and starts to brown. Be careful not to burn it.
Step 6: Build the Sauce
Pour in the chicken stock and use a wooden spoon to scrape up the browned bits stuck to the pan. These bits boost flavor. Add the remaining butter one chunk at a time, stirring constantly. The butter should blend with the stock into a smooth sauce that looks slightly cloudy.
Step 7: Finish and Serve
Add the chopped parsley and season with more salt and pepper if needed. Let the sauce bubble gently until it thickens just enough to coat the back of a spoon. Turn the heat low and return the chicken to the pan. Spoon the sauce over each piece and let it sit for one minute to absorb flavor.

Serve right away with extra sauce poured over and a wedge of lemon on the side.
Expert Troubleshooting: Solving Common Outdoor Failures
Bitter Garlic Fix
Garlic can taste harsh if it burns over open fire. To avoid this, use heat zones. Sear the chicken in the hottest center of the fire, but move the skillet to the edge before adding garlic and butter. This gives you control without scorching the flavor.
Raw Center Problem
Campfire lighting is not always reliable. Use an instant-read thermometer to check the chicken’s thickest part. It must hit 165 degrees Fahrenheit for safety. Do not rely on guessing or visual cues alone.
tip:Butterflying doubles the surface area for searing, helps the sauce cling better, and ensures the center reaches 165 degrees Fahrenheit before the garlic burns.
Mushy Chicken Mistake
Too much liquid can leave your chicken soggy, especially in foil packs. Let some moisture escape by slightly opening the foil in the last few minutes or finishing the cooking over direct heat. This helps create better texture.
Managing Low Fuel
If your portable stove is running low or your coals start to fade, cover the skillet with a lid or foil to trap heat. This method saves fuel and keeps cooking time on track even when the fire is weak.
Campsite Hygiene: Remote Safety Without Running Water
Keeping your cooking space clean is just as important as the recipe itself. Start by setting up a simple hand-wash station. Use a water container with a spout, place it on a raised surface, and add a bottle of biodegradable soap. Keep a small towel or paper towels nearby for drying.
When handling raw chicken, wash your hands before touching anything else. Clean your cutting surface and any tools right after use. Always separate raw and cooked items. Once the chicken is cooked, never place it back on the same plate or cutting board that held it raw.
Pack extra zip bags or bins to sort clean and used tools. Keeping things organized helps avoid cross-contamination and keeps everyone safe.
Serving and Storage Tips
Once your garlic butter chicken is cooked and sauced, serve it hot with a wedge of lemon for a burst of brightness. If you have space, pair it with cooked rice or roasted vegetables prepared earlier and kept warm in a thermal container. A side of campfire-baked potatoes or a crisp salad can also balance the richness.
If you have leftovers, let the chicken cool completely before packing it into a sealed container. Store it in the cooler near fresh ice to keep it safe. Reheat gently over low heat in a covered pan to avoid drying it out. Add a splash of water or stock to bring back the moisture. Avoid reheating more than once to maintain texture and safety.
Helpful Notes
If your campfire is unpredictable, keep a backup heat source like a small gas stove to stay on schedule. Wind shields around your skillet can also improve heat control and reduce cooking time.
Use a meat thermometer with a quick read time for better accuracy and less guessing. A simple cloth placed under your cutting board can stop it from slipping on uneven camp tables.
If you want to save space, pre-measure dry ingredients into small paper packets or label mini jars for each meal. For an extra boost of flavor, add a dash of chili flakes or a pinch of grated parmesan just before serving.
You can also swap chicken breasts with thighs for a juicier result. Just remember that darker meat might take a little longer to reach the correct temperature.
Garlic Butter Chicken for Camping
Ingredients
Method
- In a shallow bowl, mix the flour, garlic powder, salt, and black pepper. Butterfly each chicken breast by slicing through the middle to create four thinner pieces.
- Press each chicken piece into the flour mix until fully coated. Shake off any extra and set aside.
- Heat a cast iron skillet over medium-high heat. Add one tablespoon of butter and the olive oil. When it sizzles, lay in the chicken pieces.
- Sear each side for 3–5 minutes until golden and cooked through. Remove to a clean plate once done.
- Lower the heat. Add minced garlic to the pan and stir for 1 minute until softened and fragrant.
- Pour in chicken stock, scraping up browned bits. Stir in remaining butter chunks one at a time to emulsify.
- Add parsley and season to taste. Simmer until sauce thickens slightly. Return chicken to pan and spoon sauce over. Let rest 1 minute.
- Serve hot with a lemon wedge and extra sauce over the top.
Notes
Nutrition Facts (Per Serving)
- Calories: 390
- Total Fat: 26g
- Saturated Fat: 12g
- Protein: 33g
- Carbohydrates: 6g
- Fiber: 0.5g
- Sugar: 0.3g
- Cholesterol: 120mg
Conclusion: From Planning Anxiety to Gourmet Confidence
Cooking Garlic Butter Chicken for camping is not just about the ingredients. It is about knowing what to prep at home and how to stay safe and organized out in the wild. When you plan ahead and understand the basics of heat, storage, and hygiene, the rest becomes much easier.
Eighty percent of this recipe’s success comes from thoughtful packing and smart gear choices. The last twenty percent is simply managing the fire and enjoying the process. With this system, you get a delicious reward after a long hike without the stress or mess.
Download our free Campfire Equipment Checklist to make your next trip smoother. Then share your plate using the hashtag CampfireGourmet. Every camp cook has their moment. This one could be yours.
Leave a Reply
You must be logged in to post a comment.