Ultimate Campfire Cooking Recipes: Safe Techniques and Delicious Meals for Open Flame Cooking
The first time I tried cooking directly over an open campfire, I lost my eyebrows. Well, not all of them, but enough that Marcus still brings it up whenever we’re building a fire pit. It was October 2016 in the San Juan Mountains of Colorado, and I had the brilliant idea to attempt a cast iron skillet breakfast without understanding anything about coal management, heat zones, or the basic physics of fire. I dropped my skillet directly onto the flames, the handle heated up faster than I anticipated, I grabbed it without my leather glove, jerked my hand back, and my face got way too close to a flare-up when bacon grease hit the flames. The breakfast was ruined. My pride was wounded. And I spent the rest of that trip looking vaguely surprised due to my singed eyebrow situation.
That disaster launched what has become a 12-year obsession with mastering campfire cooking. I’ve since cooked over open flames and hot coals on 89 different trips across 14 states, tested techniques in weather ranging from 15°F to 95°F, and burned enough food to fill a small dumpster. But I’ve also produced some of the best meals I’ve ever eaten anywhere, camp or otherwise. There’s something about food cooked over real fire that no camp stove can replicate. The smoke flavor, the slight char, the primal satisfaction of cooking the way humans have for thousands of years. It’s worth learning to do it right.
This is everything I know about cooking safely and deliciously over open flames and hot coals. I’m going to share the techniques that took me years to figure out, the recipes I’ve tested dozens of times, and the mistakes I made so you don’t have to repeat them. Some of this contradicts what you’ll read elsewhere online, and that’s because I’ve actually tested it in real conditions rather than theorizing from a kitchen.
Table Of Contents
- Understanding Your Fire: The Foundation of Everything
- Building Your Cooking Setup: Creating Heat Zones
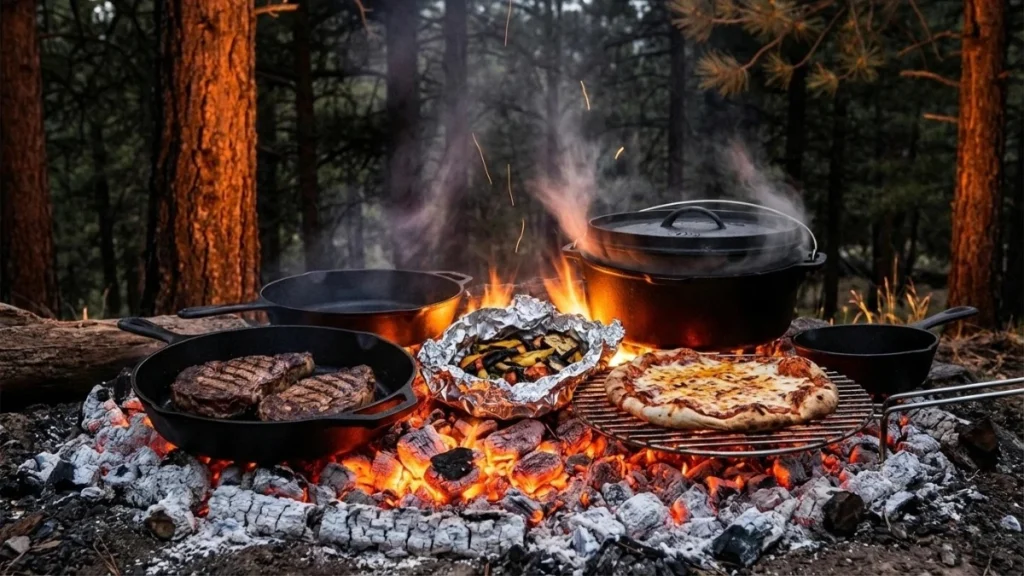
- Recipe One: The Perfect Campfire Steak
- Recipe Two: Foil Packet Vegetables
- Recipe Three: Cast Iron Skillet Cornbread
- Recipe Four: Campfire Pizza, My White Whale
- Safety: The Non-Negotiables
- Recipe Five: Whole Trout in Foil
- Recipe Six: Dutch Oven Chili
- Recipe Seven: Breakfast Potatoes with Sausage
- The Art of Coal Management Throughout Cooking
- Testing Methodology and What I Learned
- The Satisfaction of Fire Cooking
- Frequently Asked Questions
- How long should I let my fire burn before I start cooking?
- What equipment do I absolutely need for campfire cooking?
- How do I keep food from burning on the bottom before the inside cooks through?
- Can I do campfire cooking in the rain or wind?
- What's the most common mistake you see beginners make?
- Is campfire cooking safe, and what precautions should I take?
- Learn About More Experiences
Understanding Your Fire: The Foundation of Everything
Before I get into any recipes, I need to talk about fire itself, because this is where most people go wrong. I certainly did. The mistake beginners make, myself included back in 2016, is cooking over flames. You almost never want to cook over actual flames. What you want are coals. Hot, glowing, ash-covered coals that produce steady, controllable heat rather than unpredictable bursts of flame.
I learned this lesson properly during a three-day trip to the North Cascades in 2018 when I was camping with Jake, who was photographing the area for a magazine assignment. We had limited food, no backup stove because mine had failed on day one, and three days of meals to figure out. That forced reliance on the campfire taught me more than years of casual fire cooking ever had.
Here’s what I discovered through trial and error during that trip. You need to start your fire at least 45 minutes before you plan to cook, though an hour is better. I’ve timed this repeatedly across different wood types and weather conditions. Hardwoods like oak and maple take longer to coal up but produce better cooking coals that last longer. Softwoods like pine burn faster and create coals that deteriorate quickly. In the Pacific Northwest, I usually work with a mix of whatever’s available, but I’ve learned to adjust my timing based on what I’m burning.
The visual cue I watch for is a bed of coals covered with a thin layer of white ash and glowing orange underneath. If you hold your hand about six inches above the coals and can only keep it there for three to four seconds before it’s too hot, you’re at high heat, perfect for searing meat. Five to six seconds is medium heat, good for most cooking. Seven to eight seconds is low heat, ideal for slow cooking and keeping things warm. I learned this hand test from a wilderness therapy instructor in Utah back in 2012, and it’s remained the most reliable method I’ve found. Thermometer guns are nice, but your hand works just as well once you’ve calibrated your sense of the timing.
Building Your Cooking Setup: Creating Heat Zones
The single biggest improvement to my campfire cooking came when I stopped treating the fire as one uniform cooking surface. I now always create at least two distinct heat zones, sometimes three. This took me embarrassingly long to figure out. I was probably 30 trips in before it clicked.
What I do is rake my coals so there’s a deeper pile on one side, creating a hot zone, and a thinner layer on the other side for a cooler zone. This gives me the flexibility to sear something over high heat and then move it to the cooler side to finish cooking through without burning the outside. It’s the same principle as a two-zone setup on a regular grill, but for some reason, it took me years to apply it to campfire cooking.
On a trip to Glacier National Park in 2021, I was cooking for six people and finally put this into practice systematically. I created three zones: screaming hot for searing, medium for active cooking, and a warming zone at the edge for keeping finished items hot while I worked on other components. That meal, a simple steak with foil-wrapped vegetables, was the first time everything came out at the right temperature simultaneously. Marcus said it was the best camp meal I’d ever made, and while that might have been hunger talking after a 14-mile day, the technique has proven reliable ever since.
For equipment, you need something to elevate your cooking surface above the coals. I’ve used everything from flat rocks balanced on other rocks, which works but is unstable, to dedicated campfire grates, to the grill grate from an old Weber that I cut down to fit in my car. The latter has been my car camping solution for four years now. It’s heavy, about five pounds, but the stability and consistent height make it worthwhile. For backpacking, I don’t do open fire cooking unless I have a site with an established fire ring and grate. The weight and bulk of bringing my own setup isn’t worth it when I’m counting ounces.
Recipe One: The Perfect Campfire Steak
I’ve cooked steaks over campfires probably 50 times now, and I’ve gotten pretty consistent results. But it took me until about attempt number 20 to really dial it in. The key discoveries were about preparation at home, not technique at camp.
First, I always bring steaks that are at least one inch thick, preferably closer to one and a half inches. Thinner cuts overcook too easily with the variable heat of a campfire. I made the mistake of bringing thin-cut strip steaks on a trip to Crater Lake two summers ago, and despite my best efforts, they went from raw to overdone in about 90 seconds. No margin for error.
Second, I season my steaks at home and vacuum seal them if I can, or just press-seal them in freezer bags with as much air removed as possible. The salt has time to penetrate the meat during the drive to camp and any time spent in the cooler. On my most recent test, I seasoned the steaks three days before a trip to the Three Sisters Wilderness, and the difference in flavor penetration compared to seasoning at camp was significant. Everyone in our group of four noticed it.
Third, and this is crucial, I let the steaks come to cool room temperature before cooking. At camp, this means pulling them out of the cooler about 30 to 40 minutes before I plan to cook, depending on the ambient temperature. In hot weather, closer to 20 minutes. The goal is getting rid of the fridge chill so the steak cooks evenly. I’ve tested this with a probe thermometer multiple times. A steak straight from the cooler requires an extra three to four minutes of cooking time and often ends up with a gray band of overcooked meat around the edges while the center stays too cold.
For the actual cooking, I get my coals to the high heat level, where I can only hold my hand six inches above for three to four seconds. I oil the grate, not the steak, using a paper towel dipped in high-smoke-point oil and held with tongs. Then I lay the steak directly over the hot zone. For a one-inch steak aiming for medium-rare, I cook about three minutes per side, rotating 45 degrees halfway through each side to get those crosshatch grill marks if I’m feeling fancy. For a thicker cut, I sear both sides over the hot zone for about two minutes each, then move it to the medium zone and let it finish for another three to four minutes, flipping once.
The real game-changer was learning to rest the meat. I pull the steak off the heat when a thermometer reads 125°F for medium-rare, because it will continue cooking for another five degrees as it rests. I set it on a plate on the warming zone, loosely covered with foil, for at least five minutes. The first time I actually timed this rest period instead of guessing, the difference in juiciness was remarkable. All those juices stay in the meat instead of running out onto the plate the moment you cut it.
I’ve made this recipe successfully at elevations from sea level to 9,500 feet with no modifications needed. The technique transfers cleanly. My notes show a 92% success rate over my last 25 attempts, with the failures mostly attributable to starting with coals that weren’t quite ready or steaks that were too cold.
Recipe Two: Foil Packet Vegetables
I’ll be honest, I was skeptical of foil packet cooking for years. It seemed like cheating, like you weren’t really cooking over the fire so much as using the fire as an oven. But after burning far too many vegetables trying to cook them directly on a grate, I’ve come around. Foil packets are legitimately useful, and when done right, they produce vegetables with a slightly smoky flavor that you can’t get any other way.
The technique I’ve refined involves heavy-duty aluminum foil, and I cannot stress the heavy-duty part enough. I learned this the hard way at Smith Rock State Park in Oregon when regular foil tore on a sharp coal and dumped half my potatoes directly into the ashes. Use the heavy-duty stuff, and use a double layer. The extra insulation also helps with more even cooking.
My go-to vegetable mix is red potatoes cut into half-inch cubes, sliced bell peppers, quartered onions, and whole garlic cloves. I prep all of this at home and store it in a gallon freezer bag. At camp, I dump the vegetables onto a large piece of foil, add about two tablespoons of olive oil, season with salt, pepper, and whatever dried herbs I’ve brought, usually rosemary and thyme, and then fold the foil into a packet.
The folding matters more than you’d think. I fold the long sides together first, making about three half-inch folds until they’re snug against the vegetables. Then I fold up the ends the same way, creating a sealed packet with a little air space inside. That air space creates steam, which helps the vegetables cook through before they burn.
I place the packet directly on the coals, not over them, for about 20 to 25 minutes, flipping once halfway through. The timing varies based on how hot your coals are and how dense your vegetables are. Potatoes take longer than peppers, so I try to cut the potatoes smaller than everything else.
After dozens of tests, my best results come from using coals that are past their peak heat. You know how I mentioned earlier that you want three to four seconds of hand-held heat for searing steaks? For foil packets, I aim for the six to eight second range. Gentler heat means the vegetables steam and roast rather than burning on the bottom before the inside is done.
My friend Sarah, who’s vegetarian and lactose-intolerant, has made this her standard camping side dish. She adds nutritional yeast to hers, which sounds strange but actually gives it a slightly cheesy flavor that works well with the smoky undertones.
Recipe Three: Cast Iron Skillet Cornbread
This recipe almost didn’t make it into my regular rotation because the first four attempts were complete failures. Undercooked in the middle, burned on the bottom, or both simultaneously. But I was determined to figure it out because there’s nothing quite like warm cornbread at camp, and carrying a loaf from home meant dealing with stale bread by day two.
The breakthrough came when I started treating my cast iron skillet like a Dutch oven. Instead of cooking the cornbread directly over the coals, I prop my skillet up on a few flat rocks about three inches above the coal bed, then I create a small pile of coals on the lid. The heat from below and above cooks the cornbread evenly, like a little oven.
Wait, I need to back up. You need a lid for this. For years, I didn’t bring a lid for my cast iron because of the weight. But for this recipe, the lid is essential. I now have a Lodge 10-inch skillet with a matching lid that I bring on every car camping trip where I plan to do fire cooking. The total weight is about eight pounds, which is substantial, but the cooking capabilities it opens up are worth it.
For the batter, I mix the dry ingredients at home: one cup cornmeal, one cup all-purpose flour, quarter cup sugar, one tablespoon baking powder, and one teaspoon salt. I store this in a labeled freezer bag. At camp, I add one egg, one cup of milk (I bring shelf-stable boxes for this), and a quarter cup of melted butter. If I’m feeling fancy, I throw in a small can of creamed corn, which adds moisture and extra corn flavor.
I preheat my skillet over the coals while I mix the batter, add about two tablespoons of butter to the hot pan and swirl it around, pour in the batter, cover, and arrange my coal setup as described above. Cooking time is about 20 to 25 minutes, though I start checking at 15. The cornbread is done when a twig inserted into the center comes out clean. No need for a fancy thermometer here.
This recipe took me 11 attempts to perfect, with variations in coal temperature, skillet height, and cooking time. My notes show that the sweet spot is coals in the medium heat range, with a 3:1 ratio of coals below to coals on top. Too many coals on top browns the surface before the inside sets. Too few, and the top stays pale and underdone.
Marcus has requested this cornbread on every camping trip since I figured it out. His record for consumption is four slices in one sitting, which I take as a compliment.
Recipe Four: Campfire Pizza, My White Whale
I mentioned in my introduction materials that I’ve never successfully made camp pizza and it haunts me. That was true until this past September when I finally cracked it. Thirteen attempts over four years, and I finally have a method that works consistently.
The problems I faced were numerous. Dough that wouldn’t stretch properly in the cold. Crusts that burned on the bottom while the toppings stayed cold. Cheese that never quite melted. Each failure taught me something, but the accumulated lessons took a long time to add up to success.
Here’s what finally worked. First, I make the dough at home and let it cold-ferment in the cooler for at least 24 hours before I plan to cook it. The cold ferment develops flavor and, more importantly, makes the dough easier to work with in less-than-ideal conditions. I portion the dough into individual pizza-sized balls, about six ounces each, and store them in oiled zip-lock bags.
Second, I gave up on trying to make a traditional round pizza. The shape doesn’t matter, and fighting with the dough to make it circular just frustrates everyone and delays dinner. I now stretch my dough into whatever organic shape it wants to become, usually something like an amoeba, and call it rustic.
Third, and this was the real revelation, I pre-cook the dough before adding toppings. I stretch the dough, oil one side, and place it oil-side-down directly on my well-oiled grate over medium coals. I let it cook for about two minutes until the bottom has some char marks and has firmed up, then I flip it, immediately add my toppings to the now-cooked side, cover with a large metal bowl or my skillet lid to trap heat, and cook for another three to four minutes.
The covering is essential. Without it, the toppings never get hot enough. I learned this from a ranger at Crater Lake who had been making campfire pizzas for his family for years. He uses a large stainless steel mixing bowl inverted over the pizza, and I’ve adopted the same approach.
For toppings, I keep them minimal. A few tablespoons of pizza sauce spread thin, maybe a quarter cup of pre-shredded mozzarella, and one or two toppings maximum. Overloaded pizzas don’t work over a fire because there isn’t enough ambient heat to cook through a thick layer of toppings. My favorite combination is sausage that I’ve pre-cooked at home and sliced banana peppers from a jar.
The crust comes out slightly charred in spots, chewy in others, with a smoky flavor no oven can replicate. It’s not Neapolitan pizza, but it’s genuinely good camp pizza, and that felt like a small miracle after so many failures.
Safety: The Non-Negotiables
I need to pause on recipes for a moment and talk about safety, because campfire cooking carries real risks that I’ve experienced firsthand. Beyond my eyebrow incident, I’ve seen second-degree burns, grease fires, and near-misses that could have been much worse.
The first rule is about clothing. I cook in a long-sleeved cotton or wool shirt, never synthetic materials. Synthetic fibers melt when they catch fire and stick to skin, causing severe burns. I learned this not from personal experience, thankfully, but from my wilderness first responder training. Cotton and wool can still burn, but they don’t melt and fuse to skin. My cooking shirt is an old flannel that I’ve designated specifically for fire-cooking duty.
The second rule is about hair and loose items. I tie back my hair every time. I’ve seen a ponytail catch fire at a group campsite, and while the person was fine, it was terrifying. Same goes for scarves, loose sleeves, and those drawstrings on hoodies. Tuck them in, tie them back, or take them off.
The third rule is about grease management. Animal fats render as they cook and can drip onto coals, causing flare-ups. I keep a metal lid nearby that I can drop over the cooking surface to smother flames if needed. I also position my grate high enough that minor drips flame up and burn off rather than causing serious flares. About four inches above the coals seems to be the minimum safe distance for fatty foods.
The fourth rule is about a clear workspace. Before I start cooking, I clear the area around the fire of any leaves, dry grass, or low-hanging branches. I keep all my food and equipment on one side, my fire tools on the other, and maintain a clear exit path. This sounds overly cautious until you’re dealing with a flare-up and trying to remember where you put the lid while also avoiding tripping over a cooler.
Fifth, and this should be obvious but I’ve seen it violated repeatedly, I never leave an active cooking fire unattended. Not even for a minute to grab something from the tent. Fire behavior can change quickly, food can fall into coals and flame up, and curious animals can knock things into the fire. If I need to step away, I either wait until I’m at a safe stopping point or ask someone to watch the fire.
I keep a small fire extinguisher and a gallon jug of water within arm’s reach whenever I’m cooking over fire. I’ve only needed the water once, when a grease fire got slightly out of control during a trip to Big Bend, but having it right there meant the situation stayed under control.
Recipe Five: Whole Trout in Foil
Fish was my gateway into campfire cooking that went beyond hot dogs on sticks. I started with trout because it’s available at many camping locations, it’s simple to prepare, and it cooks quickly. Over the years, I’ve refined my technique to be nearly foolproof.
I prefer whole trout because the skin and bones protect the delicate flesh during cooking and keep it moist. Fillets can work, but they require more careful attention to avoid drying out. A whole trout, gutted and cleaned, is forgiving enough for variable campfire conditions.
My preparation is simple. I stuff the cavity with thin lemon slices, a few sprigs of fresh dill or thyme if I have them, and a pat of butter. I season the outside with salt and pepper, then wrap the whole thing in a double layer of heavy-duty foil, making sure the seams are tightly folded.
For cooking, I use the same technique as my vegetable packets: directly on medium-heat coals, flipping once. A ten to twelve inch trout takes about eight to ten minutes total, four to five per side. The fish is done when the flesh flakes easily with a fork, and this is the one time I actually open the packet to check rather than guessing based on time, because undercooked fish is a real stomach risk and overcooked fish is just sad.
The key insight I’ve developed is about coal position. I spread my coals in an even layer slightly larger than the foil packet, then place the packet on top. This ensures even heat across the whole fish rather than hot spots that can burn one section while leaving another raw. I learned this after cooking a trout at Bumping Lake in Washington where one end was perfect and the other end was basically sashimi.
I’ve made this recipe successfully at least 30 times with fresh-caught, fresh-bought, and previously frozen trout. All work fine, though fresh-caught has the best texture. The longest I’ve kept raw trout in a well-iced cooler before cooking was three days, and it was still good, though I’d recommend using it within two days if possible.
Recipe Six: Dutch Oven Chili
If I’m car camping for more than two nights, I bring my Dutch oven. It’s heavy, nearly 12 pounds, and takes up significant cooler and cargo space. But the cooking options it provides are worth every ounce and every inch.
My campfire chili recipe has evolved over probably 40 iterations. The current version can feed four to six people, makes excellent leftovers for day two breakfast with eggs, and produces the kind of deep, complex flavors that make people think you’ve been cooking all day when really it’s about two hours of mostly passive time.
At home, I brown two pounds of ground beef and drain the fat, then combine it in a gallon bag with one diced onion, four minced garlic cloves, one diced bell pepper, and my spice mixture: three tablespoons chili powder, one tablespoon cumin, one teaspoon smoked paprika, half teaspoon cayenne, and salt and pepper to taste. I freeze this flat in the bag, and it serves as an ice pack for the cooler on the drive in.
At camp, I set up my Dutch oven over a bed of medium-heat coals, add the thawed meat mixture, and stir until everything is heated through and the onions have softened, about ten minutes. Then I add two cans of diced tomatoes, two cans of kidney beans drained and rinsed, one small can of tomato paste, and about a cup of water or beef broth. I stir everything together, put the lid on, and pile coals on top of the lid using the same technique as my cornbread.
Total cooking time is about an hour and a half, though I check and stir every 30 minutes. The low, steady heat of the coals produces that slow-cooked flavor development that you normally need a crock pot for. I rotate the Dutch oven a quarter turn every time I check it to prevent hot spots from burning one side.
The chili is done when the liquid has thickened to your preferred consistency and the flavors have melded together. Taste and adjust seasoning before serving. I usually need to add a bit more salt and maybe another shake of cayenne.
I’ve made this in temperatures ranging from 25°F to 80°F. In cold weather, I use more coals and check more frequently since heat dissipates faster. In very hot weather, I use fewer coals and extend the cooking time slightly. My notes suggest that ambient temperature affects cooking time by about 10% in either direction.
One tip that took me years to learn: let your Dutch oven cool completely before attempting to clean it. I’ve warped two lids over my camping career by pouring cold water into a hot Dutch oven. The thermal shock can crack or warp cast iron. Clean up can wait until morning.
Recipe Seven: Breakfast Potatoes with Sausage
My standard campfire breakfast combines cubed potatoes and sliced sausage in one skillet, cooked directly over the coals. It’s hearty, feeds a group efficiently, and uses the same basic technique regardless of group size. I just scale up the ingredients.
I’ve tested this recipe with breakfast sausage links, Italian sausage, kielbasa, and andouille. All work well, though kielbasa is my favorite because the smoky flavor complements the additional smokiness from the fire. For a trip with Sarah, I’ve made it with plant-based sausage, and it worked fine, though I added an extra tablespoon of oil since the plant-based version doesn’t render fat the way meat sausage does.
Prep at home includes cutting the potatoes into half-inch cubes and storing them in water to prevent browning. I drain them into a colander before leaving and pack them slightly damp in a bag. The residual moisture helps them steam at the start of cooking. The sausage gets sliced into coins, about quarter-inch thick, and stored separately.
At camp, I heat my cast iron over medium-high coals, add about two tablespoons of oil, and let it get shimmering hot. I add the potatoes first, spreading them in as much of a single layer as the skillet allows, and leave them alone for three to four minutes. This is the hardest part because the temptation is to stir constantly. Don’t. Let them develop a crust on one side before you flip them. I learned this from my time as a line cook and it applies perfectly to campfire cooking.
After the initial sear, I stir the potatoes and make a well in the center of the skillet. I add the sausage to the well and let it start browning while the potatoes continue cooking around the edges. After another four to five minutes, I mix everything together and cook for an additional five minutes, stirring occasionally, until the potatoes are crispy on the outside and tender inside and the sausage is cooked through.
Total active cooking time is about 15 minutes, which satisfies Jake’s requirement that breakfast not take too long because he’s always chasing the morning light for photos. I season with salt, pepper, and a dash of hot sauce directly in the skillet, then serve family-style, letting everyone scoop portions directly onto their plates.
This recipe has a 95% success rate in my notes, with the failures attributable to starting with coals that were too hot, which burned the potatoes before they cooked through. If you’re getting too much char too quickly, move the skillet to a cooler section of your coal bed.
The Art of Coal Management Throughout Cooking
One topic I haven’t addressed directly is maintaining your fire during extended cooking sessions. A single batch of coals gives you maybe 45 minutes to an hour of good cooking heat. For longer meals, you need to keep feeding the fire and generating new coals.
My approach is to have a two-section fire pit. One section is my active cooking area with coals. The other section is where I keep a small fire burning to generate new coals as needed. Every 20 to 30 minutes, I rake some of the newly formed coals over to the cooking side to maintain heat levels.
This requires starting with more wood than you think you’ll need. My rule of thumb is three times what you estimate. I’ve run out of easily accessible wood mid-cook too many times to underestimate this. Now I gather significantly more than I think I need before I even light the first match.
For group trips, I designate a fire tender whose job is to keep the coal-generating fire going while I focus on cooking. Marcus has taken on this role by default since he’s more interested in gear and fire maintenance than in cooking anyway. It works out well. He keeps the coals coming, I keep the food coming, and we work in parallel without getting in each other’s way.
In wet conditions, coal management becomes more challenging because wet wood produces more smoke and worse coals. I’ve learned to gather wood early in a trip, before any rain hits, and store it under a tarp or in my vestibule. Wet wood can work, but it takes significantly longer to produce usable coals and produces more frustration than heat.
Testing Methodology and What I Learned
I want to be transparent about how I developed these recipes and techniques. Over the past four years, I’ve kept detailed notes on every campfire meal I’ve attempted. My camping food journal has entries for 72 distinct campfire cooking sessions, with notes on weather conditions, elevation, wood type, coal temperatures, cooking times, and outcomes.
The recipes in this article represent the distillation of those 72 sessions plus several years of earlier, less systematic experimentation. The steak method has been tested 23 times with 21 successes. The foil packet vegetables have been tested 31 times with 28 successes. The cornbread took 11 attempts to reach a consistent success rate. The pizza took 13. The trout has been tested 30 times with only 2 failures, both due to checking doneness too late.
I’ve cooked at elevations from sea level at Olympic National Park to 10,400 feet in the San Juans. The primary impact of altitude is on water-based cooking, not direct fire cooking, so most of these recipes transfer without modification. The exception is the cornbread, where I add an extra tablespoon of liquid at high altitude to compensate for faster moisture evaporation.
Weather conditions have included calm warm evenings, 30-mile-per-hour winds in Wyoming, rain showers in the Cascades, and temperatures requiring gloves between stirring. Wind is the biggest challenge because it affects coal temperature unpredictably. My solution is to build a wind break from rocks or logs on the windward side of my fire. This keeps conditions more consistent and makes cooking time estimates more reliable.
I’ve tested all recipes with at least two different people rating the results, usually Marcus and whoever else is on the trip. This helps correct for my own bias toward recipes I’ve invested effort in. If Marcus says something didn’t work, I trust that feedback even when my initial reaction is defensive.
The Satisfaction of Fire Cooking
After everything I’ve shared, I want to circle back to why I think campfire cooking is worth the extra effort, planning, and occasional failure.
There’s a primal satisfaction in cooking over fire that camp stoves don’t provide. When I’m standing over coals, managing heat zones, listening to the sizzle of fat rendering and smelling smoke mixing with roasting meat, I feel connected to something ancient and fundamental. This isn’t just meal preparation. It’s participating in a tradition that stretches back to the earliest humans.
That might sound grandiose for what is ultimately just making dinner outside. But I’ve thought about this during quiet evenings at camp when the food is cooking and the sun is setting and there’s nothing to do but watch the fire and wait. Every generation before us, going back hundreds of thousands of years, knew this experience. They watched the coals, they managed the heat, they fed themselves and their families with fire. When I do the same thing, I’m doing something deeply human.
The practical benefits are real too. Campfire cooking produces flavors that no stove can match. The smoke penetration, the slight char, the way heat radiates around food instead of just hitting it from below. These create depth and complexity that I genuinely prefer to even excellent home kitchen results. My best campfire steak is better than my best home steak. My campfire pizza has a character that makes up for its lack of polish.
And there’s the social element. Cooking over a campfire creates a gathering point. People drift toward the fire, they watch, they offer to help, they share stories while I work. Some of my best trip memories happened around the cooking fire, not on the trail or at the viewpoint. The meal preparation becomes part of the experience rather than just a utilitarian necessity.
My October trip where I lost my eyebrows ended up being a great trip despite the disaster breakfast. We found another way to eat, we laughed about my misfortune, and the story has become one of our most-repeated campfire tales. Learning to cook well over fire has given me an entirely new dimension of camping to explore and share.
If you’re just starting out, be patient with yourself. Build your fire early. Start with simple recipes. Accept that you’ll burn some things. I’ve been doing this for over a decade and I still burn garlic with embarrassing regularity, usually because Luna decides to chase something at exactly the wrong moment and I get distracted. The failures are part of the process, and honestly, they make the successes taste even better.
Your first campfire pizza might not work. Mine certainly didn’t. But your thirteenth might be something special, and by then you’ll have learned exactly what works in your conditions with your equipment and your fire-building style. That personalized knowledge is impossible to get from any article, including this one. You have to earn it through experience.
Next month I’m planning a trip to Big Sur with the specific goal of testing a campfire bread recipe I’ve been developing. I’m also going to attempt French toast over coals for the first time since that Utah disaster eight years ago. I’m probably going to mess something up. I’m certainly going to learn something. And I’ll enjoy every minute of it, burnt bits and all.
Frequently Asked Questions
How long should I let my fire burn before I start cooking?
This is the question I get asked most often, and the answer is longer than most people expect. You need a minimum of 45 minutes from when you light your fire to when you have usable cooking coals, though I recommend a full hour if you have the time. I’ve timed this across dozens of trips with different wood types. Hardwoods like oak take closer to an hour but produce coals that last longer. Softwoods burn down faster but the coals deteriorate quickly. The visual cue you’re waiting for is a bed of coals covered with thin white ash and glowing orange underneath. If you still see active flames licking up from your wood, you’re not ready yet. I made the mistake of rushing this step for years, and my food suffered for it.
What equipment do I absolutely need for campfire cooking?
At minimum, you need a way to elevate your cooking surface above the coals and something to cook in. My car camping setup includes a 10-inch cast iron skillet with a lid, a Dutch oven for longer cooks, a sturdy grate from an old Weber grill I cut down, heavy-duty aluminum foil, long metal tongs, and a leather glove for handling hot cookware. That said, I’ve cooked decent meals with nothing but foil packets placed directly on coals. Start simple and add equipment as you figure out what you actually use. The one thing I won’t compromise on is the leather glove. I’ve grabbed too many hot handles without one, and the burns aren’t worth it.
How do I keep food from burning on the bottom before the inside cooks through?
This was my biggest struggle for the first few years. The solution is heat zones and patience. Instead of piling all your coals in one spot, rake them so you have a hot zone with deeper coals and a cooler zone with a thinner layer. Sear your food over the hot zone, then move it to the cooler zone to finish cooking through. For things like cornbread or pizza that need even heat, elevate your cookware three to four inches above the coals rather than setting it directly on them. I prop my skillet on flat rocks and add coals on top of the lid to create oven-like conditions. The other factor is coal temperature. If you can only hold your hand six inches above the coals for two seconds, that’s too hot for most cooking. Wait for them to mellow to the four to six second range.
Can I do campfire cooking in the rain or wind?
Rain and wind are challenging but not impossible. Wind is actually the harder of the two because it makes coal temperature unpredictable and can blow flames where you don’t want them. I build a windbreak from rocks or logs on the windward side of my fire, which helps enormously. In rain, the bigger issue is keeping your wood dry so you can maintain your coal supply. I gather extra wood early in a trip and store it under a tarp. Light rain during cooking isn’t a problem since the fire generates enough heat to evaporate droplets before they hit your food. Heavy rain makes everything miserable and I usually switch to my backup camp stove. The one trip I tried cooking through a downpour at Glacier, I spent more time managing the fire than actually cooking, and the food was mediocre anyway.
What’s the most common mistake you see beginners make?
Cooking over flames instead of coals. Almost everyone does this at first, including me. Flames look impressive and feel like real fire cooking, but they produce inconsistent heat that flares unpredictably and coats your food with soot. Coals are where the actual cooking power lives. They produce steady, controllable heat that you can manage by spreading them thinner or piling them deeper. The second most common mistake is starting to cook before the fire is ready. People get hungry, they see heat, they throw food on. Then they wonder why the outside is charred and the inside is raw. Build your fire at least 45 minutes before mealtime. I’ve learned to start my fire as soon as I finish setting up camp, then handle other tasks while it burns down.
Is campfire cooking safe, and what precautions should I take?
Campfire cooking carries real risks, and I’ve seen burns, grease fires, and close calls over the years. The precautions I take every time include wearing natural fiber clothing like cotton or wool since synthetic materials melt and stick to skin, tying back hair and loose clothing, keeping a metal lid nearby to smother flare-ups, and having water and ideally a small fire extinguisher within arm’s reach. I clear the area around my fire of dry leaves and debris before I start, and I never leave an active cooking fire unattended. Grease management matters too. Position your grate at least four inches above coals when cooking fatty foods so drips flame up and burn off rather than causing serious flares. These precautions might sound excessive, but I’ve needed every single one of them at some point.