Transportable Picnic Side Dishes: Grain Salads, Slaws, and Hearty Sides That Actually Survive the Journey
The moment I knew I needed to completely rethink my approach to picnic side dishes happened at Sauvie Island Beach three summers ago. I’d spent the better part of a Saturday morning preparing what I thought was a beautiful quinoa salad with fresh tomatoes, cucumber, and a gorgeous lemon herb dressing. The colors were stunning. The taste was perfect straight from my kitchen. I photographed it for my blog, packed it into what I thought was a secure container, and headed out with Marcus and the kids for what was supposed to be a relaxing beach day.
Forty-five minutes later, I opened my cooler to find quinoa soup. The tomatoes had released their juices, the cucumber had gone limp and watery, and my beautiful dressing had separated into an oily mess floating on top of vegetable water. Liam, who was seven at the time and already suspicious of anything green, took one look and declared he’d rather eat sand. Emma tried to be supportive but couldn’t hide her disappointment. Marcus, bless him, attempted a few bites before quietly suggesting we hit the food truck instead.
That disaster sent me on a two-year mission to figure out what actually works for transportable side dishes. I’ve since tested over forty different recipes in conditions ranging from a pleasant 68 degrees at Laurelhurst Park to a brutal 92 degree afternoon at a friend’s backyard birthday party. I’ve ruined countless batches, stained multiple containers, and driven my family slightly crazy with my insistence on tasting things at two-hour intervals. But I’ve also discovered what genuinely holds up, what tastes even better after sitting, and what you should never, ever attempt to transport no matter how good it looks in the recipe photo.
Here’s everything I’ve learned about grain salads, slaws, and hearty sides that actually make it from your kitchen to your picnic blanket in edible condition.
Table Of Contents
- The Great Grain Debate: Why Your Choice of Grain Matters More Than Your Dressing
- The Slaw Situation: Why Your Coleslaw Is Probably Too Wet
- The Asian-Style Slaw That Changed My Picnic Game
- Potato Salad: The Controversial Side Dish I've Finally Figured Out
- A German-Style Potato Salad for the Mayo-Averse
- Hearty Bean Salads That Actually Taste Good
- The Roasted Vegetable Situation
- Container Wars: What I've Learned About Packing
- The Temperature Tracking Obsession
- The Make-Ahead Timeline That Actually Works
- The Recipes I've Abandoned
- Final Thoughts on What I've Learned
- Frequently Asked Questions
The Great Grain Debate: Why Your Choice of Grain Matters More Than Your Dressing
Let me save you some money and frustration by telling you what I learned the hard way: not all grains are created equal when it comes to picnic transport. I spent an entire month testing different grains side by side, packing identical portions in identical containers with identical dressings, and checking them at one, three, and five hour marks. The results genuinely surprised me.
White rice is a disaster waiting to happen. It gets gummy, clumps together, and absorbs dressing until the whole thing turns into a sticky, flavorless mass. I made a rice salad for a picnic at Forest Park and after the 25 minute hike to our spot, it had transformed into something resembling day-old sushi rice that had been left in the sun. Brown rice fares slightly better but still tends toward mushiness after about three hours.
Quinoa can work, but only if you treat it correctly. The key discovery I made after my Sauvie Island disaster was that quinoa needs to be spread on a sheet pan and cooled completely before you add anything wet to it. I mean bone dry and room temperature, which takes about 20 minutes with a fan pointed at it or 40 minutes on your counter. When I started doing this, my quinoa salads stopped turning into soup. The other trick is to slightly undercook it. I pull mine off the heat when it still has the tiniest bit of bite, knowing it’ll continue absorbing liquid from the dressing as it sits.
But here’s the thing: farro and barley are the real winners for picnic transport, and I genuinely don’t understand why more people don’t use them. I’ve taken farro salad to eleven different picnics at this point, and it has never once disappointed me. After five hours in my Coleman soft-sided cooler at 42 degrees, farro maintains its chewy texture perfectly. It doesn’t get mushy. It doesn’t clump. It actually seems to improve as the flavors meld together.
My standard farro salad has become the dish I bring when I need to impress people. I toast one and a half cups of dry farro in a dry pan for about three minutes until it smells nutty, then cook it in salted water like pasta until it’s tender but still chewy, usually around 25 to 30 minutes. After draining and cooling it completely on a sheet pan, I toss it with a half cup of good olive oil, the juice of two lemons, a quarter cup of red wine vinegar, two minced garlic cloves, and a teaspoon of salt. To this base I add a cup of halved cherry tomatoes, a diced Persian cucumber, half a red onion that’s been soaked in cold water for ten minutes to mellow its bite, a cup of crumbled feta packed separately, and a big handful of fresh mint and parsley.
The preparation for this recipe takes me about 35 minutes, not the 20 minutes I’ve seen claimed in similar recipes. But the payoff is worth it. I made this for Emma’s end of school picnic last June when temperatures hit 84 degrees by noon, and it was still perfect at 2pm when we finally got around to eating. Three other parents asked for the recipe, which almost never happens because most people are too polite to ask.
One critical note about farro: you need to buy the semi-pearled or pearled variety unless you want to be cooking for over an hour. The packaging doesn’t always make this clear. I accidentally bought whole farro once and wondered why it was still crunchy after 45 minutes of simmering. Look for cooking times on the package. If it says 25 to 30 minutes, you’ve got the right stuff.
Barley works almost identically to farro and is usually cheaper. I use pearl barley and cook it the same way. The texture is slightly softer and the grains are smaller, which some people prefer. Liam actually likes barley better than farro because he says the bigger farro grains are too chewy. I’ve learned to make both versions for family picnics to keep the peace.
The Slaw Situation: Why Your Coleslaw Is Probably Too Wet
Here’s a confession: I hated making slaw for picnics for years because it always turned into a watery mess by the time we ate it. I blamed the mayonnaise, the cabbage, even my containers. It took me embarrassingly long to figure out that the problem was my technique, not my ingredients.
The issue is moisture. Cabbage contains a tremendous amount of water, and when you dress it and let it sit, that water releases and dilutes your dressing while simultaneously making everything soggy. For years I thought this was just an unavoidable reality of slaw. Then I discovered salting.
Now, before you tell me that salting cabbage is obvious and everyone knows this, let me clarify: I’m not talking about the quick toss with salt that most recipes mention in passing. I’m talking about serious salting and draining that takes about an hour and makes a genuinely dramatic difference.
Here’s my process. I shred my cabbage, usually half a head of green and a quarter head of purple for color, and toss it with about a tablespoon of kosher salt in a colander set over a bowl. Then I put a plate on top and weight it down with a couple of cans. I let this sit for at least 45 minutes, preferably an hour. The amount of liquid that drains out is honestly shocking the first time you do this. We’re talking about a quarter cup or more of cabbage water.
After draining, I rinse the cabbage briefly under cold water to remove excess salt, then spin it dry in my salad spinner. If you don’t have a salad spinner, you can roll it in clean kitchen towels and squeeze. The cabbage should feel noticeably drier and slightly wilted, which sounds bad but is actually what you want.
When I make slaw with properly salted and drained cabbage, it stays crunchy and the dressing stays creamy for hours. I’ve taken slaw made this way to picnics at Mount Tabor Park where we didn’t eat until four hours after I made it, and the texture was still excellent.
My go-to picnic slaw uses that salted cabbage as a base. I add two grated carrots, half a thinly sliced red onion that’s been soaked in cold water, and a quarter cup of chopped fresh cilantro. For the dressing, I whisk together half a cup of mayonnaise with two tablespoons of apple cider vinegar, one tablespoon of honey, a teaspoon of Dijon mustard, and half a teaspoon of celery seed. The dressing goes on right before packing, and I always bring a little extra in a separate container in case it needs refreshing at the picnic site.
One variation I’ve tested extensively is a vinegar-based slaw for hot weather picnics. When temperatures are above 85 degrees, I get nervous about mayonnaise even in a well-packed cooler, so I switch to a dressing made from a quarter cup of olive oil, three tablespoons of rice vinegar, one tablespoon of honey, and a big pinch of red pepper flakes. This version is actually better after sitting because the acid slightly pickles the cabbage. I made this for a beach picnic last August when it hit 89 degrees, and it was the only dish that tasted as good at 3pm as it had at 10am when I packed it.
The Asian-Style Slaw That Changed My Picnic Game
I need to tell you about this slaw because it’s become the most requested dish I bring to group picnics. I adapted it from a recipe I found on Serious Eats years ago, but I’ve modified it so much based on my testing that it barely resembles the original.
The base is half a head of napa cabbage and half a head of red cabbage, both shredded thin. Napa cabbage is gentler than regular green cabbage and has a slightly sweeter flavor that works beautifully here. I salt and drain both cabbages together using my standard method.
The additions are what make this slaw special: two cups of shredded rotisserie chicken, half a cup of shelled edamame, two thinly sliced green onions, a quarter cup of chopped roasted peanuts, and a big handful of fresh cilantro and mint. The herbs go in right before serving because they wilt if dressed too early.
The dressing is where I spent most of my testing time. My final version uses three tablespoons of rice vinegar, two tablespoons of soy sauce, one tablespoon of sesame oil, one tablespoon of honey, one tablespoon of peanut butter, one minced garlic clove, and about half a teaspoon of grated fresh ginger. I blend this in my food processor until smooth. The peanut butter seems unusual but it helps the dressing cling to the cabbage and adds richness without dairy.
I dress the cabbage, carrots, chicken, and edamame the morning of the picnic and keep the herbs, peanuts, and green onions in separate small containers. When we arrive at our spot, I add the fresh elements and toss everything together. This two-stage approach keeps the herbs perky and the peanuts crunchy.
I’ve made this for at least fifteen picnics now, and it’s become my signature dish. At Emma’s birthday picnic at Laurelhurst Park last spring, we had twelve kids and eight adults, and this slaw disappeared within twenty minutes while the store-bought pasta salad sat untouched. That felt like a genuine victory.
Potato Salad: The Controversial Side Dish I’ve Finally Figured Out
I have strong opinions about potato salad, and I’m prepared to defend them. For years, I avoided making potato salad for picnics because I was terrified of mayonnaise sitting in warm temperatures. Every food safety course I’ve taken has drilled into my head that the danger zone between 40 and 140 degrees Fahrenheit is where bacteria thrive, and potato salad seemed like an invitation for trouble.
But here’s what I’ve learned through actual testing: properly made and properly cooled potato salad that starts at 38 degrees and stays below 40 degrees is perfectly safe for hours. The key words there are properly made and properly cooled.
My method starts with choosing the right potatoes. I use Yukon Golds exclusively because they hold their shape better than russets and have a creamier texture than red potatoes. I cut them into roughly three-quarter inch cubes before cooking, which ensures even cooking and means I don’t have to handle hot potatoes later.
The cooking liquid matters too. I cook my potatoes in heavily salted water with a splash of white vinegar. The salt seasons the potatoes all the way through, and the vinegar helps them hold their shape. After about 12 minutes, when a fork slides through easily but the potatoes don’t fall apart, I drain them and spread them on a sheet pan to cool. This is crucial. Never dress hot potatoes with mayonnaise. The heat melts the mayo, makes it greasy, and creates that unpleasant oily coating that bad potato salad is famous for.
Once the potatoes are completely cool, usually about 30 minutes, I toss them with my dressing. My standard recipe for two pounds of potatoes uses three-quarters cup of mayonnaise, two tablespoons of whole grain mustard, two tablespoons of apple cider vinegar, half a teaspoon of celery seed, and generous salt and pepper. I fold in four chopped hard-boiled eggs, three sliced celery ribs, and a quarter cup of minced red onion.
Here’s the part that took me years to figure out: potato salad tastes best when made the night before. The flavors need time to meld, and the potatoes absorb the dressing and become more flavorful. I make mine at least 12 hours ahead, taste it the next morning, and almost always add more salt. Cold dulls flavors, so what tastes perfectly seasoned at room temperature will taste bland after refrigeration.
For transport, I keep my potato salad in a container surrounded by ice packs on all sides, not just below. I also bought an inexpensive digital thermometer that I leave in the cooler so I can check the temperature when we arrive. If my potato salad registers above 40 degrees at any point, I wouldn’t serve it. In over 20 picnics with potato salad, this has never happened because I pack my cooler correctly.
The correct cooler packing for mayo-based salads, in case you’re wondering, is ice packs on the bottom of the cooler, then a layer of other cold items like drinks, then your mayo-based dishes on top of those with more ice packs surrounding them. The goal is to create a cold environment from all directions, not just below. I also never open my cooler more than necessary, which means training my kids to grab their drinks quickly and close the lid immediately.
A German-Style Potato Salad for the Mayo-Averse
Marcus doesn’t love traditional potato salad. He finds it too heavy and doesn’t enjoy the texture of cold mayonnaise. So I developed a German-style version that uses a warm bacon vinaigrette instead of mayo, and honestly, it’s become my preference for summer picnics too.
I cook two pounds of Yukon Gold potatoes the same way, but while they’re cooking, I fry six slices of thick-cut bacon until crispy. I remove the bacon and crumble it, then add a quarter cup of apple cider vinegar to the hot bacon fat along with a tablespoon of whole grain mustard, a teaspoon of sugar, and a big pinch of salt. This dressing gets poured over the still-warm potatoes, which absorb it beautifully.
After the potatoes cool to room temperature, I add half a cup of thinly sliced celery, a quarter cup of minced red onion, and two tablespoons of chopped fresh dill. The crumbled bacon goes in last. This salad is actually better at room temperature than cold, which makes it ideal for picnics where you might not have great cooler space.
I’ve tested this recipe at temperatures up to 88 degrees, and it held up perfectly for five hours. Because there’s no mayonnaise, the food safety concerns are minimal. The vinegar actually helps preserve it, and the flavors seem to improve as everything sits together.
Hearty Bean Salads That Actually Taste Good
Bean salads have a reputation problem. Most people think of that sad three-bean salad from grocery store deli counters, the one swimming in overly sweet vinaigrette with mushy kidney beans and waxy green beans. I thought I hated bean salad until I started making my own with properly cooked dried beans and actually good dressings.
The difference between canned beans and beans you cook yourself is significant enough that I now make the effort for picnics when I want to impress people. Dried beans cooked from scratch have better texture, more flavor, and hold up longer without getting mushy. I know this adds time. I know not everyone wants to soak beans overnight. But the results are worth it for special occasions.
My white bean salad has become a regular in my picnic rotation. I soak one pound of dried cannellini beans overnight, then simmer them with a bay leaf, a few garlic cloves, and a big pinch of salt until they’re tender but not falling apart, usually about 45 minutes to an hour depending on the beans’ age. After draining and cooling, I dress them while still slightly warm with a quarter cup of olive oil, three tablespoons of red wine vinegar, two minced garlic cloves, a teaspoon of dried oregano, salt, and plenty of black pepper.
Once the beans are at room temperature, I add a cup of halved cherry tomatoes, half a diced English cucumber, a quarter cup of thinly sliced red onion, and a quarter cup of chopped fresh parsley. If I’m feeling fancy, I’ll add some chopped oil-packed sun-dried tomatoes or marinated artichoke hearts.
This salad is incredibly sturdy. I’ve kept it in my cooler for up to six hours with no degradation in quality. The beans don’t get mushy, the tomatoes hold their shape, and the dressing doesn’t separate. It’s also one of the few picnic salads that Liam will actually eat, mostly because he likes picking out the beans and ignoring the vegetables, but I’ll take what I can get.
For quicker preparations, canned chickpeas work better than other canned beans because they’re firmer and less prone to mushiness. My chickpea salad uses two cans of chickpeas, rinsed and drained, with the same basic vinaigrette but I add a can of drained tuna packed in olive oil, some capers, and chopped fresh dill. This version is heartier and can almost serve as a main dish.
The Roasted Vegetable Situation
Roasted vegetables are tricky for picnics. They’re delicious right out of the oven, but they can get soggy or develop off flavors after sitting in a sealed container for hours. After considerable experimentation, I’ve developed a few strategies that work.
First, some vegetables roast and transport better than others. Hearty vegetables like sweet potatoes, beets, carrots, and Brussels sprouts hold up well. Softer vegetables like zucchini, summer squash, and bell peppers get mushy. I once made a beautiful roasted summer vegetable medley that turned into a watery mess within two hours of packing. Never again.
Second, roasted vegetables need to cool completely and uncovered before packing. If you seal warm roasted vegetables in a container, steam condenses and makes everything wet. I spread my roasted vegetables on a sheet pan and let them cool at room temperature for at least 30 minutes, occasionally blotting with paper towels if they seem oily.
My favorite roasted vegetable dish for picnics is a warm or room-temperature sweet potato salad. I cube about two pounds of sweet potatoes, toss them with olive oil, salt, and a teaspoon of cumin, and roast them at 425 degrees for about 30 minutes until tender and slightly caramelized. After cooling, I toss them with a can of rinsed black beans, half a cup of crumbled cotija cheese, a diced avocado added right before serving, some chopped cilantro, and a dressing made from lime juice, olive oil, honey, and a minced chipotle pepper.
This dish can be served at room temperature, which makes it flexible for picnics where cooler space is limited. I’ve successfully transported it for up to four hours in a cooler and another hour sitting out on the picnic blanket. The sweet potatoes actually improve as they absorb the lime dressing.
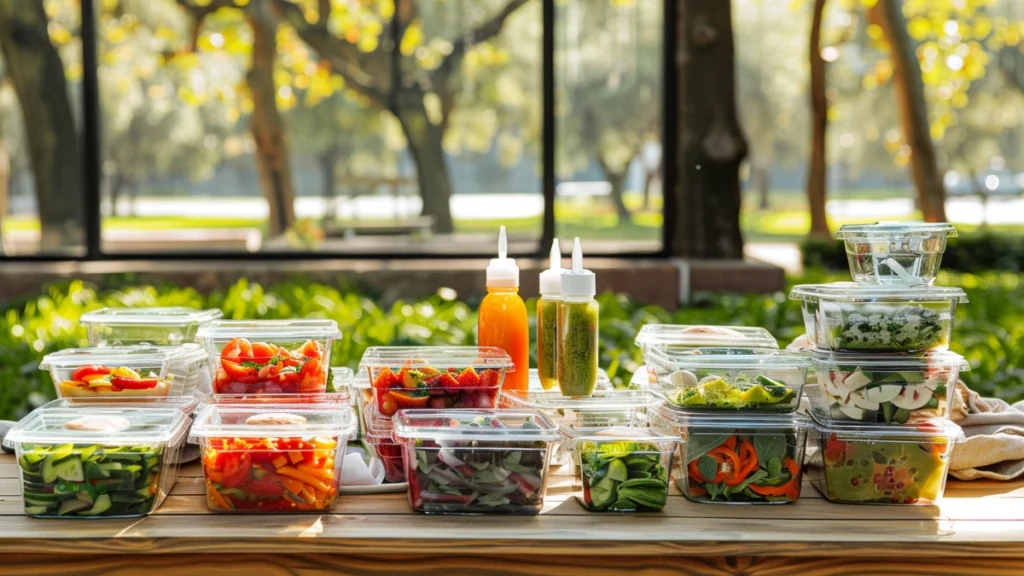
Container Wars: What I’ve Learned About Packing
Let me tell you about my container collection. I currently own somewhere around fifteen different food storage containers, ranging from cheap plastic ones from the dollar store to expensive snap-lid systems that cost more than seems reasonable. I’ve tested all of them for picnic transport, and I have strong opinions.
First, the shape of your container matters for different foods. Wide, shallow containers work best for salads because you can spread the ingredients in a single layer and avoid crushing the bottom layers with weight. Tall, narrow containers are terrible for salads but fine for transporting dressings or dips.
Second, the seal is everything. I’ve ruined more picnic outfits than I care to admit by trusting containers that seemed sealed but weren’t. My favorite containers are the Sistema brand with the clips on all four sides. They’re not glamorous, but they genuinely don’t leak. I’ve tested them by filling them with water, sealing them, and shaking them over my sink. The Sistema containers passed. My old Rubbermaid containers failed spectacularly.
Third, glass containers look beautiful and are great for the environment, but they’re heavy and can break. I used to bring mason jars for everything because they photograph well for my blog. After breaking two in my cooler and spending twenty minutes picking glass shards out of my ice packs, I switched to plastic for transport and only use glass for serving once we arrive.
Fourth, and this took me embarrassingly long to figure out, always pack dressings separately when possible. Even with properly prepared ingredients, salads can get overdressed and soggy if they sit in dressing for hours. I keep small squeeze bottles specifically for picnic dressings. A four-ounce squeeze bottle holds enough dressing for a large salad and takes up almost no cooler space.
The Temperature Tracking Obsession
I mentioned this briefly before, but I want to emphasize how important temperature monitoring has become to my picnic process. After taking a food safety certification course three years ago, I became somewhat paranoid about the danger zone between 40 and 140 degrees Fahrenheit. This is the temperature range where bacteria grow most rapidly, and foods shouldn’t spend more than two hours total in this range.
I now have a small digital thermometer that lives in my cooler during picnic season. Before we leave, I note the temperature of my cooler interior. When we arrive at our destination, I check it again. If we’re going to be out for more than a few hours, I check periodically. This might sound excessive, but it gives me peace of mind and has actually changed some of my behaviors.
For example, I learned that my soft-sided cooler maintains temperature better when it’s packed full. A half-empty cooler with lots of air space warms up much faster than one that’s tightly packed. I now fill any empty space with frozen water bottles or extra ice packs.
I also learned that pre-chilling my cooler makes a significant difference. The night before a picnic, I put a few ice packs in my empty cooler and close it. This brings down the interior temperature before I add food. A pre-chilled cooler can keep foods up to two hours longer than a room-temperature one.
The Make-Ahead Timeline That Actually Works
One of the biggest questions I get from readers is how far ahead they can make picnic sides. The answer depends entirely on the dish, and I’ve learned the specific timelines through extensive testing.
Most grain salads can be made 24 to 48 hours ahead and actually taste better after sitting overnight. The grains absorb the dressing and the flavors meld together. I typically make my farro salad the evening before a picnic, store it in the refrigerator overnight, and taste it in the morning to adjust seasonings. Almost always, I need to add more salt and sometimes more lemon juice.
Slaws can be made 12 to 24 hours ahead if you’re using the salting method I described. The cabbage stays crisp because you’ve already removed excess moisture. Without the salting step, I wouldn’t make slaw more than a few hours ahead.
Potato salad genuinely improves after 12 to 24 hours and can be made up to 48 hours ahead without quality loss. This has been consistent across every test I’ve run. Day-old potato salad tastes better than same-day potato salad, full stop.
Bean salads are similar. They can be made two to three days ahead and often taste better on day two. The beans absorb the dressing and become more flavorful without getting mushy, at least if you’ve cooked them properly.
The items you shouldn’t make ahead are anything with fresh herbs, avocado, or delicate greens. These need to be added within an hour or two of eating. I prep them at home, pack them separately, and add them at the picnic site.
The Recipes I’ve Abandoned
In the interest of honesty, let me tell you about some recipes I’ve tried and abandoned for picnics. These might work in other contexts, but they failed my transport tests repeatedly.
Panzanella, the Italian bread salad, sounds perfect for picnics but doesn’t transport well. The bread absorbs the tomato juices and dressing and turns into mush within about an hour. I tried making it with extra-toasted bread, with the bread packed separately, even with croutons instead of bread cubes. Nothing worked. It needs to be made and eaten immediately.
Anything with mixed greens as a main component gets sad and wilted in a cooler. I’ve tried every combination of greens and can never get them to stay perky for more than two hours. Sturdy greens like kale and arugula work better than delicate lettuce, but even they wilt eventually. I’ve stopped trying to make green salads for transport and instead bring hearty grain or bean salads that happen to include some greens.
Pasta salad with regular Italian dressing separates and gets oily. The oil and vinegar need an emulsifier like mustard or mayonnaise to stay combined. Every time I’ve used a basic vinaigrette on pasta, I’ve regretted it.
Anything with raw garlic tastes progressively stronger as it sits. A salad that tasted perfectly garlicky at 10am can be overwhelming by 2pm. I’ve learned to use roasted garlic or reduce the raw garlic quantity significantly for make-ahead dishes.
Final Thoughts on What I’ve Learned
After all this testing, experimentation, and occasional failure, I’ve come to appreciate that successful picnic side dishes share a few common characteristics. They use sturdy ingredients that don’t wilt, weep, or get soggy. They’re dressed appropriately for their sitting time. They’re packed in reliable containers that actually seal. And they’re kept at safe temperatures throughout transport.
But beyond the practical considerations, I’ve learned that the best picnic food is food that makes people happy when they’re hungry after a hike or relaxed after lounging in the sun. It doesn’t have to be fancy. It doesn’t have to photograph well. It just has to taste good and be safe to eat.
My family has become my most honest critics. Liam still refuses anything green, but he’ll happily eat farro salad if I pick out the herbs. Emma has started helping me in the kitchen on recipe test days, which has become some of my favorite time with her. Marcus provides steady feedback about seasoning levels and always tells me honestly when something isn’t working.
The picnics themselves have become our family ritual. Every Saturday from April through October, weather permitting, we pack up the cooler and head to one of our regular spots. Sometimes it’s just the four of us. Sometimes we invite friends. Either way, there’s always a tested side dish in the cooler, and I know it’ll taste good when we get there.
That disastrous quinoa soup at Sauvie Island feels like a long time ago now. I still make quinoa salad, but I’ve figured out how to do it right. The key lessons from that failure, like so many of my cooking failures, turned out to be useful. Cool your grains completely. Don’t overdress. Trust your cooler but verify with a thermometer. And always, always pack the feta separately.
If you try any of these recipes and something goes wrong, don’t be discouraged. I’ve failed more times than I’ve succeeded, and each failure taught me something useful. The goal isn’t perfection. The goal is delicious food, shared with people you love, in a beautiful outdoor setting. Everything else is just details.
Frequently Asked Questions
How long can picnic side dishes safely sit out at room temperature?
According to food safety guidelines, perishable side dishes should not sit in the temperature danger zone between 40 and 140 degrees Fahrenheit for more than two hours total. On hot days above 90 degrees, that window shrinks to just one hour. I always pack my sides in a well-insulated cooler with ice packs on all sides, which keeps them below 40 degrees for four to six hours easily. For mayo-based dishes like potato salad, I use a digital thermometer to check the temperature when we arrive and periodically throughout the picnic. Vinegar-based slaws and grain salads without dairy are more forgiving and can safely sit out longer than creamy dressings.
What grains hold up best for make-ahead picnic salads?
After testing dozens of grain salads over two years, farro and pearl barley are my top recommendations for picnic transport. Both maintain their chewy texture for five to six hours without getting mushy or clumping together. Quinoa works if you spread it on a sheet pan to cool completely and slightly undercook it, but it requires more careful handling. White rice is the worst choice because it turns gummy and absorbs too much dressing. Brown rice fares slightly better but still gets soft after three hours. For foolproof results, stick with farro or barley and dress them while still slightly warm so they absorb flavor without becoming waterlogged.
How do I prevent coleslaw from getting watery and soggy?
The secret to crisp, non-watery coleslaw is serious salting and draining before you add any dressing. Toss your shredded cabbage with about one tablespoon of kosher salt per half head, place it in a colander over a bowl, weight it down with a plate and some cans, and let it drain for 45 minutes to an hour. You will be shocked by how much liquid comes out. Rinse briefly to remove excess salt, then spin or squeeze dry in clean towels. This removes the moisture that would otherwise release into your dressing and dilute it. Slaw made this way stays crunchy for four hours or more, even with creamy mayonnaise dressing.
Can I make picnic side dishes the night before?
Yes, and many actually taste better when made ahead. Grain salads improve after 24 to 48 hours as the grains absorb the dressing and flavors meld together. Potato salad genuinely tastes better after 12 to 24 hours of refrigeration. Bean salads can be made two to three days ahead and often peak on day two. Slaws made with the salting method hold well for 12 to 24 hours. The only items you should not make ahead are fresh herbs, avocado, and delicate greens. I prep these at home, pack them in separate small containers, and add them at the picnic site right before serving.
What are the best containers for transporting picnic salads without spilling?
After testing over fifteen different container types, I recommend snap-lid containers with clips on all four sides, like the Sistema brand. These genuinely do not leak, which I verified by filling them with water and shaking them over my sink. Wide, shallow containers work best for salads because ingredients spread in a single layer instead of crushing under their own weight. Avoid tall narrow containers for salads. Pack dressings separately in small squeeze bottles, usually four ounces is enough for a large salad. Glass containers look beautiful but are heavy and can break in transit. I broke two mason jars in my cooler and spent twenty minutes picking out glass shards. Save glass for serving at the picnic site, not transport.
What picnic side dishes should I avoid making for outdoor events?
Some recipes simply do not survive transport no matter how carefully you pack them. Panzanella, the Italian bread salad, turns to mush within an hour as bread absorbs tomato juices. Ay salad with mixed greens as the main component wilts within two hours, even sturdy kale and arugula eventually go limp. Pasta salad dressed with plain vinaigrette separates and gets oily because oil and vinegar need an emulsifier like mustard or mayo to stay combined. Dishes with raw garlic taste increasingly strong as they sit, so a perfectly seasoned salad at 10am becomes overwhelmingly garlicky by 2pm. Avocado browns within two hours unless added on site. Stick with sturdy grains, properly salted slaws, and bean-based salads for reliable results.