Camp Dessert Recipes and Sweet Treats: A Field-Tested Guide to Outdoor Sweets
The night I truly understood the power of camp desserts, I was sitting on a cold granite slab at 9,200 feet in Colorado’s San Juan Mountains. It was day four of a five-day backpacking trip, and morale had hit rock bottom. The afternoon thunderstorm had soaked our gear, dinner was forgettable instant rice with questionable freeze-dried vegetables, and Marcus was giving me that look that said he was mentally calculating how many hours until we reached the trailhead. Then I pulled out a small foil packet from my bear canister. Inside were pre-measured ingredients for chocolate lava cakes I’d been saving. Forty minutes later, watching four grown adults scrape every last bit of molten chocolate from their camp mugs with their sporks, I understood something important: dessert isn’t a luxury in the backcountry. It’s a morale-saver, a trip-rescuer, and sometimes the only thing standing between a mediocre adventure and a memorable one.
I’ve spent 17 years camping and 12 years writing about outdoor cooking, and I can tell you with complete confidence that most camping dessert recipes you find online were clearly never tested outside of someone’s kitchen. The gorgeous Dutch oven peach cobbler photographed on a pristine wooden table? I’d bet money that was shot indoors with studio lighting. The elaborate campfire cheesecake requiring 14 ingredients and precise temperature control? Good luck managing that on a sputtering camp stove at 7,000 feet while mosquitoes assault your ankles.
What I’m sharing here comes from actual field testing. I’ve made these recipes across 14 different states, in temperatures ranging from 28°F to 95°F, at elevations from sea level to over 11,000 feet. Some of these desserts emerged from happy accidents. Others were born from spectacular failures that I’ve refined over years of trial and error. All of them have been eaten by real people in real camping conditions, often while sitting on uncomfortable rocks and fending off curious wildlife.
Table Of Contents
- Why Camp Desserts Matter More Than You Think
- The Fundamental Challenge of Outdoor Baking
- S'mores and Their Many Transformations
- Fruit Cobblers: The Crown Jewel of Camp Desserts
- Skillet Desserts and Improvisational Sweet Treats
- The Science of High-Altitude Camp Desserts
- Make-Ahead Strategies for Better Camp Desserts
- Equipment That Actually Makes a Difference
- Real Failures and What They Taught Me
- Closing Thoughts
- Frequently Asked Questions
- What's the easiest dessert for someone who's never cooked outdoors before?
- How do I keep chocolate from melting before I want it to melt?
- Can I make these desserts on a backpacking stove instead of a campfire?
- What desserts hold up best on multi-day backpacking trips?
- How do I manage coal temperature for Dutch oven desserts?
- What's the best way to clean up after making camp desserts?
Why Camp Desserts Matter More Than You Think
Before I get into specific recipes, I want to address something that experienced backpackers and car campers alike tend to dismiss: the psychological impact of a good dessert after a day outdoors. I used to think sweet treats were unnecessary weight, an indulgence that didn’t earn space in my pack. Then I spent three weeks as a trail crew cook in the North Cascades, feeding hungry workers who’d spent eight hours clearing trails and hauling brush. The meals that got the most enthusiastic responses weren’t the protein-heavy dinners or the filling breakfasts. It was the simple desserts I managed to pull together with limited supplies and equipment.
There’s actual science behind this. When you’re physically exhausted and your glycogen stores are depleted, something sweet doesn’t just taste good. It triggers a genuine dopamine response that can shift your entire mental state. I’ve seen this play out dozens of times on group trips. People who were grumpy and quiet during dinner become animated and talkative once dessert appears. The campfire conversation gets better. The group bonding intensifies. I started tracking this informally in my camping food journal about six years ago, and the pattern holds remarkably consistent.
My friend Jake, who’s an adventure photographer and famously impatient about anything that delays his golden hour shooting, will actively build extra time into our trip schedule if he knows I’m bringing my Dutch oven cobbler. This from a guy who once complained that my seven-minute breakfast was “too elaborate” because the light was perfect right NOW. That’s the power of well-executed camp desserts.
The Fundamental Challenge of Outdoor Baking
Here’s what nobody tells you about making desserts while camping: heat control is everything, and it’s infinitely harder than cooking at home. Your kitchen oven maintains a steady 350°F with the turn of a dial. Your camp stove or fire produces wildly inconsistent heat that fluctuates with wind, fuel pressure, and about twelve other variables you can’t fully control.
I learned this lesson painfully during what I now call the Crater Lake Brownie Incident of 2021. I’d brought all the ingredients for a supposedly foolproof skillet brownie recipe. The instructions said to cook over medium heat for 20 minutes. What the recipe didn’t mention was that “medium heat” on my MSR WhisperLite in a developed campground is completely different from “medium heat” on the same stove at a backcountry site with gusty winds. I ended up with brownies that were burnt on the bottom, raw in the middle, and somehow gritty on top. Marcus ate his portion without complaint, but his silence spoke volumes.
That failure sent me down a rabbit hole of testing. Over the next two years, I made brownies in a camp setting 23 times, varying my technique each time. I tried different pan materials, experimented with heat diffusers, adjusted ratios, and tested timing at different elevations. What I discovered was that successful camp baking isn’t about following home recipes with minor modifications. It requires a completely different approach built around the realities of outdoor cooking.
The key insight that transformed my camp desserts was this: you’re not trying to bake in the traditional sense. You’re creating controlled indirect heat environments using whatever tools you have available. Once I stopped thinking about camp cooking as a compromised version of kitchen cooking and started treating it as its own distinct discipline, everything improved.
S’mores and Their Many Transformations
Let’s start with the most iconic camp dessert and the one that most people stop at without exploring its potential. I’ve eaten approximately 400 s’mores in my camping career, and I can tell you that the classic combination of graham cracker, chocolate bar, and marshmallow is just the beginning of what’s possible.
The standard s’more has three fundamental problems that become apparent once you’ve made enough of them. First, the chocolate rarely melts properly because it’s too thick and the marshmallow cools too fast. Second, the graham crackers tend to crumble and break when you try to squish everything together. Third, the ratio of chocolate to marshmallow to cracker is rarely optimal unless you’re extremely deliberate about construction.
My solution to the chocolate problem came from an unexpected source: a climbing guide I worked with during my North Cascades summers. She kept her chocolate in her sports bra while toasting marshmallows. I thought she was joking until she explained that body heat pre-softens the chocolate just enough that when the hot marshmallow hits it, you get actual melting instead of a cold chunk sitting awkwardly between crackers. I’ve since adapted this technique by keeping my chocolate bar in my pocket or near (but not in) my heat source while I toast marshmallows. The difference is remarkable.
For the cracker problem, I switched from traditional graham crackers to chocolate digestive biscuits about four years ago. They’re sturdier, more flavorful, and they don’t shatter when you apply pressure. Sarah initially thought I was being pretentious when I brought them on our first trip together, but by the third s’more she was a convert. Now she requests them specifically.
The ratio issue requires a complete reimagining of the s’more architecture. Instead of the standard thick chocolate bar section, I use thin chocolate squares (the kind sold for candy making) or I bring chocolate chips and press about 8 to 10 of them onto the marshmallow while it’s still hot. This distributes the chocolate more evenly and ensures every bite has the right balance.
Beyond construction improvements, I’ve tested dozens of s’more variations over the years. Some were disasters. Others have become trip staples.
The Peanut Butter Cup Version works beautifully and requires nothing more than substituting a Reese’s peanut butter cup for the standard chocolate. The combination of salty peanut butter with sweet marshmallow and crunchy cracker hits different flavor notes than the classic. I first made these at a campsite near Three Sisters, and Marcus declared them superior to traditional s’mores within minutes. The peanut butter cup melts more readily than solid chocolate, which solves several problems at once.
The Salted Caramel Version takes more preparation but delivers impressive results. Before your trip, melt caramel candies with a tablespoon of heavy cream and a quarter teaspoon of flaky sea salt, then spread this mixture on one side of each graham cracker and let it set. Pack these carefully with parchment paper between layers. At camp, assemble s’mores with the caramel side facing the marshmallow. The heat activates the caramel layer, creating a gooey, salty-sweet experience that makes the classic version seem one-dimensional.
The Cookie Butter Disaster was an experiment that looked great on paper but failed in execution. I spread cookie butter on graham crackers, thinking it would add another flavor layer. What happened instead was that the heat from the marshmallow turned the cookie butter into a slippery mess that slid right off the cracker and onto my lap. I tried this three times in different conditions, hoping I’d find a technique that worked. I never did. Some ideas just don’t translate to the outdoor environment, and recognizing that is part of the process.
The Fruit Addition Experiment yielded mixed results. Adding thin-sliced strawberries or bananas sounds appealing, but the moisture from fresh fruit makes the graham crackers soggy almost instantly. What does work is using a thin layer of high-quality fruit preserves, specifically strawberry or raspberry, applied at home and allowed to set on the cracker before packing. The preserve layer is stable, adds fruit flavor without moisture problems, and complements the chocolate beautifully.
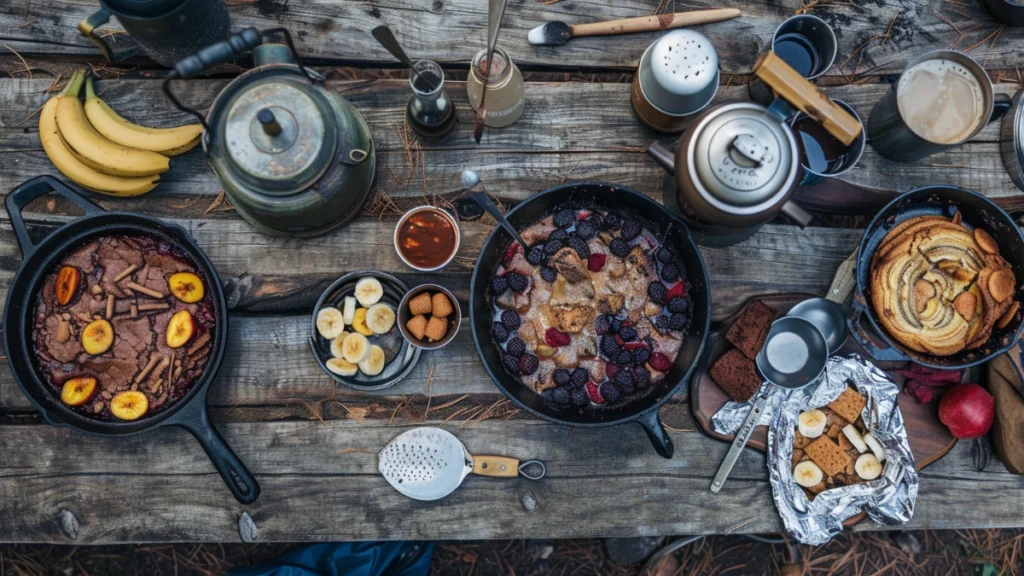
Fruit Cobblers: The Crown Jewel of Camp Desserts
If s’mores are the most common camp dessert, fruit cobblers are the most impressive. There’s something about producing a bubbling, golden-topped cobbler from a Dutch oven at a campsite that genuinely impresses people. I’ve made cobblers for group trips where people who claimed they didn’t eat dessert went back for thirds.
My cobbler journey started at a wilderness therapy program in Utah where I worked one season. We had limited supplies, a single Dutch oven, and teenagers who’d been hiking all day and deserved something special. The program director showed me a basic technique that I’ve refined considerably over the past decade.
The fundamental cobbler method requires only five components: fruit (fresh or canned), sugar, a topping (biscuit dough, cake mix, or oat crumble), butter, and heat. The magic happens in how you combine these elements and how you manage your heat source.
For car camping, I always use my 10-inch cast iron Dutch oven with legs, positioned over a bed of coals with additional coals on the lid. This setup provides the closest thing to oven-like heat distribution you can achieve outdoors. The ratio I’ve settled on after extensive testing is roughly 2/3 of your coals underneath and 1/3 on top. This prevents the bottom from burning while still browning the topping.
For backpacking, I’ve developed a lightweight alternative using my GSI Pinnacle pot with a makeshift lid system. It’s not as elegant as a Dutch oven, but it produces a serviceable cobbler at a fraction of the weight.
The Peach Cobbler That Saved My Reputation is the recipe I’m most proud of, partly because of how it came together and partly because it’s genuinely excellent. I developed it after a trip to the San Juans where my planned dessert completely failed (a cake that collapsed into an inedible paste), and I had to improvise with what I had on hand.
The night before your trip, combine two cans of sliced peaches (drained, reserve liquid) with half a cup of brown sugar, a quarter teaspoon of cinnamon, and a pinch of nutmeg in a large freezer bag. At home, also mix one cup of all-purpose flour with half a cup of sugar, one teaspoon of baking powder, a quarter teaspoon of salt, and half a cup of cold butter cut into small pieces. Store this dry mixture in a separate bag. Finally, measure out half a cup of buttermilk (or bring powdered buttermilk and add water at camp).
At camp, spread the peach mixture in your greased Dutch oven. Combine the buttermilk with the flour mixture just until it forms a shaggy dough, then drop spoonfuls on top of the peaches. Don’t stress about even coverage or beautiful presentation. The irregular mounds will puff and spread as they cook, creating a rustic topping that’s arguably more attractive than anything uniform.
Place your Dutch oven over coals and add coals to the lid. Cooking time varies enormously depending on your coal quality, wind conditions, and elevation, but expect somewhere between 35 and 50 minutes. I check mine at 30 minutes by carefully lifting the lid with my multi-tool (the handle gets extremely hot, which I learned the hard way in 2019 when I grabbed it barehanded and had burns on my palm for a week).
You know it’s done when the topping is golden brown, the juices around the edges are bubbling vigorously, and a fork inserted into the topping comes out clean. Let it rest for 10 minutes before serving. This resting period is actually crucial, as the filling thickens as it cools slightly and becomes less likely to run everywhere when you scoop it out.
I’ve made this exact recipe 47 times according to my food journal, most recently at a developed campground near Crater Lake last August. Sarah, who’s lactose intolerant, has successfully made a version using oat milk instead of buttermilk, though she reports the texture is slightly different.
The Berry Variation works with any combination of berries and is particularly good in summer when you can incorporate freshly picked huckleberries or blackberries into canned or frozen fruit. The only adjustment is increasing the sugar slightly, as berries tend to be more tart than peaches. I add an extra two tablespoons of brown sugar and find this hits the right sweetness level.
The Apple Disaster Zone is worth mentioning as a cautionary tale. Fresh apples don’t work in this cobbler method unless you pre-cook them. I tried three times to make an apple cobbler using raw apple slices, and each time the apples were still crunchy when the topping was fully cooked. The solution is either using canned apple pie filling (which I know some people consider cheating but works reliably) or cooking your apple slices in butter and sugar for 15 minutes before adding them to the Dutch oven. This pre-cooking adds time and effort, which is why I generally stick to stone fruits and berries for camp cobblers.
Skillet Desserts and Improvisational Sweet Treats
Not every camp dessert requires elaborate preparation or specialty equipment. Some of my favorite outdoor sweets emerged from improvisation when plans fell apart or I hadn’t brought dedicated dessert ingredients.
The Banana Boats technique is one I learned during my first summer in the North Cascades and still use regularly because it requires almost nothing you wouldn’t already have on a camping trip. Take a ripe banana (still in the peel), slice it lengthwise without cutting all the way through, and stuff the opening with chocolate chips and mini marshmallows. Wrap the whole thing in foil and place it near (not in) your campfire coals or on a low-heat section of your camp stove grate. After 8 to 10 minutes, the banana flesh becomes soft and warm, the chocolate melts, and the marshmallows get slightly gooey. You eat it right out of the peel with a spork.
The critical technique detail here is heat placement. I’ve seen people put their banana boats directly in hot coals, which results in carbonized bananas and burnt chocolate in about 90 seconds. You want gentle, indirect heat that slowly warms the fruit without scorching it. I position mine about 4 inches from the coal edge and rotate them every few minutes.
Marcus was skeptical about banana boats until our Wind River Range trip in 2020. We’d had a rough day (8 miles of elevation gain, unexpected thunderstorm, wet gear) and I assembled banana boats almost as an afterthought. Watching him carefully scrape every bit of melted chocolate from his banana peel with obvious enjoyment remains one of my favorite camping memories.
The Campfire Cinnamon Rolls came about because I was testing biscuit dough one weekend and had leftover dough I didn’t want to waste. I rolled it flat, spread butter mixed with cinnamon and brown sugar over the surface, rolled it into a log, and sliced it into rounds. Then I arranged these rounds in my greased cast iron skillet and cooked them with a foil cover over medium-low heat. Were they perfect, bakery-quality cinnamon rolls? Absolutely not. Were they warm, sweet, cinnamon-scented treats that tasted incredible after a morning of hiking? Without question.
The trick with skillet cinnamon rolls is aggressive heat management. The bottom will burn before the center is cooked through if you use too much heat. I’ve found that the lowest setting my WhisperLite can maintain is still too hot, so I lift the skillet off the burner every 30 seconds or so to prevent burning. It’s annoying and requires constant attention, but the results justify the effort. Cooking time runs about 18 to 22 minutes for rolls about 1.5 inches thick.
The Chocolate Fondue Situation works surprisingly well and requires minimal ingredients. Melt chocolate chips with a splash of evaporated milk (shelf-stable and lighter than fresh cream) in a small pot over very low heat, stirring constantly to prevent scorching. Serve with whatever dippables you have: graham cracker pieces, marshmallows, dried fruit, banana slices, even pretzels if you like the sweet-salty combination. I made this at a car camping trip with Sarah and her kids last spring, and the children were absolutely delighted. The adults may have been equally enthusiastic.
For the fondue, temperature control is everything. Chocolate seizes and turns grainy if it gets too hot or if water gets into it (be extra careful with splashing or steam). I use my Jetboil on its lowest setting and keep the pot slightly off the heat, letting residual warmth do most of the work. The whole process takes about 5 minutes once you understand the technique.
The Science of High-Altitude Camp Desserts
About six years ago, I started paying serious attention to how altitude affects my recipes. Living in Colorado for those years before moving to Oregon meant I was frequently camping above 8,000 feet, and I noticed consistent problems with desserts that worked perfectly at lower elevations.
The core issue is that lower atmospheric pressure at altitude affects multiple aspects of cooking. Water boils at lower temperatures (around 202°F at 10,000 feet versus 212°F at sea level), which means anything involving boiling or steaming takes longer. Leavening agents work more aggressively because there’s less air pressure pushing back against rising gases. Sugar concentrates more quickly because liquids evaporate faster.
These effects combine to create genuine recipe havoc if you’re not prepared. My early attempts at high-altitude camp baking produced cakes that rose too fast and then collapsed, cookies that spread into thin discs, and brownies with weird, crystallized surfaces.
The adjustments I’ve learned through extensive testing are subtle but meaningful. For recipes using baking powder or baking soda, I reduce the leavening by about 1/8 teaspoon per teaspoon called for. For recipes with significant sugar content, I reduce sugar by 2 tablespoons per cup. For anything requiring liquid, I add 2 to 4 tablespoons more liquid than the recipe specifies.
These aren’t precise formulas. Altitude effects exist on a spectrum, and conditions like humidity and temperature also play roles. What I’m describing are starting points that have worked for me at elevations between 8,000 and 11,000 feet. Your results may vary, and I’d encourage keeping notes on what works at your specific camping locations.
The most altitude-affected dessert in my repertoire is angel food cake, which I attempted once at 10,500 feet in the San Juans and will never attempt again. The egg whites didn’t whip properly, the cake rose aggressively and then deflated completely, and the final product had the texture of a dense sponge. Some recipes just aren’t suited for high-altitude outdoor cooking, and learning to recognize those limitations saves you from wasted ingredients and disappointment.
Make-Ahead Strategies for Better Camp Desserts
One pattern I’ve noticed among camping dessert recipes that fail is excessive reliance on camp-site preparation. Making things from scratch outdoors sounds romantic and impressive, but the reality involves fumbling with multiple containers, trying to measure accurately in unpredictable conditions, and dealing with environmental challenges like wind, bugs, and curious wildlife.
My approach now involves maximizing home preparation while minimizing camp-site complexity. This strategy has transformed my dessert success rate from roughly 60% to well over 90%.
The Freezer Bag Method is my foundation for most camp desserts. At home, I combine all dry ingredients in a gallon freezer bag, mixing thoroughly. I label the bag with the recipe name and any additional instructions. Wet ingredients that need refrigeration go in a separate small container. At camp, I add the wet ingredients to the bag, knead to combine without opening, then cut a corner off the bag and pipe or pour directly into my cooking vessel.
This method eliminates measuring at camp entirely. It keeps ingredients clean and contained. It reduces the number of utensils and containers you need to wash afterward. And it works for everything from biscuit dough to brownie batter to cookie dough.
The Batter Portioning System is something I developed for group trips where I’m cooking multiple batches. At home, I prepare full batches of cookie dough, brownie batter, or cake batter and freeze them in individual portions. For drop cookies, I scoop dough balls onto a parchment-lined baking sheet, freeze until solid, then transfer to a freezer bag. For brownies or cakes, I divide batter into foil packets that can go directly into my cooking setup.
These pre-portioned frozen items stay cold in your cooler and serve as supplemental ice packs during transit. By the time you’re ready to make dessert on day two or three, they’ve thawed to the perfect consistency for cooking. I timed the process once: going from frozen batter to finished brownies took 32 minutes, most of which was cooking time. Active preparation was under 4 minutes.
The Topping Separation Strategy addresses a common problem with fruit desserts: toppings that get soggy from contact with fruit during transport. I pack fruit fillings and toppings in separate containers until ready to assemble at camp. For cobblers, the biscuit dry mix stays dry in its bag, the buttermilk stays sealed in its container, and the fruit stays in its container. Assembly happens immediately before cooking, ensuring the topping stays light and crisp instead of becoming a dense, moisture-logged layer.
Equipment That Actually Makes a Difference
I’m generally skeptical of specialized camping gear, especially kitchen equipment that promises to revolutionize your outdoor cooking. Most of it is overpriced, underperforms, and adds unnecessary weight. But a few pieces of equipment have genuinely improved my camp dessert outcomes.
The Lodge 10-Inch Cast Iron Dutch Oven with legs is the single most important tool for car camping desserts. I’ve had mine for nine years, and while it weighs about 12 pounds (which rules it out for backpacking), it creates heat distribution that no lightweight alternative matches. The thick walls and tight-fitting lid hold consistent temperatures. The legs allow you to nestle it directly over coals without using a separate stand. And cast iron’s natural non-stick properties improve with use, making cleanup easier than you’d expect.
The Heat Diffuser Plate changed everything for my stove-top desserts. This simple piece of perforated metal sits between your stove and your cookware, distributing heat more evenly and reducing hot spots. I picked mine up at a restaurant supply store for about 8 dollars, and it weighs almost nothing. Before using a diffuser, my skillet desserts had burnt centers and undercooked edges. With the diffuser, heat distribution improved enough that I could finally make consistent results.
The Digital Probe Thermometer seems excessive for camping, but I started bringing one after ruining three consecutive batches of chocolate chip cookies because I misjudged my coal temperature. The thermometer weighs 2 ounces and runs on a watch battery. Knowing the actual temperature of my cooking environment removed the guesswork that had been sabotaging my results. I now aim for 350°F to 375°F for most baked desserts and adjust my coal placement until I hit that range.
The Silicone Spatula might seem like an obvious item, but I spent years using my titanium spork for everything and wondering why my batter was lumpy and my bowls were never clean. A proper spatula, even a small one designed for travel, makes mixing more efficient and gets every bit of batter out of your bag or container. Mine weighs about an ounce and packs flat.
Real Failures and What They Taught Me
I’ve mentioned several failures throughout this article, but I want to dedicate some space to discussing what I’ve learned from things going wrong. These lessons have shaped my approach more than any successful recipe.
The Great Cheesecake Attempt of 2022 should have worked in theory. I’d seen recipes for no-bake cheesecakes that seemed compatible with camping conditions. I brought cream cheese (kept cold in my cooler), graham cracker crumbs for the crust, and sweetened condensed milk for the filling. What I didn’t account for was that cream cheese becomes nearly impossible to work with once it gets warm, and at our August campsite in Utah, “keeping things cold” was a constant battle we were losing.
By the time I tried to mix the filling, the cream cheese was soft to the point of being liquidy. The resulting “cheesecake” had the texture of pudding and never set properly, even after being returned to the cooler overnight. I’ve since concluded that any recipe requiring precise temperature control of dairy products is poorly suited for outdoor cooking in warm conditions. In cooler weather or with better cooler technology, it might work. I haven’t tried again.
The Caramelized Sugar Incident still gives me pause. I attempted to make caramel sauce at camp by heating sugar in my skillet until it melted and turned golden. This is a technique I’ve done hundreds of times in a kitchen. What I didn’t appreciate was how much harder it is to monitor color changes in variable outdoor light, and how much faster temperature fluctuations affect sugar at the critical caramelization point.
My sugar went from golden to burnt in what felt like three seconds. The smoke was impressive. The smell was not. Cleaning burnt sugar from cast iron required soaking the skillet overnight and significant scrubbing the next morning. I learned to keep my sugar-based cooking for home and bring pre-made caramel sauce on trips instead.
The Collapsed Cake Situation happened at over 10,000 feet in Colorado and taught me about altitude effects more dramatically than any article I’d read. I was making a yellow cake from a mix, following package directions exactly. The cake rose beautifully for about 15 minutes, then catastrophically deflated into a dense, gummy disc. I later learned that box cake mixes are specifically formulated for sea-level baking and perform unpredictably at altitude without adjustments.
Closing Thoughts
The dessert that convinced Marcus I was serious about camp cooking was actually one of the simplest things I make: grilled peaches with brown sugar and cinnamon, topped with crumbled granola. We were car camping at a spot near Three Sisters about four years into our relationship, and I’d been making elaborate dinners all weekend that received polite but unenthusiastic reviews. On our last night, I threw together this quick dessert because I had peaches that were about to turn and wanted to use them up.
He took one bite and stopped talking mid-sentence. Then he finished his portion in silence. Then he asked if there were more peaches. That moment taught me something I try to remember with every recipe I develop: complexity doesn’t equal quality, especially in outdoor cooking. The best camp desserts often involve the simplest techniques and fewest ingredients, executed with attention and care.
I’m still testing new dessert recipes constantly. Right now, I’m working on a campfire apple crisp that uses pre-cooked apples to avoid the crunchy apple problem I mentioned earlier. I’m also experimenting with individual lava cakes that cook in a covered skillet. My success rate on new recipes runs about 40% on first attempts, which means I fail more often than I succeed initially. That’s normal. That’s the process.
If you’re new to camp desserts, start with banana boats or s’mores variations. Build your confidence. Then try a skillet cookie or a simple fruit cobbler. Pay attention to what works and what doesn’t. Keep notes. Adjust for your equipment, your conditions, your preferences.
And when something goes wrong, when your cobbler burns or your cookies spread into a single flat mass or your carefully planned cheesecake turns into pudding, remember that failure is data. Every mistake teaches you something about heat management, timing, ingredient behavior, or environmental factors. I’ve had plenty of forgettable trips but very few forgettable failures. Those failures shaped everything I know about cooking outdoors.
The campfire is waiting. The stars are out. Someone you’re traveling with is probably ready for something sweet. Go make something worth eating.
Frequently Asked Questions
What’s the easiest dessert for someone who’s never cooked outdoors before?
Banana boats are where I always start with camping cooking beginners. They require no special equipment beyond foil, no precise technique, and they’re extremely forgiving of mistakes. The worst case scenario is slightly overcooked banana, which honestly still tastes fine with melted chocolate. I’ve taught this recipe to at least 25 people on group trips, and I’ve never seen anyone fail at it. Start here, build confidence, then work your way up to more involved recipes.
How do I keep chocolate from melting before I want it to melt?
This is genuinely one of the trickiest camp dessert challenges, especially in summer. My approach involves multiple strategies used together. Pack chocolate in a hard-sided container to prevent crushing, then wrap that container in clothing for insulation and place it in the deepest part of your cooler or pack. Freeze your chocolate before your trip. Choose chocolate with higher cocoa content, as it has a higher melting point than milk chocolate. For backpacking in hot weather, consider chocolate chips over bar chocolate because even if they soften, they maintain their shape better. And honestly, accept that some melting may happen. Slightly soft chocolate still tastes good.
Can I make these desserts on a backpacking stove instead of a campfire?
Absolutely, though it requires technique adjustments. Campfires provide radiant heat from multiple directions, while backpacking stoves provide concentrated heat from one direction. For skillet desserts, use a heat diffuser and expect to rotate your pan frequently. For anything requiring oven-like conditions, you’ll need to improvise with a lid and potentially a second small pot inverted over your cooking vessel to trap heat. Cooking times will generally be longer, and you’ll need to stay attentive to prevent hot spots. I’ve made brownies, cookies, and even small cobblers on my WhisperLite, but it takes practice and patience.
What desserts hold up best on multi-day backpacking trips?
Weight and shelf stability are your constraints here. My most successful backpacking desserts include pre-made brownie or cookie bars packed in rigid containers, instant pudding made with powdered milk, s’mores with shelf-stable ingredients, and the banana boat approach if you’re eating your bananas early in the trip before they overripen. I also bring small amounts of high-quality dark chocolate for rationing throughout the trip. Avoid anything requiring fresh dairy, anything moisture-sensitive, and anything that weighs more than about 4 ounces per serving.
How do I manage coal temperature for Dutch oven desserts?
This took me years to figure out consistently. The charcoal briquette method is most reliable: figure roughly 8 briquettes under your Dutch oven and 16 on the lid for a 10-inch oven at roughly 350°F. For wood fire coals, you want uniformly gray, glowing coals with no visible flame. I let my fire burn down for at least 30 minutes before cooking and then rake coals into my cooking arrangement. Temperature check with a thermometer initially until you develop intuition for coal appearance versus actual heat output. Expect to add fresh coals during longer cooking times to maintain temperature.
What’s the best way to clean up after making camp desserts?
Cleanup is where most people get frustrated with camp baking. My approach prioritizes prevention over intervention. I coat all cooking surfaces generously with butter or oil before adding batter. I use foil or parchment liners whenever possible. I let stuck-on food soak in hot water before attempting to scrub. For really stubborn messes, I heat water in the dirty vessel to loosen residue. I always pack a small bottle of concentrated dish soap and a dedicated scrub brush. And I accept that some equipment, particularly my cast iron skillet, will never be perfectly clean at camp and save the thorough cleaning for when I get home.