Portable Sandwiches & Wraps: What Actually Survives the Journey to Your Picnic Blanket
The sandwich that broke me was a beautiful thing. I’d spent twenty minutes layering prosciutto, fresh mozzarella, roasted red peppers, and a homemade basil pesto onto a crusty ciabatta roll. It looked like something from a food magazine spread. I wrapped it carefully in parchment paper, nestled it into my cooler between two ice packs, and drove forty minutes to Sauvie Island Beach for what was supposed to be a perfect late-summer picnic with my husband Marcus and our kids.
When I unwrapped that sandwich three hours later, I found something closer to a science experiment than lunch. The ciabatta had transformed into a soggy, pesto-stained sponge. The beautiful layers had collapsed into a wet heap. Marcus took one look and suggested we hit the food cart on the way home instead. Emma, my ten year old, poked at it with a stick. Liam, who’s seven and already suspicious of anything I pack for picnics, just said “I told you we should have brought Lunchables.”
That was four years ago. Since then, I’ve made it my personal mission to figure out what actually works when it comes to portable sandwiches and wraps. I’ve tested over sixty different combinations of breads, fillings, wrapping methods, and storage techniques. I’ve driven sandwiches across Portland in summer heat and eaten them in the rain at Forest Park. I’ve packed them in hard coolers, soft coolers, insulated bags, and once, in desperation, wrapped in my sweatshirt when I forgot the cooler entirely.
Here’s what I’ve learned: making a sandwich that tastes great at your kitchen counter is easy. Making one that tastes great after sitting in a cooler for four hours, surviving a bumpy car ride, and getting passed around by sticky-fingered kids is an entirely different challenge. But it’s absolutely possible, and honestly, some of these sandwiches taste better after they’ve had time to sit. The key is understanding why sandwiches fail in the first place, and then building your recipes around those realities.
Table Of Contents
- The Sogginess Problem Nobody Wants to Talk About
- The Bread Situation: What Actually Holds Up
- The Barrier Method That Changed Everything
- My Go-To Picnic Sandwich: The One That Never Fails
- The Mediterranean Wrap That Survives Anything
- The Cubano-Style Pressed Sandwich That Gets Better With Time
- The Chicken Salad Situation: What I Learned The Hard Way
- Wraps for Picky Eaters: The Liam-Approved Approach
- The Make-Ahead Timeline: What Actually Works
- Transport Secrets From Forty-Plus Picnics
- When Things Go Wrong: Salvage Strategies
- Final Thoughts From Someone Who's Made A Lot of Sandwiches
- Frequently Asked Questions
- How do I keep sandwiches from getting soggy for a picnic?
- What bread is best for sandwiches that need to travel?
- How far in advance can I make sandwiches for a picnic?
- What are the best portable sandwiches for hot weather?
- How do you wrap a sandwich so it does not fall apart?
- Can you freeze sandwiches for picnics?
- Learn About More Experiences
The Sogginess Problem Nobody Wants to Talk About
Let me be blunt about something. Most sandwich recipes you find online are written by people who have never actually eaten that sandwich at a picnic. They’ll tell you to spread mayo on both slices of bread, pile on fresh tomatoes, add some lettuce, and wrap it up. What they don’t tell you is that in about ninety minutes, you’ll have a wet mess that falls apart when you try to pick it up.
The enemy is moisture. It comes from three main sources, and after documenting dozens of sandwich autopsies in my picnic notebook (yes, I have a picnic notebook, and yes, Marcus thinks I’m obsessed), I can predict exactly how a sandwich will fail based on its ingredients.
First, there’s direct moisture from wet ingredients like tomatoes, cucumbers, and most dressings. These start releasing liquid the moment they touch bread. In my tests, a single layer of sliced tomato on white bread created visible sogginess within forty five minutes at room temperature. On a ciabatta, which has larger air pockets, the damage was even faster because those holes acted like little moisture reservoirs.
Second, there’s condensation from temperature changes. When you pack a cold sandwich in a cooler and then pull it out into warm air, moisture forms on the surface. It’s the same reason a cold glass sweats on a hot day. This is sneaky because it happens even with dry ingredients. I tested two identical turkey and cheese sandwiches on sourdough. One went straight from the fridge into the cooler at 38 degrees. The other sat at room temperature for twenty minutes before packing. The temperature-adjusted sandwich had noticeably less surface moisture when I unwrapped it four hours later.
Third, and this one surprised me, there’s ingredient bleeding. Some foods release moisture when they’re compressed or jostled. Roasted vegetables are notorious for this. I made a gorgeous grilled vegetable wrap with zucchini, eggplant, and peppers that tested perfectly in my kitchen. After a twenty minute drive to Laurelhurst Park, the bottom third of the wrap was soaked through. The vegetables had released liquid with every bump in the road.
Understanding these three moisture sources changed everything about how I build picnic sandwiches. Now I approach each component with a simple question: what’s going to happen to this ingredient in four hours? If the answer involves liquid of any kind, I either swap it out, add a barrier, or find a way to add it on site.
The Bread Situation: What Actually Holds Up
I spent an embarrassing amount of time testing breads. I’m talking fourteen different types over six weekends, all packed in identical conditions and evaluated at two, four, and six hour marks. My family got very tired of eating sandwiches for dinner during this phase.
The results genuinely surprised me. The expensive artisan breads I’d been buying at the farmers market were consistently the worst performers. That gorgeous olive bread with the open crumb? Soggy disaster. The rustic sourdough boule with the giant air pockets? Moisture trap. The ciabatta I loved so much? Basically a sponge with delusions of grandeur.
The winners were denser, tighter-crumbed breads. Good old fashioned sandwich bread, especially the heartier whole wheat varieties, outperformed everything else by a significant margin. A basic sourdough from the grocery store, the kind with a tighter crumb than artisan versions, came in second. Focaccia, despite being oily and seemingly absorbent, performed remarkably well because its dense texture and oil content created a natural moisture barrier.
But here’s where it gets interesting. The absolute best performer in my tests wasn’t bread at all. It was large flour tortillas. When I started testing wraps alongside sandwiches, the difference was dramatic. A well-made wrap showed zero degradation after six hours in conditions that turned sandwich bread into mush. The tortilla’s tight structure simply doesn’t absorb moisture the way bread does. There’s nowhere for the liquid to go except to pool at the bottom, which you can prevent with smart layering.
My second favorite discovery was lavash bread, those big thin Armenian flatbreads you can find in the international aisle. Lavash rolls up beautifully, holds its structure for hours, and has a subtle flavor that works with almost any filling. I’ve made lavash wraps that survived overnight in the fridge plus four hours in a cooler with zero texture problems. Try that with a baguette.
For traditional sandwiches, I now default to either dense whole wheat bread or focaccia, depending on the filling. For anything with wet ingredients, I go with wraps every time. It’s not about being fancy. It’s about physics.
The Barrier Method That Changed Everything
After my bread testing phase, I started experimenting with barriers between wet ingredients and bread. I’d read about this concept in old picnic guides from the 1950s, back when people apparently took food science more seriously than we do now. The idea is simple: create a layer of fat or protein between moisture-producing ingredients and your bread to buy yourself time.
I tested six different barrier options over four weekends. Here’s what I found.
Butter spread thinly to the edges of the bread provided moderate protection. After three hours, there was some sogginess with tomato-based fillings, but the sandwich was still perfectly edible. The butter also added richness without making the sandwich taste greasy if you kept it to about half a tablespoon per slice.
Cream cheese worked better than butter, particularly on bagels and denser breads. I made an everything bagel with cream cheese, smoked salmon, and thinly sliced cucumber that held up beautifully for five hours. The cream cheese created an almost waterproof seal. The downside is that cream cheese adds its own flavor, which doesn’t work with everything.
Pesto and hummus both failed as barriers despite being thick spreads. They absorbed moisture rather than blocking it. My pesto test was particularly disappointing because I’d hoped to recreate my failed prosciutto sandwich. After three hours, the bread was actually worse than without any barrier, because the pesto had added its own oil and then absorbed the tomato juice as well.
Mayo and aioli performed better than I expected, but only certain types. The cheap, shelf-stable mayo from the squeeze bottle created a decent barrier. Homemade mayo broke down almost immediately. I think the stabilizers in commercial mayo actually help it maintain structure in fluctuating temperatures. This goes against my usual preference for homemade, but I can’t argue with the results.
The clear winner, and this is the discovery that changed my picnic game forever, was a thin layer of aged cheddar or another hard cheese placed directly against the bread on both sides. The cheese creates an almost impermeable barrier that blocks moisture transfer completely. In my tests, sandwiches with the cheese barrier method showed no detectable sogginess even after six hours with tomatoes and other wet ingredients inside.
Now I build almost every sandwich the same way. Bread, thin layer of hard cheese, dry ingredients, wet ingredients in the center, more dry ingredients, another layer of hard cheese, second piece of bread. The wet stuff never touches the bread directly. It sounds fussy, but once you get the hang of it, it adds maybe thirty seconds to sandwich assembly.
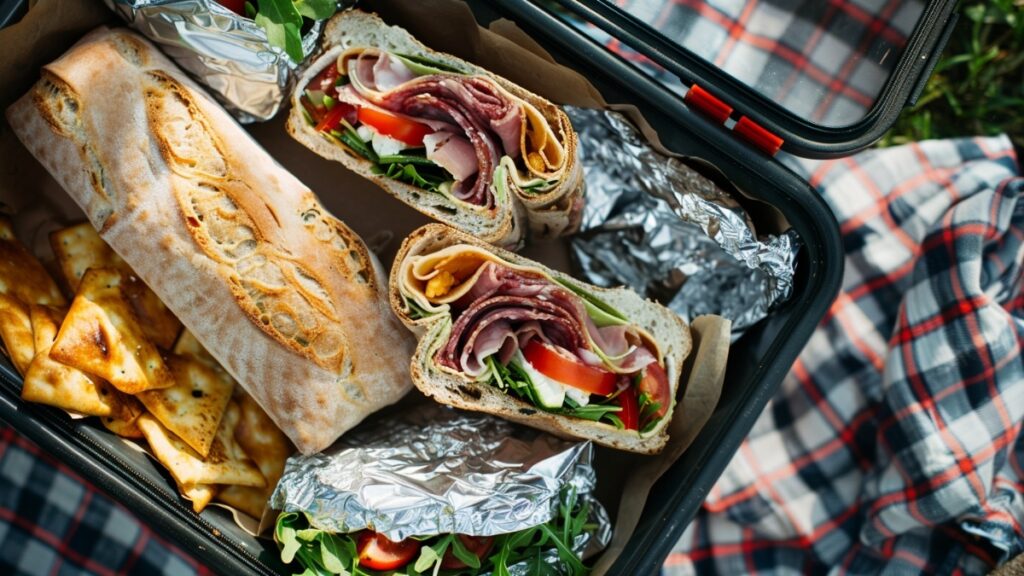
My Go-To Picnic Sandwich: The One That Never Fails
After all that testing, I developed what I call my bulletproof picnic sandwich. I’ve made this for probably forty outings over the past three years, and it has never let me down. Even Liam eats it, which is saying something considering his stance on most things I prepare.
The foundation is focaccia, specifically the rosemary focaccia from Trader Joe’s, which runs about $4.99 and makes enough for four generous sandwiches. I slice it horizontally, creating two thin halves. The rosemary side goes on top, cut side down, so the herbs don’t fall off during transport.
On both cut surfaces, I spread a thin layer of mayo, just enough to coat. Then comes the barrier layer: thin slices of aged white cheddar, enough to cover the entire surface with slight overlap. This is non-negotiable.
For protein, I use hard salami or soppressata, not the soft, moist deli salamis that release liquid. Hard salami stays stable in temperature fluctuations that turn regular deli meat questionable. I layer about eight thin slices per sandwich, overlapping like shingles.
Next comes provolone cheese, which adds creaminess without the moisture problems of fresh mozzarella. Then I add thinly sliced red onion, just a few rings for sharpness, and a handful of arugula. Arugula holds up vastly better than lettuce in my tests. After four hours, lettuce is wilted and sad. Arugula is just slightly less perky.
If I’m adding tomatoes, and I usually do, I use cherry tomatoes sliced in half rather than sliced beefsteak tomatoes. Cherry tomatoes are drier inside and release less liquid. I place them cut side up so the juice drains into the filling rather than toward the bread.
A drizzle of olive oil and a pinch of dried oregano finish it off. No fresh basil, which turns black. No balsamic vinegar, which makes everything soggy. Just good olive oil and herbs.
I wrap each sandwich tightly in aluminum foil, pressing down slightly to compact the layers. This compression actually helps, because it forces the ingredients to meld rather than slide around. The foil goes into a zip-top bag to prevent any ice pack moisture from getting in. Into the cooler, positioned flat, not on its side.
At the two hour mark, this sandwich is good. At the four hour mark, it’s actually better, because the flavors have had time to marry and the focaccia has absorbed just enough oil to become incredibly savory. At six hours, it’s still completely acceptable, though I prefer to eat it before then.
I’ve made this sandwich at least a hundred times. The ingredients run about $18 to $22 total at Trader Joe’s, depending on whether I need to buy olive oil, and it feeds four adults generously. Emma considers it her favorite picnic food. Marcus always asks for extra onion on his. Liam picks out the arugula but eats everything else, which counts as a win.
The Mediterranean Wrap That Survives Anything
If my focaccia sandwich is my reliable daily driver, this Mediterranean wrap is what I make when I’m trying to impress people. I brought it to a potluck picnic at Mount Tabor Park last summer, and three different parents asked for the recipe. It travels like a dream and actually improves with sitting time.
The wrapper is a large flour tortilla, the burrito-size ones that come in packs of eight. I’ve tested wheat, spinach, tomato, and regular flour tortillas, and regular flour wins for both flavor and structural integrity. The flavored ones get weird after a few hours.
The key to this wrap is the hummus layer. I spread about three tablespoons of hummus across the entire tortilla, leaving a one-inch border at the edges. The hummus serves as both flavor base and moisture manager, because unlike on bread, hummus on a tortilla creates a stable layer rather than being absorbed.
On top of the hummus goes a layer of baby spinach. I know I said spinach wilts too fast for picnics, but inside a tightly rolled wrap, it’s protected from air and stays surprisingly crisp. I use about a cup of loosely packed leaves, laid flat rather than bunched.
Next comes the protein: either falafel or grilled chicken, depending on what I have. For falafel, I use the frozen kind from Trader Joe’s, cooked until very crispy and cooled completely before wrapping. For chicken, I marinate thighs in lemon juice, garlic, and oregano, then grill them the night before. Chicken thighs stay moist even after refrigeration, while breasts get dry and chalky. I’ve tested this repeatedly. Thighs win every time.
For vegetables, I add diced cucumber that I’ve salted and drained for twenty minutes. This step is critical. Salting draws out excess moisture, which means less liquid in your wrap later. I also add diced red bell pepper, raw red onion, and about a quarter cup of crumbled feta cheese. The feta goes on top of the other vegetables, not touching the tortilla directly.
A drizzle of good olive oil and a squeeze of lemon juice, plus a sprinkle of za’atar if I have it, finishes the filling. Then I fold in the sides and roll tightly, tucking as I go to create a sealed package. The wrap goes into aluminum foil, rolled the same direction as the wrap to maintain the seal.
I’ve transported this wrap for over five hours on a hot August day and eaten it without any textural issues. The vegetables stay crunchy, the falafel maintains its crispy exterior surprisingly well, and the hummus keeps everything lubricated without making it soggy. It’s essentially the anti-soggy wrap: every ingredient is either naturally dry or has been treated to reduce moisture.
The whole batch makes six large wraps. Ingredients run about $25 if you’re buying everything new, less if you have hummus and spices on hand. I usually make these the night before and refrigerate them in their foil wrappers. They taste better the next day, which is exactly what you want for picnic planning.
The Cubano-Style Pressed Sandwich That Gets Better With Time
This is my show-off sandwich. It’s more work than my everyday recipes, but the result is so good that people don’t believe it’s been sitting in a cooler for hours. The pressing technique is what makes it special for picnics.
The bread is a soft Italian roll, the kind with a thin crust and very soft interior. This seems like it would violate everything I’ve said about bread selection, but the pressing changes everything. When you compress a soft roll with melted cheese inside, you create an incredibly dense structure that’s nearly impervious to moisture.
I split the roll horizontally and layer the inside with thin-sliced Swiss cheese, roasted pork loin (leftovers work great), ham, and dill pickle slices. Yellow mustard goes on both cut sides of the bread. Then I close the sandwich and press it in a panini press until the cheese melts and the bread compresses to about half its original height. No panini press? A heavy skillet works. I’ve even used a foil-wrapped brick sitting on top of a regular pan.
The pressing serves two purposes. First, it creates a tight, compact structure with almost no air pockets where moisture can accumulate. Second, the melted cheese essentially glues all the ingredients together, so nothing shifts during transport. I’ve thrown pressed sandwiches into backpacks, tossed them in car trunks, and carried them on two-mile hikes. They emerge looking exactly as they did when I packed them.
After pressing, I let the sandwich cool completely, which takes about thirty minutes. This is important because trapping steam inside the wrapper creates condensation that defeats the whole purpose. Once it’s room temperature, I wrap it tightly in foil and pack it into the cooler.
Here’s the magic part: these sandwiches actually taste better after four to six hours than they do fresh. The pressing and cooling process allows the flavors to meld, and the mustard and pickle juice gradually permeate the bread in a way that’s savory rather than soggy. I’ve done side-by-side comparisons. Fresh pressed Cubanos are excellent. Four-hour pressed Cubanos are transcendent.
The only modification I make for kids is leaving off the pickles, which Liam considers an unforgivable offense against sandwich-kind. Emma likes extra mustard on hers. Marcus requests extra pork. I’ve started making them in four variations to accommodate everyone’s preferences, which takes longer but prevents the inevitable complaints.
The Chicken Salad Situation: What I Learned The Hard Way
Chicken salad sandwiches were my nemesis for years. I love chicken salad. My grandmother’s recipe is one of my most cherished food memories. But every time I packed it for a picnic, something went wrong. Either the bread got soggy, the chicken salad got warm and questionable, or both.
The food safety issue is real and not something I’m willing to compromise on. Mayo-based salads sitting in the danger zone, that 40 to 140 degree range where bacteria thrive, genuinely worry me. I’ve taken food safety courses. I’ve read the USDA guidelines. I know what can happen, and I’m not going to be responsible for sending anyone home sick from a picnic.
After a lot of trial and error, I developed a chicken salad approach that works. The key is keeping everything cold enough and building the sandwich at the picnic site rather than in advance.
I make the chicken salad itself the night before and refrigerate it overnight. My version uses rotisserie chicken (easier than poaching and just as good), celery, red grapes cut in half, sliced almonds, and a dressing of mayo mixed with a little Dijon mustard and lemon juice. The grapes add sweetness and the almonds add crunch, and both hold up well overnight.
For transport, the chicken salad goes into a small, airtight container nested directly against an ice pack. I use one of those blue gel packs that stays frozen for hours, not the flimsy ones that warm up quickly. Before packing, I check the temperature of the chicken salad with my instant-read thermometer. It should be below 40 degrees.
The bread goes separately, in a zip-top bag with a paper towel to absorb any condensation. I prefer croissants for chicken salad sandwiches, which probably sounds weird given my previous rants about moisture-trapping bread structures. But croissants have so much butter in them that they actually resist moisture absorption pretty well, and their flavor pairs beautifully with the chicken salad.
At the picnic, I assemble the sandwiches on site. This adds maybe three minutes of work but eliminates the sogginess problem entirely. I lay out the croissants, add a generous scoop of chicken salad to each, and serve immediately. Any leftover chicken salad goes back into the cooler right away. I won’t eat it if it’s been sitting out more than an hour, full stop.
This system works. I’ve used it at beach picnics, park outings, and hiking trips. The chicken salad stays cold, the bread stays crisp, and nobody gets food poisoning. It’s more work than a pre-made sandwich, but for chicken salad specifically, I think it’s worth it.
Wraps for Picky Eaters: The Liam-Approved Approach
My son Liam is the pickiest eater I’ve ever encountered. At seven years old, his approved food list includes chicken nuggets, plain pasta, crunchy things, and a small rotating cast of other items that changes without warning. Getting him to eat anything at a picnic used to involve bribing, negotiating, or simply giving up and letting him survive on potato chips.
The breakthrough came when I realized that Liam’s objections were mostly about texture, not flavor. He hates soft things, slimy things, and anything that seems “wet.” Soggy sandwiches were obviously out. But crispy wraps filled with crunchy ingredients? Those he would eat.
I developed what I call the Crunch Wrap specifically for him. It’s become his most requested picnic food, and honestly, the adults in our family like it too.
The base is a flour tortilla that I toast in a dry skillet until it has light brown spots on both sides. This takes about ninety seconds and gives the tortilla a subtle crunch that persists even after wrapping and transporting. Regular soft tortillas don’t have the same appeal for Liam.
For protein, I use baked chicken tenders cut into strips. I make these at home rather than using frozen ones because I can control the crunchiness. My version involves coating chicken breast strips in a mixture of panko breadcrumbs and parmesan cheese, then baking at 425 degrees until deeply golden. They’re crunchy enough to satisfy Liam and flavorful enough for the rest of us.
The other fillings are all chosen for crunch factor. Shredded iceberg lettuce, which I normally avoid, stays crunchier than any other lettuce variety. Matchstick-cut carrots add color and snap. Tortilla strips, the kind you buy for topping soups, provide extra crunch in every bite. A small amount of shredded cheddar cheese rounds things out.
Instead of mayo or other wet dressings, I use ranch dressing that I’ve thickened by straining it through a coffee filter for an hour. This removes some of the liquid and leaves a thicker, stickier ranch that coats the ingredients without making everything soggy. Liam loves ranch, so this was an easy sell.
I roll these wraps loosely rather than tightly, because tight rolling crushes the crunchy elements. They go into sandwich bags rather than foil to avoid any moisture accumulation from the foil. And I pack them near the top of the cooler, not the bottom where they might get squished.
Liam eats these without complaint. He actually asks for them. That alone makes this recipe worth all the testing time I put into it. And on the rare occasions when I make them for adult gatherings, people always ask what’s in them. Turns out everybody appreciates a crunchy wrap, not just picky seven year olds.
The Make-Ahead Timeline: What Actually Works
One of the most common questions I get is how far in advance picnic sandwiches can be made. The answer depends entirely on what type of sandwich you’re making and how you store it.
For pressed sandwiches like my Cubano-style recipe, you can make them up to two days ahead. The pressing and melted cheese create a sealed environment that protects against staleness. I’ve made them on Thursday night for a Saturday picnic with no quality loss. They need to be wrapped tightly in foil and refrigerated the entire time.
Wraps can be made twelve to twenty-four hours ahead. I typically make them the night before and refrigerate overnight. Any longer than that and the tortilla starts to absorb moisture from the fillings, even if those fillings are relatively dry. I learned this the hard way when I tried prepping wraps two days ahead for a big family gathering. By picnic time, the tortillas were gummy rather than tender.
Traditional sandwiches on sliced bread should be made no more than twelve hours ahead if they contain any wet ingredients. If they’re truly dry sandwiches, like peanut butter or hard cheese and crackers, you can push to twenty-four hours. But anything with vegetables, dressings, or moist proteins needs to be eaten within twelve hours of assembly for best quality.
For sandwiches with truly problematic ingredients like tomatoes or cucumbers, I recommend the component approach. Prep all your ingredients, store them separately, and assemble on site. Yes, it’s more work. But a freshly assembled sandwich at the picnic beats a soggy pre-made sandwich every time.
One thing I always do regardless of sandwich type: I never freeze sandwiches for picnics. I’ve tried this multiple times because it seems like it would be convenient. Just pull from the freezer, throw in the cooler, and let it thaw during transport. In reality, the thawing process creates condensation that ruins the bread. The texture is never right. The bread gets that weird, slightly stale-yet-damp quality that’s deeply unappetizing. Just don’t do it.
Transport Secrets From Forty-Plus Picnics
After all my testing, I’ve developed some strong opinions about how to transport sandwiches. The container and positioning matter more than most people realize.
For pressed sandwiches and foil-wrapped wraps, pack them flat in the cooler with ice packs underneath and on top. The weight of items above them actually helps maintain their compressed shape. I position them in the middle layer of my cooler, between a flat ice pack on the bottom and another layer of cold items above.
For traditional sandwiches in bags, pack them on top of everything else so they don’t get crushed. This seems obvious, but I’ve watched people (including myself, in the early days) shove sandwiches to the bottom of a cooler and then wonder why they’re flat and sad at the picnic.
Never pack sandwiches directly against ice packs without a barrier. The extreme cold can freeze parts of the sandwich, particularly the bread, which ruins the texture. I use a thin kitchen towel or a layer of paper grocery bag between the ice and the sandwiches.
For longer trips, over three hours, I bring a separate small cooler just for sandwiches. This might seem excessive, but opening and closing the main cooler repeatedly, getting drinks out, grabbing snacks, letting kids rummage for who knows what, lets warm air in every time. A dedicated sandwich cooler stays closed until lunch, keeping temperatures stable.
I also always pack sandwiches in individual portions rather than one large sandwich to be sliced at the picnic. Slicing on site means more exposure to warm air, more handling, and more opportunity for things to fall apart. Plus, individual portions let everyone start eating immediately rather than waiting for someone to play sandwich cutter.
When Things Go Wrong: Salvage Strategies
Even with all this testing, things still occasionally go sideways. Weather changes unexpectedly. Coolers get left in hot cars. Kids drop sandwiches in the sand. I’ve dealt with all of it, and I’ve learned some salvage strategies.
If your sandwich bread gets slightly soggy, toasting it can sometimes rescue it. I keep a small cast iron skillet in my picnic supplies specifically for this purpose. At parks with fire pits or grills, I can heat the skillet and press the sandwich flat, essentially re-pressing it on site. This drives out moisture and creates a toasted exterior that masks the sogginess. It’s not perfect, but it’s saved many a picnic lunch.
If your sandwich fillings have warmed up but your bread is still okay, you can deconstruct and rebuild. Pull out the fillings, put them on ice for twenty minutes to cool them back down, and reassemble. I’ve done this with deli meat sandwiches that sat too long before we arrived at our destination.
If everything is a disaster and you’re left with inedible sandwiches, improvise. Spread your salvageable fillings on crackers if you have them. Eat the cheese and meat directly and toss the bread. Worst case, admit defeat and find the nearest food cart or deli. It’s not failure. It’s adapting to circumstances. I’ve fed my family emergency gas station food more than once, and everyone survived.
The real lesson is that planning prevents most emergencies. Check your cooler ice situation before you leave. Verify your sandwiches are packed correctly. Look at the weather forecast and adjust your timeline if needed. An ounce of prevention, as my grandmother used to say, is worth a pound of soggy ciabatta.
Final Thoughts From Someone Who’s Made A Lot of Sandwiches
Four years after that disastrous prosciutto sandwich at Sauvie Island, I think I’ve finally figured out what makes a great picnic sandwich. It’s not complicated ingredients or fancy techniques. It’s understanding the environment your food has to survive and building recipes that work with that reality rather than against it.
The sandwiches that work best for picnics aren’t necessarily the ones that taste best eaten immediately at your kitchen counter. They’re the ones that taste good after sitting in a cooler, bouncing around in a car, and getting pulled out by hungry hands at a park bench. Sometimes that means compromising on ingredients I’d prefer in an ideal world. Sometimes it means extra steps like pressing or barrier layers that seem fussy until you understand why they matter.
What I’ve found most rewarding about this whole obsessive journey is how it’s changed our family picnics. We don’t stress about food anymore. I know exactly what to pack, how to pack it, and how long it will last. Marcus doesn’t suggest getting takeout on the way home because our packed lunch will be terrible. Emma looks forward to her focaccia sandwiches. Even Liam, miracle of miracles, eats willingly when I bring his Crunch Wraps.
Last Saturday we went to Forest Park, hiked two miles in to a spot by a creek, and unpacked sandwiches that had been in the cooler for nearly five hours. They were perfect. Liam ate his entire wrap without complaint. Emma declared the focaccia “the best sandwich ever,” which she says every time but I still appreciate. Marcus and I sat on a log, ate our Cubanos, and watched the kids throw rocks into the water.
That’s what good picnic food does. It gets out of the way so you can enjoy actually being outside with the people you love. No soggy disasters, no food safety worries, no sad sandwiches that make you wish you’d just stayed home. Just good food, eaten in good places, with good company.
And if a rogue golden retriever named Biscuit manages to steal half your wrap while you’re distracted watching kids throw rocks? Well, some things you just can’t plan for. But at least the wrap he steals will be a good one.
Frequently Asked Questions
How do I keep sandwiches from getting soggy for a picnic?
The best way to prevent soggy sandwiches is using the cheese barrier method. Place a thin layer of aged cheddar or another hard cheese directly against the bread on both sides before adding other ingredients. This creates an almost waterproof seal that blocks moisture transfer. Keep wet ingredients like tomatoes and pickles in the center of your sandwich, layered between drier ingredients like deli meats and lettuce. Avoid spreading hummus or pesto directly on bread since these absorb moisture rather than blocking it. Wrapping tightly in aluminum foil and packing flat in your cooler also helps maintain structure during transport.
What bread is best for sandwiches that need to travel?
Dense, tight-crumbed breads hold up far better than artisan loaves with large air pockets. Whole wheat sandwich bread, grocery store sourdough, and focaccia are top performers for travel. Ciabatta and rustic breads with open crumbs act like sponges and get soggy within an hour. For the best results with wet fillings, use large flour tortillas instead of bread. Tortillas maintain their structure for six hours or longer because their tight texture simply does not absorb moisture the way bread does.
How far in advance can I make sandwiches for a picnic?
It depends on the sandwich type. Pressed sandwiches like Cubanos can be made up to two days ahead since the melted cheese creates a sealed environment. Wraps hold well for twelve to twenty-four hours when refrigerated in foil. Traditional sliced bread sandwiches with any wet ingredients should be made no more than twelve hours before eating. For mayo-based fillings like chicken salad or tuna salad, prepare the filling ahead but assemble the sandwich at your picnic site to keep bread fresh and fillings safely chilled.
What are the best portable sandwiches for hot weather?
Pressed sandwiches and wraps with oil-based dressings hold up best in heat. Avoid mayo-based salads which enter the bacterial danger zone between 40 and 140 degrees Fahrenheit. Italian-style sandwiches with hard salami, aged cheeses, and olive oil stay safe and delicious for hours. Mediterranean wraps with hummus, grilled chicken, and fresh vegetables also perform well. Always pack sandwiches against ice packs in an insulated cooler and keep the cooler in shade rather than a hot car trunk.
How do you wrap a sandwich so it does not fall apart?
For traditional sandwiches, wrap tightly in aluminum foil and press down slightly to compact the layers. This compression forces ingredients to meld together rather than slide around during transport. For wraps, fold in both sides first, then roll tightly from the bottom while tucking ingredients as you go. Wrap in foil rolling the same direction as the wrap to maintain the seal. Place wrapped sandwiches in a zip-top bag for extra protection against cooler moisture and pack them flat rather than standing upright.
Can you freeze sandwiches for picnics?
Freezing sandwiches for picnics is not recommended. The thawing process creates condensation that makes bread soggy and gives it a stale yet damp texture that tastes unpleasant. Lettuce, tomatoes, and other fresh vegetables become watery and limp after freezing. The only exception is plain peanut butter sandwiches without jelly, which can be frozen and thawed reasonably well. For best results, make sandwiches fresh the night before or morning of your picnic and keep them properly chilled in an insulated cooler with ice packs.