Fast & Easy 30-Minute Camp Meals: Quick-Prep Recipes for Busy Travelers and Late Arrivals
I pulled into the Three Sisters Wilderness trailhead at 8:47 PM last August, a full three hours behind schedule thanks to a jackknifed semi on Highway 97 that turned my drive from Bend into a white-knuckled crawl. Marcus was already there, headlamp on, looking equal parts concerned and hangry. Luna was pacing circles around him, and I could hear both their stomachs growling from twenty feet away. We had maybe forty minutes of usable twilight left, our original dinner plan of slow-simmered camp chili was laughably optimistic, and I was staring down one of camping’s most common and least glamorous realities: you need food, you need it fast, and you’re too tired to think straight.
That night changed how I approach camp cooking entirely. I’d been so focused on perfecting elaborate backcountry meals over the years that I’d neglected the obvious truth that most camping nights don’t unfold according to plan. Traffic happens. Weather delays happen. That “quick” afternoon hike turns into a five-hour scramble because someone, and I’m looking at myself here, misread the trail map. After seventeen years of camping and at least a hundred nights where dinner needed to happen in thirty minutes or less, I’ve developed a reliable collection of recipes that actually work under pressure. Not theoretical thirty-minute meals that assume you have a pristine kitchen and unlimited counter space, but real meals tested in failing light, on uneven ground, with tired hands and limited water.
Every recipe in this article has been made at least six times in actual camping conditions. I’ve timed each one with my watch, tracked fuel consumption, and gotten honest feedback from Marcus, who has zero patience for anything that takes longer than advertised. These aren’t fancy meals. They won’t win any presentation awards, and you’ll probably eat most of them directly from the pot with a spork. But they’ll fill you up, taste genuinely good, and get you fed before exhaustion takes over completely.
Table Of Contents
- The Reality of Late-Arrival Cooking
- Recipe One: The Emergency Pasta That Saved My Marriage
- Recipe Two: The One-Skillet Breakfast That Converts Skeptics
- Recipe Three: The Quesadilla System That Never Fails
- Recipe Four: The Dump-and-Heat Soup Strategy
- Recipe Five: The Instant Ramen Upgrade Protocol
- The Make-Ahead Principle That Ties Everything Together
- What I'm Still Working On
- Final Thoughts from That Late-Night Arrival
- Frequently Asked Questions
- How much meal prep should I do at home before a camping trip?
- Do these recipes work at high altitude?
- What's the best way to keep ingredients cold for multi-day camping trips?
- Can I make these recipes on a campfire instead of a camp stove?
- Are these recipes suitable for vegetarian or vegan campers?
- What's the minimum cooking equipment I need for these meals?
- Learn About More Experiences
The Reality of Late-Arrival Cooking
Before I share specific recipes, I need to talk about what makes a meal genuinely achievable in thirty minutes at camp versus what food writers claim is thirty minutes. I’ve tested recipes from outdoor magazines that said “quick prep” but required chopping six vegetables, mixing three sauces, and somehow having access to a cutting board larger than my sleeping pad. That’s not quick prep. That’s optimistic fiction.
Real thirty-minute camp cooking means ingredients that require minimal cutting, ideally none. It means one pot or one pan, maximum. It means recipes that work even when your headlamp battery is dying and you can’t quite see the color of your food. And critically, it means meals that taste good even when you’re too exhausted to appreciate subtlety.
I learned this distinction the hard way during a solo trip to Crater Lake in October 2022. I’d planned what I thought was a simple stir-fry, but by the time I’d julienned carrots with a camp knife in near-darkness, I’d added twenty minutes to the process and nearly sliced my thumb. The meal was fine. The experience was miserable. That night, I started keeping notes on what actually works under pressure, and I’ve been refining that list ever since.
The recipes that follow all share common characteristics. They use ingredients that store well without precise temperature control, which matters when your cooler is more of a suggestion than a guarantee. They can be partially prepped at home, which I’ve found is the single biggest time-saver for camp cooking. And they’re forgiving of imprecise measurements, because measuring cups don’t exist in the backcountry, and even car campers don’t want to haul extra equipment for a one-night trip.
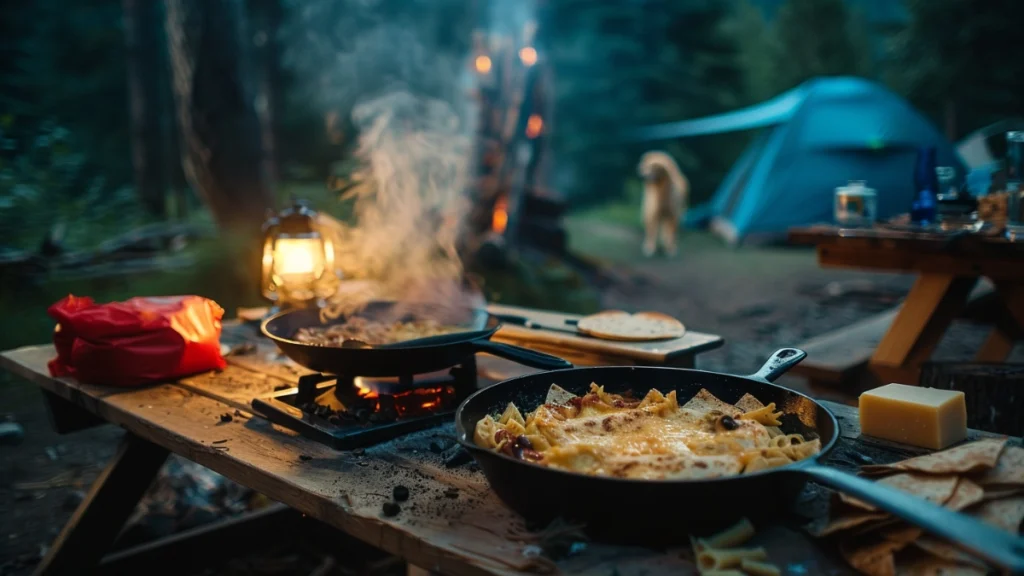
Recipe One: The Emergency Pasta That Saved My Marriage
I’m exaggerating about the marriage part, but only slightly. Marcus and I had been dating for about six months when we took a trip to the North Cascades in late September. I’d been talking up my camp cooking skills, maybe overselling them a bit, and our first night was supposed to feature homemade camp carbonara. What I hadn’t accounted for was the 4,500-foot elevation gain we’d tackled that day, the unexpected rain that turned our trail into a mudslide, and the fact that by 7 PM we were both so tired we could barely stand.
I looked at my carefully packed carbonara ingredients and nearly cried. Rendering pancetta, tempering eggs, grating parmesan while crouched on wet ground? Not happening. Instead, I threw together what I now call Emergency Garlic Noodles, and it’s become our most-requested camp dinner. Marcus has asked for it at least twenty times since that trip.
The recipe is almost embarrassingly simple. You need pasta, and I specifically recommend angel hair or thin spaghetti because they cook fastest. You need olive oil, garlic, red pepper flakes, parmesan, and salt. That’s it. Five ingredients, and three of them don’t require refrigeration.
Here’s how I make it now, after refining the technique over dozens of trips. At home, I mince four cloves of garlic and mix them with three tablespoons of olive oil in a small leak-proof container. This is crucial because mincing garlic at camp in the dark is a recipe for disaster and, knowing my track record, burned garlic. I’ve burned garlic forty-four times at camp, and I’ve finally learned to minimize opportunities for number forty-five. The garlic-oil mixture travels in my red bag, which is my color-coding system for dinner ingredients.
At camp, I boil water in my GSI Pinnacle pot. About four cups works for two servings. While the water heats, which takes roughly seven minutes on my ancient MSR WhisperLite at moderate elevation, I set out the garlic oil, parmesan in its little container, and the red pepper flakes. When the water boils, in goes four ounces of angel hair. At sea level, this cooks in four minutes. At the 5,200-foot campsites around Sisters, I add another minute. Above 8,000 feet, budget six minutes and stir occasionally.
Here’s where the technique matters. When the pasta is just barely done, I drain most of the water but keep about a quarter cup in the pot. This starchy liquid is what makes the sauce come together instead of just coating the noodles in oil. I dump the garlic oil directly onto the hot pasta and toss for about thirty seconds. The residual heat takes the raw edge off the garlic without actually cooking it long enough to burn. Then I add the parmesan, about a quarter cup grated, and toss again. The starchy water emulsifies with the oil and cheese to create something that actually resembles a sauce. A generous pinch of red pepper flakes and salt to taste, and you’re done.
From lighting my stove to eating, this takes twenty-two minutes. I’ve timed it repeatedly. The prep at home takes maybe five minutes, and cleanup is one pot, one spork, minimal scrubbing. On that rainy North Cascades night, I made it in slightly under twenty-five minutes because my hands were shaking from cold and exhaustion. Marcus ate his entire portion without speaking, then looked up and said, “This is actually really good.” Coming from him, that’s a five-star review.
The recipe works with variations too. I’ve added a can of tuna for protein on longer backpacking trips, though I drain it well and add it at the very end so it doesn’t get mushy. I’ve thrown in sun-dried tomatoes from a pouch, which travel beautifully and don’t need refrigeration. For my vegetarian friend Sarah, I skip the parmesan and add nutritional yeast instead, which sounds weird but provides that savory depth she’d otherwise miss. The core technique stays the same: pasta, reserved starchy water, garlic oil, toss vigorously, season.
Recipe Two: The One-Skillet Breakfast That Converts Skeptics
I need to confess something. For years, I was a breakfast snob at camp. I’d pack elaborate ingredients for eggs benedict variations, make-from-scratch pancakes, the works. Then my adventure photographer friend Jake started joining our trips, and I discovered the hard way that some people view breakfast as an obstacle to the day’s activities, not a meal to be savored.
Jake’s exact words during a trip to Utah’s canyon country: “Dinah, the light is perfect RIGHT NOW and you’re still cooking eggs. Can we please just eat something and go?” He wasn’t wrong. The morning light in the desert lasts maybe forty minutes before it gets harsh and unflattering, and I’d been burning through that window making unnecessarily complicated food.
I developed this breakfast specifically for Jake, though it’s become my go-to for any morning when time matters more than culinary ambition. The whole thing comes together in one skillet in about eighteen minutes, including the time it takes my stove to heat up. I call it the Everything Scramble, which is a boring name for a breakfast that’s saved more mornings than I can count.
At home, I prep what I call breakfast bags. Into a quart freezer bag goes a quarter cup of dehydrated hash browns, a tablespoon of dried onion flakes, a quarter teaspoon each of salt, pepper, and paprika, and two tablespoons of real bacon bits or pre-cooked crumbled sausage from the refrigerator section. The bacon bits don’t need refrigeration and last forever. The pre-cooked sausage needs to stay cold but adds substantial protein. I mark these bags with a blue stripe because blue means breakfast in my system.
At camp, I heat my ten-inch cast iron skillet over medium flame if I’m car camping, or my lightweight aluminum pan if I’m backpacking. While it heats, I add about three-quarters of a cup of water to the breakfast bag and let it sit. This rehydrates the potatoes and onions while I’m doing other things, like locating my spatula and convincing Luna that she doesn’t need to investigate every sound in the forest.
After five minutes of soaking, I dump the contents into the hot skillet with a tablespoon of oil. I let this cook without stirring for about three minutes, which lets the bottom get slightly crispy. Then I stir, flatten it out, and let it crisp again for another two minutes. At this point, I crack two or three eggs directly into the skillet, right on top of the potato mixture. I break the yolks and stir everything together, cooking until the eggs are just set, usually another three minutes.
The whole process from lighting the stove to plating takes eighteen minutes on average. I’ve made this at 6 AM in thirty-five-degree temperatures in the Wind River Range, and I’ve made it at sea level on a sunny California beach. The timing stays remarkably consistent because the dehydrated ingredients don’t care about elevation or temperature, only the water boiling for my camp coffee takes longer at altitude.
Jake’s review after the first time I made this for him: “Okay, this is acceptable.” He scraped his bowl clean and we were hiking by 6:45. From Jake, “acceptable” is genuine enthusiasm.
I’ve tested variations of this breakfast more than any other recipe in my rotation. The vegetarian version uses TVP (textured vegetable protein) instead of meat, rehydrated in the same bag. It’s not quite the same, but Sarah approves and it adds similar texture. For extra calories on cold mornings, I stir in a small handful of shredded cheese in the last thirty seconds. The cheese melts into everything and boosts the calorie count by about 150, which matters when you’re facing a long day in cold weather.
One important note about cast iron: I only bring it car camping. My ten-inch skillet weighs 4.5 pounds, which is unacceptable for backpacking. For backcountry trips, I use a lightweight non-stick pan that weighs twelve ounces, and the recipe works nearly as well. The potatoes don’t get quite as crispy, but at 6 AM in the wilderness, nobody is judging presentation.
Recipe Three: The Quesadilla System That Never Fails
I hesitate to even call this a recipe because it’s more of a technique, but it’s genuinely the fastest hot meal I can make at camp. From ignition to eating, a fully loaded quesadilla takes eleven minutes. I’ve tested this at least thirty times across different conditions, and the timing rarely varies by more than a minute or two.
The breakthrough came during a trip to Glacier National Park three summers ago. We’d spent the day hiking to Grinnell Glacier, a strenuous ten-mile round trip that left us completely drained. Back at camp, I had ingredients for a proper dinner, but the thought of actually cooking made me want to crawl into my tent and give up on food entirely. Instead, I grabbed tortillas, cheese, and the leftover black beans from lunch, and discovered that quesadillas might be the perfect camp meal.
Here’s what I’ve learned about making great camp quesadillas. First, tortilla size matters. I use the ten-inch flour tortillas because they fit perfectly in my skillet and provide enough surface area for substantial fillings. The small six-inch ones are too fiddly and don’t hold enough food. Second, cheese selection is critical. Pre-shredded Mexican blend works, but I’ve gotten better results bringing a block of pepper jack and slicing it thin at home. The slices melt more evenly than shreds, and you can layer them more precisely.
Third, and this was my biggest discovery, you can pre-assemble quesadillas at home and transport them flat in a gallon freezer bag. I layer tortilla, cheese, whatever filling I’m using, more cheese, second tortilla, then wrap the whole thing in plastic wrap. They stack flat in a cooler and stay fresh for two to three days if your cooler is maintaining temperature. When you’re ready to eat, you unwrap and cook. The pre-assembly alone saves five to seven minutes at camp.
For fillings, I’ve tested probably fifteen different combinations. The one I make most often includes refried beans spread thin, sliced pepper jack, canned green chiles, and pre-cooked chicken strips that I buy in the refrigerated section at the grocery store. Those chicken strips are camp cooking gold. They’re already cooked, already seasoned, and they just need to heat through. I slice them into thin strips at home and add them to the quesadilla assembly.
Cooking technique matters too. I heat my skillet over medium-low flame, not medium or high. I know it feels counterintuitive when you’re hungry and impatient, but higher heat burns the tortilla before the cheese melts. Medium-low gives you a golden, crispy exterior and properly melted interior in about four minutes per side. I flip using two spatulas because my hands aren’t steady enough for the impressive one-handed flip I’ve seen other camp cooks do.
The entire cooking process takes eight minutes for one quesadilla. Prep at home takes about ten minutes for four pre-assembled quesadillas. If I’m making them from scratch at camp, which I sometimes do on car camping trips when I have more time, I can still complete one in fifteen minutes total.
Marcus and I have eaten quesadillas for dinner at least forty times over the past three years. They work equally well as breakfast, as lunch, or as that awkward 4 PM meal when you got back from hiking too late for lunch but too early for dinner. I’ve made them in rain by holding an umbrella over my stove with one hand, which I don’t recommend but proves they’re adaptable. I’ve made them at 9,500 feet in Colorado, where the only adjustment needed was patience with the cheese melting slightly slower.
For my lactose-intolerant camping partners, I’ve tested dairy-free cheese alternatives, and honestly, they work fine in a quesadilla. The texture is slightly different, but when everything’s melted between tortillas with flavorful fillings, the difference is minimal. Violife and Daiya brands have both performed well in my tests.
Recipe Four: The Dump-and-Heat Soup Strategy
This isn’t a single recipe so much as a philosophy I developed after too many hungry nights, but it’s saved me more often than any fancy technique. The concept is simple: combine canned or pouched ingredients that are already fully cooked, heat until hot, and eat. No chopping, no precise timing, no technique required. Just heat.
I keep what I call an emergency soup kit in my car at all times during camping season. It contains two pouches of pre-cooked rice, two cans of chicken, two cans of black beans, one can of fire-roasted tomatoes, and a small bottle of hot sauce. None of these ingredients need refrigeration until opened. Total weight is about four pounds, and the kit has bailed me out on at least six trips when dinner plans fell apart.
The basic soup goes like this: dump a can of chicken with its liquid into your pot, add a can of black beans, drained, add the fire-roasted tomatoes, heat until everything bubbles, add pre-cooked rice, heat another two minutes, add hot sauce to taste. Done. Twelve minutes from start to finish, and you have a hearty soup that provides protein, carbs, and vegetables.
I made this exact soup on a solo trip to the Olympic Peninsula last fall when a sudden storm forced me off the trail three hours earlier than planned. I was soaked, cold, and setting up camp in a misty drizzle that made me question all my life choices. The thought of elaborate cooking was laughable. But hot food was essential for my morale and my body temperature. I dumped everything into my pot, hunched over my stove with my rain jacket providing a makeshift wind break, and ate directly from the pot while standing under a tree. It wasn’t glamorous. It was survival, and it worked perfectly.
The formula is infinitely adaptable. Thai-style version: coconut milk, canned chicken, red curry paste, and rice. Italian version: white beans, canned tomatoes, Italian sausage links sliced thin (these travel okay for a day in a cooler), and pre-cooked pasta. Breakfast version: canned corned beef hash with two eggs cracked directly in. The eggs cook in the residual heat if you put a lid on for three minutes.
I’ve also tested various instant soup bases as starters. The best I’ve found are the Better Than Bouillon pastes, particularly the roasted chicken and vegetable varieties. A teaspoon dissolved in hot water provides a flavorful base that makes even bland canned ingredients taste reasonable. The jars are heavy for backpacking, but for car camping, they’re a secret weapon.
One critical lesson I learned from my Wilderness First Responder training: hot food isn’t just about taste when you’re tired and cold. It actually helps maintain core body temperature and supports your body’s energy needs. On that Olympic Peninsula trip, eating hot soup was a genuine safety measure, not just a comfort. This context is why I take quick camp meals seriously. Sometimes the speed matters because you’re hungry and impatient. Sometimes it matters because you need calories and warmth before the situation gets worse.
Recipe Five: The Instant Ramen Upgrade Protocol
I need to start this section with a confession. In my first year of camping, I survived almost exclusively on instant ramen. Not because I was sophisticated enough to appreciate it, but because I was broke, inexperienced, and didn’t know any better. Those packets got me through a summer of chaos, and I’ll always have affection for their reliability. But plain instant ramen is sad camp food. It’s the meal equivalent of admitting defeat.
Over the years, I’ve developed what I call the Ramen Upgrade Protocol, which transforms a sixty-cent packet into something that actually satisfies. The base technique takes twenty minutes, uses one pot, and requires ingredients that either come in the ramen packet already or don’t need refrigeration.
The foundation is better broth. Instead of using the full seasoning packet, I use about half and supplement with a splash of soy sauce and a spoonful of peanut butter. Yes, peanut butter in ramen. I was skeptical too until a trail crew supervisor in the North Cascades showed me this trick in 2014. The peanut butter adds richness and protein, and it melts into the hot broth to create something closer to a proper soup base. I carry peanut butter in a small plastic container because glass is too heavy and breakable for camping.
While the water heats, I prep additional ingredients. A soft-boiled egg takes six minutes if you drop it in the boiling water before adding the noodles, then fish it out with your spork. Timing is everything here. I set my watch when the egg goes in. At six minutes, I pull the egg, let it sit in cold water or air for a minute while I finish the noodles, then peel and add it back to the bowl.
For vegetables, I bring dried seaweed sheets that I crumble in, and I usually have some kind of fresh vegetable in my cooler that can be sliced thin and added raw. Cabbage works particularly well because it stays crisp for days in a cooler and adds genuine freshness. Scallions are even better if I’ve remembered to bring them, though they tend to get smashed in transit.
Protein options beyond the egg include the same pre-cooked chicken strips I mentioned for quesadillas, canned chicken, or pre-cooked shrimp if I’m car camping and have reliable cooler temperature. For backpacking trips where weight matters, I skip the additional protein and rely on the egg and peanut butter.
The process: boil four cups of water, add egg, set timer for six minutes, remove egg at six minutes, add ramen noodles and half the seasoning packet, cook three minutes, turn off heat, stir in peanut butter and soy sauce, add crumbled seaweed and any vegetables, carefully slice egg in half and place on top. Total time from start to finish is about seventeen minutes.
I made this exact meal for Jake during an early-morning photography expedition near Crater Lake when we needed to eat at 5 AM to catch sunrise light at a specific overlook. The hot broth was essential for the thirty-degree morning temperatures, and the relative speed meant we still made our timeline. Jake’s only comment was “Why doesn’t my ramen ever taste like this?” which I took as high praise.
The technique works with any brand of instant ramen, though I’ve found that the Nongshim and Sapporo Ichiban brands have better quality noodles than the super-cheap options. Worth the extra dollar per packet when you’re trying to make something actually good.
The Make-Ahead Principle That Ties Everything Together
After describing these individual recipes, I want to stress the single strategy that makes all of them work: home prep. Every fast camp meal I’ve ever made has relied on work done in my kitchen before leaving home. The garlic oil for the pasta. The breakfast bags with pre-measured and pre-mixed ingredients. The pre-assembled quesadillas. The upgraded ramen components packed in clearly labeled containers.
I spent years thinking I could just figure it out at camp, that prep was something I could do while the stove heated or while waiting for water to boil. This was optimistic to the point of delusion. At camp, especially late at night, especially when tired, your cognitive function is not what it is at home. Tasks that take two minutes in a well-lit kitchen take ten minutes when you’re crouched on rocky ground with a headlamp flickering and mosquitoes circling your ears.
My current system involves what I call a “cook kit” for each trip. Before leaving home, I think through each meal and prep everything possible in advance. Garlic gets minced and mixed with oil. Spices get pre-measured into small containers. Vegetables that travel well get chopped. Proteins get portioned. Everything gets labeled with meal name and any cooking instructions I might forget.
The time investment at home is minimal. Maybe thirty minutes of prep for a three-day trip. But that thirty minutes saves hours of fumbling at camp and eliminates most of the decisions I’d otherwise need to make when I’m exhausted. When I arrive at camp late, I don’t have to think about what to cook or how to cook it. I just grab the appropriate bag and follow the process I’ve already established.
This system also reduces waste and forgotten ingredients. Before I started using the cook kit approach, I’d frequently pack individual components and forget the one crucial item that made the recipe work. Now everything for each meal travels together, and I can verify at home that I have what I need.
What I’m Still Working On
Seventeen years of camp cooking, and I still haven’t mastered everything. The recipes in this article represent my greatest hits, the reliable standbys that work under pressure. But I have a running list of fast meals I’m still perfecting.
Camp pizza remains my white whale. I’ve tried approximately eight different approaches, from pre-made crusts to tortilla bases to English muffin variations, and none of them have achieved what I’m looking for in under thirty minutes. The closest I’ve come is a pita pizza that took twenty-eight minutes, but the results were mediocre at best. I’m not giving up, but I’m also not ready to recommend anything I’ve tested.
I’m also working on better breakfast options for cold weather. The Everything Scramble works well down to about forty degrees, but below that, my food starts cooling too fast on the plate while I’m still cooking. I’ve experimented with preheating bowls and eating directly from the pan, but neither solution is elegant. This winter, I’m planning to test some one-pot oatmeal variations that might hold heat better.
And I’ve never successfully made a thirty-minute camp meal that was genuinely impressive enough to serve to non-camping people. Everything in this article is functional and satisfying, but it’s not food you’d photograph for social media. I’m making peace with this limitation. Camp cooking is about fuel and contentment, not presentation.
Final Thoughts from That Late-Night Arrival
I’ll circle back to where I started, at that Three Sisters trailhead last August, watching the daylight fade while my stomach growled. What I made that night was the Emergency Garlic Noodles, because I had the prep work already done and the process was automatic. Marcus and I ate standing up, balancing bowls on a log, Luna watching hopefully for dropped food. The meal took twenty-three minutes from lighting my stove to the last bite.
It wasn’t the elaborate dinner I’d planned. It wasn’t particularly noteworthy or memorable in a culinary sense. But it was hot, it was fast, and it was exactly what we needed to recover from a frustrating day and get our spirits back up before setting up camp in the last of the twilight.
That’s what these recipes are really about. Not impressing anyone. Not creating gourmet experiences in the backcountry. Just feeding yourself and your companions well, quickly, under real conditions that rarely match the idealized scenarios in most outdoor cooking articles. My first camp meal ever was instant ramen eaten cold because I couldn’t figure out my stove. Seventeen years later, I can make a genuinely good dinner in twenty minutes using skills I’ve accumulated through dozens of failures and gradual improvements.
Your first attempts at these recipes might be messier than mine. The timing might run longer. Something might not turn out quite right. That’s normal. I’ve made each of these dishes between six and thirty-plus times, and they’re still not perfect every time. Just last month, I burned the bottom of my Everything Scramble because Luna spotted a deer and I got distracted watching her lose her mind.
But they work. Consistently, reliably, across conditions from desert heat to mountain cold, from sea level to nine thousand feet, from solo trips to group outings with eight hungry people. They’ve fed me through good days and awful days, through planned meals and emergency situations, through seventeen years of learning what actually matters when you’re tired and hungry and the only thing between you and sleep is getting some food into your body.
Start with one recipe. Make it at home first if you want, just to learn the process. Then try it at camp and see how it adapts to real conditions. Make notes about what worked and what didn’t. Adjust for next time. That’s how every reliable camp recipe develops. Not from perfection on the first try, but from accumulated experience and honest assessment of what actually happened.
I’m planning a solo trip to Big Sur next month, partly for the scenery and partly to test a savory breakfast version of upgraded ramen that I’ve been developing. If it works, maybe it’ll make its way into a future article. If it fails, well, I’ve got the Emergency Garlic Noodles standing by as backup. That’s the real lesson of fast camp cooking: always have a backup plan, and make sure it’s something you can execute when everything else falls apart.
Happy cooking, and may your late arrivals at camp be fed quickly and well.
Frequently Asked Questions
How much meal prep should I do at home before a camping trip?
I’ve found that 30 minutes of home prep saves roughly two hours of fumbling at camp across a three-day trip. My rule is simple: if it involves a knife, measuring, or mixing, do it at home. I mince garlic and mix it with oil, pre-measure spice blends into small containers, chop vegetables that travel well, and even pre-assemble quesadillas wrapped in plastic. Everything gets labeled with the meal name and any cooking notes I might forget when I’m exhausted. This system eliminates decision-making at camp when your brain is foggy from hiking and your headlamp battery is dying.
Do these recipes work at high altitude?
Yes, but you’ll need to adjust your expectations. I’ve tested all these recipes at elevations ranging from sea level to 9,500 feet in Colorado. The main difference is cook time. Water boils at lower temperatures above 8,000 feet, so pasta that takes four minutes at sea level needs six minutes in the mountains. My Emergency Garlic Noodles took an extra three minutes at a 9,200-foot campsite near Leadville. The quesadillas and dump-and-heat soups are least affected because they don’t rely on boiling. Budget an extra five to eight minutes for any recipe involving boiling water when you’re camping above 7,000 feet.
What’s the best way to keep ingredients cold for multi-day camping trips?
After years of cooler experiments, I’ve settled on a few strategies that actually work. First, freeze proteins flat in thin packages before the trip. They act as ice packs initially and thaw evenly. Second, pre-chill your cooler the night before by filling it with ice or frozen water bottles. Third, keep your cooler in shade and avoid opening it constantly. My Yeti Tundra 45 maintains safe temperatures for three days in moderate weather if I follow these rules. For backpacking, I skip refrigerated ingredients entirely and rely on shelf-stable options like canned chicken, hard cheeses, and pre-cooked bacon bits that don’t need refrigeration.
Can I make these recipes on a campfire instead of a camp stove?
Most of them, yes, but with caveats. Campfire cooking is less predictable than stove cooking, and temperature control is tricky. The quesadillas work well over a fire if you let the flames die down to coals first. The dump-and-heat soups are nearly foolproof over any heat source. The pasta and breakfast scramble require more attention because you need consistent medium heat. I’ve burned garlic forty-four times, and at least twelve of those were over campfires where the heat spiked unexpectedly. If campfire cooking is your only option, stick with the quesadillas and soups until you get comfortable managing flame temperature.
Are these recipes suitable for vegetarian or vegan campers?
I’ve tested vegetarian versions of every recipe in this article because my friend Sarah has been camping with us for years. The Emergency Garlic Noodles work perfectly with nutritional yeast instead of parmesan. The Everything Scramble substitutes TVP (textured vegetable protein) for the meat with good results. Quesadillas are easily made vegetarian by swapping chicken for extra beans or sauteed peppers. For vegan versions, dairy-free cheese brands like Violife and Daiya melt well enough in quesadillas, and the dump-and-heat soups are naturally vegan if you skip the canned chicken and use chickpeas or white beans instead. None of these substitutions add prep time.
What’s the minimum cooking equipment I need for these meals?
You can make every recipe in this article with just three items: a single-burner stove, one pot or skillet, and a spork. That’s genuinely it. For car camping, I bring my ten-inch cast iron skillet because it provides better heat distribution and crispier results. For backpacking, I carry a lightweight aluminum pan that weighs twelve ounces and my GSI Pinnacle pot. A lid is helpful for the upgraded ramen and the soup, but you can improvise with aluminum foil if needed. I also recommend a small spatula and a reliable lighter or waterproof matches. My complete backpacking cook kit weighs under two pounds, and I’ve never felt limited by the minimal setup.