Pinwheel Sandwiches for Picnic deserve more than soggy wraps and sad surprises. You pack the blanket, grab the drinks, open the cooler and there it is. Tortillas gone limp and fillings falling apart. Classic picnic fail.
These aren’t party appetizers. Picnic pinwheels need structure. They need smart layering. They need to survive heat, movement, and time without falling apart.
This guide shows you how to make pinwheels that hold their shape, stay fresh, and taste great hours later. You’ll learn the Barrier Method to block sogginess, discover the best heat-safe fillings, and get packing tips to keep every spiral clean and round until you’re ready to serve.
Table Of Contents
- Why Pinwheel Sandwiches Are the Ultimate Picnic Food
- The Science of the "Picnic-Proof" Pinwheel sandwiches
- Ingredients Needed
- How to Make Picnic-Perfect Pinwheel Sandwiches
- 4 Picnic-Optimized Pinwheel Recipes
- How to Pack Pinwheels for a Cooler
- Expert Troubleshooting: The Pinwheel Medic
- Serving and Storage Tips
- Helpful Notes
- Conclusion
Why Pinwheel Sandwiches Are the Ultimate Picnic Food
No utensils required
Pinwheel sandwiches are naturally finger-friendly. There’s no need for forks, knives, or even plates. Guests can grab a couple while sitting on a blanket or walking around, making them perfect for relaxed, informal outdoor meals.
Built-in portion control
Each slice is a neat, snackable bite. You can serve a full variety of flavors in one container and let everyone mix and match without waste. It’s ideal for picky eaters or large groups.
Cooler packing made easy
Round pinwheel sandwiches stack better than bulky triangle-cut sandwiches. You can fit more into a small container without squishing anything. With the right packing method, every roll stays intact, fresh, and ready to serve when you arrive at your picnic spot.
The Science of the “Picnic-Proof” Pinwheel sandwiches
Anyone can spread ingredients on a tortilla, but making pinwheels that survive a hot afternoon in a cooler takes more than that. Here’s where most recipes fall short: they don’t treat sogginess and spoilage as serious problems. This section changes that.
Choosing Your Foundation: Tortilla vs. Lavash
Tortillas are the go-to option for most. They’re soft and flexible, but prone to cracking if cold or dry. The fix is simple. Warm each tortilla in the microwave for ten seconds before rolling. This softens them just enough for a tight, clean spiral.
Lavash or rectangular flatbread offers a smarter option for those who want sharp edges and less waste. As noted in the European Food and Travel strategy, its shape eliminates the rounded ends you typically trim off. It’s also thinner, which helps with tighter rolling and more uniform stacking in containers.
The “Lipid Barrier” Method
Moisture moves from wet vegetables into bread over time. That’s what turns a firm roll into a soggy mess. To stop this, you need a hydrophobic layer that keeps water away from the tortilla.
Use a spread like cream cheese, butter, or thick hummus. Cover the entire surface from edge to edge. This acts like a raincoat between the bread and any watery fillings. Never let pickles, tomatoes, or juicy veggies touch the tortilla directly. Always place them over the barrier.
Food Safety: The “Danger Zone”

Ingredients Needed
For the Roll-Ups
- Four large flour tortillas, burrito size
- 12 slices of hard salami
- Twelve slices of deli ham
- 12 slices of provolone cheese
- Thirty-two to sixty-four slices of pepperoni, depending on how full you like them
- Three to four large romaine lettuce leaves, chopped into bite-size pieces
For the Cream Cheese Spread
- Eight ounces of cream cheese, softened to room temperature
- One tablespoon of Italian seasoning
- One cup of sliced pepperoncini peppers, drained well to remove excess moisture
- One medium tomato, seeds removed and chopped finely with liquid pressed out
Tip: Removing extra moisture from ingredients like tomato and pepperoncini is key. It helps prevent sogginess and keeps the spread thick and easy to work with.

How to Make Picnic-Perfect Pinwheel Sandwiches
1. Make the Cream Cheese Spread
Place the softened cream cheese and Italian seasoning into a small mixing bowl. Stir until the herbs are fully blended in.
Finely chop the pepperoncini and tomato. Press them gently with paper towels to remove excess liquid before adding them to the bowl. Mix until the spread is smooth and well combined.

2. Prepare the Tortillas
Lay out all four tortillas on a flat surface. If they feel cold or stiff, warm them in the microwave for ten seconds to make them easier to roll. This prevents cracking and helps them hold their shape.
3. Spread the Mixture
Scoop one-fourth of the cream cheese mixture onto each tortilla. Use a spatula to spread it evenly across the entire surface, reaching all the edges. This creates the moisture barrier that keeps your pinwheels crisp.
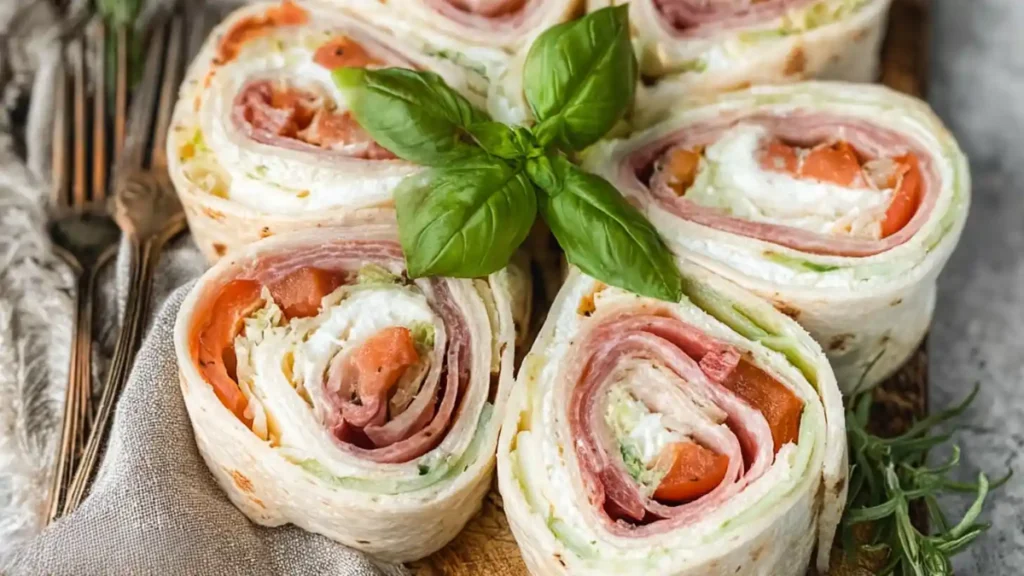
4. Layer the Fillings
Sprinkle chopped lettuce over the cream cheese layer.
Lay three slices of provolone cheese across the center of the tortilla.
Place three slices of salami on top of the cheese, followed by three slices of ham.
Arrange four to eight slices of pepperoni around the center stack so they fill the rest of the surface without overlapping too much.

5. Roll and Chill
Starting at one edge, roll the tortilla tightly into a log.
Wrap the roll tightly in plastic wrap or secure it with toothpicks to hold its shape.
Refrigerate for at least one hour. This allows the cream cheese to firm up, which holds the structure together during slicing and travel.
6. Slice and Serve
After chilling, remove the roll from the fridge. Trim the ends where the filling may be sparse.
Using a serrated knife, cut the roll into slices about one inch thick.
For the cleanest cut, use a gentle sawing motion without pressing down hard. This keeps the pinwheels round and neat.
Pro Tip: Use dental floss or a very sharp serrated knife to cut your pinwheels without squishing them into ovals.

4 Picnic-Optimized Pinwheel Recipes
Picnics aren’t one-size-fits-all. Whether you’re hiking in hot weather or packing lunch for kids, there’s a pinwheel recipe that fits. These combos are designed with temperature, taste, and transport in mind.
The Heat Wave
Ingredients: Salami, provolone, roasted red peppers, and pesto
Why it works: This version skips mayo and soft cheeses. Cured meat and oil-based pesto handle heat better than dairy-heavy spreads. Use roasted peppers that are well-drained or dried on paper towels to avoid sogginess.
The Classic Club
Ingredients: Turkey, cooked bacon, cheddar, cream cheese mixed with ranch seasoning
Why it works: Familiar flavors make this kid-approved. The cream cheese acts as the moisture barrier while the ranch powder adds flavor without adding extra liquid.
The Veggie Crunch
Ingredients: Hummus, baby spinach, shredded carrots, thinly sliced bell peppers
Why it works: Completely plant-based and loaded with crunch. Hummus holds everything together while staying shelf-stable for longer than dairy. Use firm veggies to avoid a limp texture.
The Gourmet Grazer
Ingredients: Roast beef, horseradish cream cheese, arugula, caramelized onions
Why it works: Ideal for adults who want bold flavors. The spicy kick from horseradish balances the sweetness of the onions. Arugula adds a peppery bite and holds up well in transit.
How to Pack Pinwheels for a Cooler
Packing pinwheels the wrong way turns them into flattened ovals or soggy stacks. Here’s how to keep them fresh, round, and ready to serve.
Stack Vertically
Place each pinwheel spiral-side up in a rigid, shallow container. Think sushi roll style. Avoid laying them flat in layers. Stacking them on their sides prevents weight from pressing down and keeps the shape intact.
Fill the Gaps
Use firm extras like grapes or cherry tomatoes to fill empty space in the container. This keeps the pinwheels from shifting during transport. Choose gap fillers that won’t leak juice or get crushed.
Top-Down Cooling
Most people put ice packs under their food, but cold air sinks. For the best cooling, place ice packs on top of your pinwheel container. This keeps the entire stack in the safe temperature zone while in transit.
Keep It Sealed
Always use a container with a tight-fitting lid. This prevents outside moisture from getting in and helps maintain a consistent chill inside the cooler.

Expert Troubleshooting: The Pinwheel Medic
Even a well-stacked picnic can fall apart if your pinwheels do. Here are the most common problems and exactly how to fix them.
First Problem: My Tortillas Keep Cracking When I Roll Them
The Diagnosis
Dry or cold tortillas are stiff and prone to splitting. This is one of the most common frustrations in recipe comment sections.
The Fix
Wrap a stack of tortillas in a damp paper towel. Microwave for ten to fifteen seconds. This quick steam softens them and makes rolling much easier.
Pro tip: Use the freshest tortillas you can find. Older ones tend to be dry and brittle.
Second Problem: The Pinwheels Are Unraveling in the Cooler
The Diagnosis
If your pinwheels are falling apart, it’s likely that your spread wasn’t applied to the edges or the chill time was too short.
The Fix
Make sure your spread goes all the way to the edge of the tortilla. This acts like glue when rolled.
Refrigerate the entire log for at least one hour before slicing. The cold firms up the filling and locks everything in place.
Always place the seam side down, both when chilling and when packing. This uses gravity to keep them closed.
Third Problem: I Squish Them Into Ovals When Cutting
The Diagnosis
Using too much force or a dull knife flattens the roll into a sad oval.
The Fix
Use a serrated knife and a gentle sawing motion. Let the knife do the work instead of pressing straight down.
For a clean, round cut every time, use unscented dental floss. Slide it under the roll, cross the ends over the top, and pull quickly. This slices all the way around without squashing.
Fourth Problem: They Are Soggy by Lunchtime
The Diagnosis
Too much moisture from veggies like tomatoes or cucumbers is seeping into the bread.
The Fix
Always remove seeds from watery vegetables before chopping. Pat them dry with paper towels.
If using greens, run them through a salad spinner or press firmly with towels to remove surface water.
Never skip the barrier layer. That edge-to-edge spread of cream cheese or hummus keeps the bread dry and the texture crisp
Serving and Storage Tips
Serving Suggestions
Arrange pinwheels spiral-side up on a platter or inside a shallow container for easy grabbing. If you’re serving outdoors, keep the dish shaded and chilled as much as possible. Use a lined basket or tray with parchment paper for a rustic picnic presentation. Add fresh herbs like parsley or basil around the edges for color and aroma.
Keep Cold Until Served
If your pinwheels include any dairy or meat, keep them in the cooler right up until serving. Transfer only what’s needed to the serving tray and leave the rest chilled. Rotate out warm ones with fresh cold ones as needed.
Storage After the Picnic
Place leftovers in an airtight container and refrigerate as soon as you return home. Most pinwheels stay fresh for up to two days. Avoid freezing if the filling includes raw vegetables or soft cheeses, as the texture may change after thawing.
Tip for Hosting
If you’re feeding a crowd, prep multiple flavor varieties and label them using toothpick flags or color-coded parchment dividers. This keeps things organized and avoids mix-ups for guests with dietary preferences.
Helpful Notes
Ingrédient Swaps
You can easily adjust the recipe to fit dietary needs. Use gluten-free tortillas if needed, or swap cream cheese for hummus to make it dairy-free. Provolone can be replaced with cheddar, Swiss, or any firm cheese that holds its shape.
Make-Ahead Advice
Pinwheels taste even better after resting. The chill time lets flavors blend and helps the filling stick together. Make them the night before, but always store them tightly wrapped to prevent drying out.
Avoid Overfilling
It’s tempting to pack in the ingredients, but too much filling makes rolling difficult and can lead to messy cuts. Keep layers thin and balanced for the best results.
Perfect Cuts Every Time
A sharp serrated knife or the dental floss trick makes clean slices simple. Wipe the knife between cuts to keep edges neat and the spiral visible.
Choose Sturdy Greens
If you’re using lettuce or spinach, go for firm, dry leaves. Romaine works better than spring mix, which wilts quickly and adds moisture. Always dry your greens well before layering.

Pinwheel Sandwiches for Picnic
Ingredients
Method
- 1. Make the Cream Cheese Spread: In a bowl, combine softened cream cheese and Italian seasoning. Add finely chopped, well-drained pepperoncini and tomato. Mix until smooth.
- 2. Prepare the Tortillas: Lay out tortillas. Warm in the microwave for 10 seconds if cold or stiff to prevent cracking.
- 3. Spread the Mixture: Spread 1/4 of the cream cheese mixture evenly over each tortilla, edge to edge.
- 4. Layer the Fillings: Add chopped romaine lettuce. Place three slices of provolone, then salami, then ham. Add 4–8 slices of pepperoni around the center stack.
- 5. Roll and Chill: Roll each tortilla tightly into a log. Wrap in plastic or secure with toothpicks. Refrigerate for at least 1 hour to set.
- 6. Slice and Serve: Trim ends. Cut into 1-inch slices using a serrated knife or dental floss for clean cuts.
Notes
Nutrition Facts (Per Serving)
- Calories: 163 kcal
- Carbohydrates: 4 g
- Protein: 9 g
- Fat: 12 g
- Saturated Fat: 6 g
- Polyunsaturated Fat: 1 g
- Monounsaturated Fat: 4 g
- Trans Fat: 1 g
- Cholesterol: 35 mg
- Sodium: 511 mg
- Potassium: 142 mg
- Fiber: 1 g
- Sugar: 1 g
- Vitamin A: 579 IU
- Vitamin C: 5 mg
- Calcium: 95 mg
- Iron: 1 mg
Conclusion
A great picnic pinwheel isn’t just about tasty fillings. It’s about structure, smart packing, and keeping everything fresh under the sun. That soggy wrap from last summer’s picnic? That was a design problem, not a recipe fail.
By using the Barrier Method to seal in moisture, picking heat-friendly ingredients, and stacking your rolls the right way, you’re no longer guessing. You’re prepared. Whether you’re heading to the beach, a park, or a mountaintop, your pinwheels will stay crisp, round, and ready to impress.
Ready to pack your cooler? Choose one of our picnic-proof recipes above, grab your dental floss for the perfect cut, and enjoy a mess-free outdoor feast with every bite.
Leave a Reply
You must be logged in to post a comment.