Refreshing Picnic Drink Recipes: What I Learned After 23 Batches and One Very Sticky Car
The Picnic That Changed Everything About How I Think About Beverages
Three summers ago, I packed what I thought was the perfect picnic for our family trip to Sauvie Island Beach. The sandwiches were wrapped tight. The pasta salad was chilled. The fruit was pre-cut and ready to go. I felt like a picnic professional. Then my daughter Emma, who was seven at the time, asked for something to drink about forty minutes into our setup. I reached into the cooler and pulled out the store-bought lemonade I had grabbed last minute from the grocery store. It was warm. Not lukewarm. Warm. Like, approaching room temperature warm.
Here’s what I had failed to consider: I had packed the drinks on top of everything else, thinking they would stay cold from the ice packs below. But heat rises, cold sinks, and basic physics doesn’t care about your picnic plans. By the time we were ready to eat, the lemonade tasted flat and sickeningly sweet. The sparkling water had gone completely still. My son Liam took one sip and declared it “gross,” which, while not helpful, was accurate.
That afternoon, sweating in the August sun with nothing refreshing to drink, I made myself a promise. I would figure out how to transport drinks that actually stayed cold and actually tasted good after hours in a cooler. What followed was nearly two years of testing, over twenty batches of various beverages, and one incident involving a punch that leaked all over my trunk that I still haven’t fully recovered from emotionally.
This article contains everything I learned. Every mistake. Every surprise. Every recipe that my family now requests by name.
Table Of Contents
- Why Homemade Picnic Drinks Are Worth the Extra Effort
- The Science of Keeping Drinks Cold Outdoors
- Classic Homemade Lemonade That Actually Survives the Heat
- Strawberry Basil Lemonade: The Recipe That Gets Requested Most
- Watermelon Mint Agua Fresca for Those Really Hot Days
- Infused Waters That Don't Taste Like Sad Fruit Soup
- Citrus Ginger Infused Water for When You Want Something With More Personality
- Hibiscus and Berry Agua Fresca: The Show-Stopper
- Non-Alcoholic Fruit Punch That Adults Actually Want to Drink
- Tropical Punch for Beach Picnics
- My Testing Methodology for Drink Recipes
- What Worked Across All My Tests
- What Didn't Work Despite My Best Efforts
- Transport and Serving Tips From Hard-Won Experience
- Make-Ahead Timelines I've Actually Tested
- Variations I've Tested for Different Preferences
- Conclusion: What These Drink Experiments Taught Me
- Frequently Asked Questions About Picnic Drinks
- How far in advance can I make these drinks without sacrificing flavor?
- What's the best way to keep drinks cold for more than four hours at a picnic?
- Can I substitute honey for sugar in these recipes without affecting the taste?
- Why do my infused waters taste bitter or bland?
- Is it safe to bring drinks with fresh fruit to outdoor events in summer heat?
- Can these recipes be scaled up for large gatherings without losing quality?
Why Homemade Picnic Drinks Are Worth the Extra Effort
I know what you’re thinking. Why not just freeze a few juice boxes and call it a day? I used to think the same thing. But after comparing homemade drinks to store-bought options across multiple picnics, the difference became impossible to ignore.
Store-bought drinks typically contain more sugar than you would ever add at home, which becomes especially noticeable when they warm up. That syrupy, cloying sweetness intensifies as the temperature rises. My homemade lemonades, on the other hand, actually taste better after an hour or two because the flavors have time to meld together. The herbs infuse more deeply. The fruit releases more juice. It’s counterintuitive, but it’s what I’ve observed repeatedly.
There’s also the practical matter of customization. Liam is extremely sensitive to tartness, so I need to be able to adjust the acid levels in real time. Marcus prefers his drinks less sweet than Emma and I do. Store-bought gives you one flavor profile with no flexibility. Homemade gives you control.
And honestly? There’s something about pulling out a big jar of jewel-toned punch or a pitcher of herb-infused water that makes a picnic feel like an event rather than just eating outside. My friend Julie still talks about the watermelon agua fresca I brought to her birthday picnic at Laurelhurst Park last June. You don’t get that kind of response from a six-pack of juice boxes.
The Science of Keeping Drinks Cold Outdoors
Before I share the recipes, I need to talk about temperature management, because the best recipe in the world means nothing if your drink tastes like warm bathwater by lunchtime.
I took a food safety certification course three years ago, and it fundamentally changed how I think about transporting anything perishable. The danger zone for bacterial growth sits between 40 and 140 degrees Fahrenheit. Most people know this applies to chicken salad and mayo-based dips. Fewer people realize it applies to drinks made with fresh fruit, dairy, or citrus.
Here’s what I discovered through obsessive thermometer testing: drinks in a well-packed cooler lose about 8 to 12 degrees over the first two hours, then stabilize if you keep the cooler closed. My Yeti hard-sided cooler maintains temperature better than my Coleman soft-sided one, but the Coleman is easier to carry, so I choose based on how far I’m walking. For Forest Park trail picnics, convenience wins. For Sauvie Island beach days where we’re setting up camp for six hours, performance wins.
The most effective method I’ve found involves pre-chilling everything. And I mean everything. The pitcher or jar goes in the refrigerator overnight. The drinks themselves get made the day before and refrigerated for at least twelve hours. If I’m using ice cubes in the drink itself, I add them right before leaving. If I’m keeping drinks in sealed containers, I surround them with frozen water bottles, which serve double duty as additional cold beverages once they thaw.
One mistake I made early on: putting room-temperature drinks into a cold cooler and expecting them to chill quickly. Coolers are insulators, not refrigerators. They maintain temperature; they don’t create it. I wasted so much perfectly good lemonade before I figured this out.
Classic Homemade Lemonade That Actually Survives the Heat
Let me start with the drink I’ve tested more than any other: basic lemonade. You would think this would be simple. Lemons, sugar, water, done. But after making this probably forty times over the years, I’ve learned that the details matter enormously.
The biggest variable is how you extract the lemon flavor. Squeezing juice gives you bright acidity but none of the aromatic oils from the peel. Making a simple syrup and adding lemon juice gives you sweetness but can taste one-dimensional. The method that finally worked for me involves muddling lemon peels with sugar before adding water, which releases the oils and creates a more complex flavor.
Here’s my process. I take six large lemons and use a vegetable peeler to remove wide strips of zest, avoiding the bitter white pith. I put the zest in a large bowl with one cup of granulated sugar and use a wooden spoon to muddle them together for about two minutes. The sugar should become fragrant and slightly yellow from the oils. I let this sit while I juice the lemons, which gives me about one cup of fresh juice.
Next, I add two cups of boiling water to the sugar and zest mixture, stirring until the sugar dissolves completely. This creates an intensely lemony syrup base. I strain out the zest, let the syrup cool to room temperature, then combine it with the lemon juice and four cups of cold water. This makes about two quarts.
The first time I made this, I served it immediately and thought it was good but not great. The second batch, which sat in my refrigerator overnight before our picnic at Mount Tabor Park, was transformatively better. The flavors had integrated. The tartness had mellowed slightly. Emma asked if I had added something different, but I hadn’t. Time was the only variable.
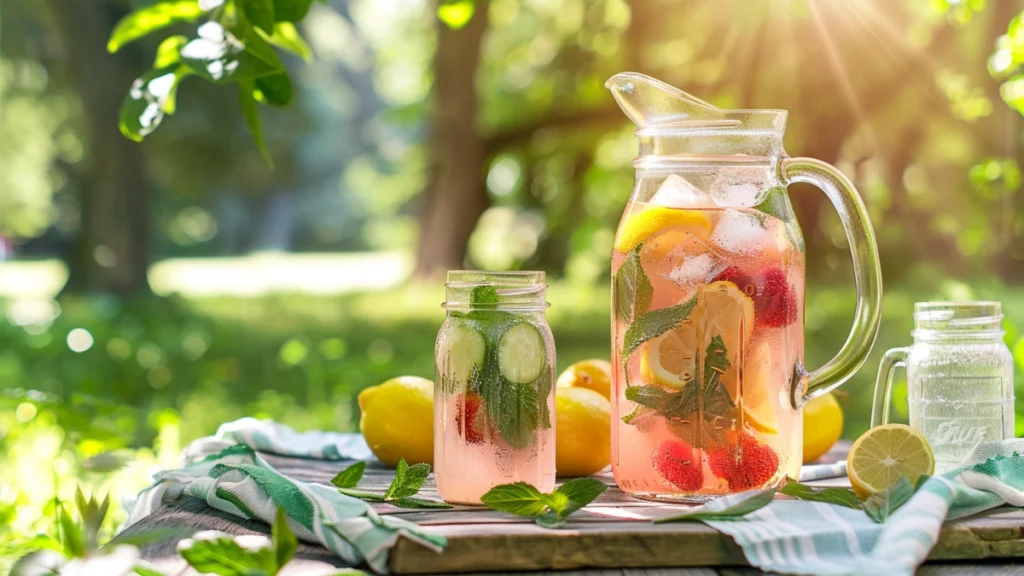
For picnic transport, I pour the lemonade into mason jars that I’ve frozen overnight with about an inch of water in the bottom. This creates an internal ice pack that chills from the inside while the ice packs in the cooler work from the outside. After four hours at a birthday party last August where the ambient temperature hit 86 degrees, the lemonade was still cold enough that condensation formed on the glass when I poured it.
Strawberry Basil Lemonade: The Recipe That Gets Requested Most
This variation happened by accident. I had extra strawberries that were starting to get soft and basil from our garden that needed to be used. I threw them into my standard lemonade base without any real plan, and it became the single most requested drink in my household.
I start with about two cups of hulled strawberries, roughly chopped. Overripe strawberries actually work better here because they’re sweeter and more fragrant. I add them to my basic lemonade base while it’s still warm, which helps break down the fruit and release more flavor. About fifteen large basil leaves go in at the same time. I let everything steep in the refrigerator for at least eight hours but preferably overnight.
Before packing for a picnic, I strain out the solids. This step is non-negotiable. I tried leaving the strawberry pieces in once, thinking they would look pretty, and they turned into sad, waterlogged mush by hour three. The drink looked like pink swamp water. Liam refused to touch it and honestly I don’t blame him.
The strained version, however, is gorgeous. It’s pale pink with a subtle herbaceous note that makes people stop and ask what they’re drinking. At a school end-of-year picnic last May, three different parents requested the recipe. One of them told me her kids drank more of my lemonade than they had consumed in total beverage volume all week, which I took as the highest possible compliment.
One note on basil: it oxidizes and turns dark after about twelve hours in the liquid. If you’re making this more than a day ahead, add the basil later in the steeping process. I learned this the hard way when I prepped too early for a Fourth of July picnic and ended up with brownish-gray specks floating throughout. Still tasted fine, but the visual was not appetizing.
Watermelon Mint Agua Fresca for Those Really Hot Days
Portland doesn’t get extremely hot very often, but when it does, temperatures can spike into the 90s and the humidity makes everything feel worse. For those days, I turn to agua fresca, which is essentially fresh fruit blended with water and a touch of sweetener.
I have tested this with cantaloupe, honeydew, cucumber, and watermelon. Watermelon wins by a significant margin for picnic purposes. It’s naturally sweeter, so you need less added sugar. It has a higher water content, so it blends smoother. And it maintains its flavor better than melon varieties, which I found got slightly funky after a few hours.
My recipe uses about six cups of cubed seedless watermelon, one cup of cold water, two tablespoons of honey, the juice of two limes, and about ten fresh mint leaves. Everything goes into the blender until completely smooth. Then I strain it through a fine-mesh sieve, which removes the foam and any fibrous bits.
The straining takes patience. Watermelon creates a lot of foam when blended, and if you pour too fast, the sieve clogs. I’ve found that letting it sit for about five minutes first allows the foam to rise and the clearer liquid to settle below. Then I skim off most of the foam and strain what’s underneath.
This agua fresca tastes best the same day it’s made. I’ve tried making it 24 and 48 hours ahead, and while it’s still drinkable, the watermelon flavor fades considerably. For a Saturday picnic, I prep everything Friday night but don’t blend until Saturday morning. Takes about fifteen minutes including cleanup.
The mint is essential but should be used sparingly. I added too much once, probably twenty leaves, and the drink tasted like flavored mouthwash. Ten leaves provides a cool background note without overwhelming the fruit.
Infused Waters That Don’t Taste Like Sad Fruit Soup
Infused water sounds so simple. Put fruit in water. Wait. Drink. In practice, it’s surprisingly easy to mess up. I’ve made infused waters that tasted like nothing. I’ve made versions that were unpleasantly bitter. I’ve made pitchers where the fruit turned into a slimy mess that nobody wanted to pour around.
After testing probably fifteen different fruit and herb combinations, I’ve identified the variables that matter most. First is time: too short and the water tastes like plain water with fruit floating in it; too long and you extract bitter compounds from peels and seeds. The sweet spot for most combinations is between four and eight hours of refrigerated steeping.
Second is preparation. Crushing or muddling herbs releases more flavor than dropping them in whole. Slicing citrus thin creates more surface area for flavor release. Softer fruits like berries should be lightly smashed to break the skin.
Third is temperature. Cold water extracts flavor more slowly but produces a cleaner taste. Room temperature water speeds extraction but can turn bitter more quickly. I always use cold water and give it adequate time.
My go-to combination for picnics is cucumber, lemon, and mint. I slice one English cucumber into thin rounds, removing any large seeds. I add one lemon sliced into wheels, and about eight mint leaves that I’ve clapped between my palms to bruise them. This goes into two quarts of cold filtered water and refrigerates overnight.
The result is subtle but remarkably refreshing. It doesn’t taste like juice or lemonade. It tastes like extraordinarily good water with gentle botanical notes. Marcus, who usually ignores any drink that isn’t coffee or plain water, voluntarily reaches for this at picnics.
For transport, I’ve tried multiple approaches. Straining out the solids works best for longer outings because the cucumber gets slimy after about six hours. Leaving everything in works fine for shorter picnics of three hours or less and looks more impressive visually. When I bring this to potlucks, I often leave the fruit in the pitcher because people comment on how pretty it looks.
Citrus Ginger Infused Water for When You Want Something With More Personality
This variation developed because I wanted infused water with more oomph than cucumber and mint. The ginger adds a slight tingle that makes the drink feel more substantial without adding sugar or calories.
I start with about two inches of fresh ginger, sliced thin. Fresh ginger is important here; ground ginger creates a cloudy, murky appearance and tastes medicinal. I add one orange sliced into half-moons, one lemon sliced thin, and half a lime sliced into wedges. Everything goes into two quarts of cold water.
This combination requires a longer steeping time than cucumber mint. I’ve found that twelve hours produces the best balance: you can taste the ginger without it being overpowering. At eight hours, the ginger barely registers. At 24 hours, it becomes too spicy for most people. Emma actually likes the 24-hour version, but she’s always been more adventurous with strong flavors than her brother.
The citrus oils in this recipe make it particularly sensitive to oxidation. If you steep too long at room temperature, it can develop off flavors. I always keep it refrigerated and never let it sit out for more than an hour or two before serving. At Liam’s soccer team picnic last spring, I kept this in the cooler until the very last minute, and several parents told me it was the best infused water they’d tasted.
Hibiscus and Berry Agua Fresca: The Show-Stopper
This is my fancy picnic drink. The one I bring when I want to impress people. It’s a deep ruby color, almost like red wine from a distance, and has a unique flavor that most people can’t immediately identify.
The base is hibiscus tea, which you can find as dried hibiscus flowers at Mexican grocery stores or in the specialty tea section of most supermarkets. I steep about half a cup of dried hibiscus flowers in four cups of boiling water for fifteen minutes, then strain and let cool completely.
While the tea cools, I blend one cup of raspberries with one cup of strawberries and half a cup of water. I strain this mixture to remove the seeds, which is tedious but necessary. Raspberry seeds stuck in teeth do not enhance the picnic experience.
I combine the hibiscus tea with the berry puree, add honey to taste (usually about three tablespoons), and the juice of two limes. The lime is crucial. Without it, the drink tastes flat despite being flavorful. The acid brightens everything and helps the berry flavor pop.
This recipe taught me something important about making drinks ahead. The hibiscus flavor intensifies the longer it sits, while the berry flavor fades. If you make it two days ahead like I did for one Fourth of July party, it ends up tasting almost entirely like hibiscus with just a suggestion of berry. For the best balance, I make it either the night before or the morning of the picnic.
The color does stain. I ruined a white cutting board and nearly ruined a white shirt learning this lesson. Use a colored pitcher and transport in leak-proof containers. If you’re serving kids, maybe provide straws instead of letting them pour it themselves.
Non-Alcoholic Fruit Punch That Adults Actually Want to Drink
Most fruit punches skew extremely sweet and clearly target children. I wanted something that would appeal to adults while still being appropriate for all ages. After six different versions, I developed a punch that Marcus drinks voluntarily, which I consider the ultimate test of adult approval.
The secret is using tea as the liquid base instead of juice or soda. I brew a pot of black tea, nothing fancy, just standard black tea, and let it cool completely. This adds tannins and slight bitterness that balances the fruit sweetness.
For a batch that serves about twelve people, I combine four cups of cold black tea, two cups of white grape juice, one cup of orange juice, the juice of two lemons, and one cup of mixed berries that I’ve lightly crushed. I sweeten to taste with honey, usually about two tablespoons. If I want bubbles, I add two cups of sparkling water right before serving.
The tea really does make a difference. I made a side-by-side comparison once, same punch with and without the tea base, and the tea version tasted more sophisticated. Less like something you’d serve at a children’s birthday party and more like something you’d be happy to drink at a dinner party.
For picnic transport, I keep everything except the sparkling water in a sealed container. Adding carbonation too early means it goes flat during transport. I bring a separate bottle of chilled sparkling water and combine them at the picnic site. Takes thirty seconds and ensures the bubbles are actually present when people drink it.
One batch of this punch, transported in my Yeti cooler with ice packs on all sides, stayed perfectly cold for nearly seven hours during an all-day event at the Oregon coast. The fog that day kept ambient temperatures around 65 degrees, which helped, but the cooler setup was the real hero.
Tropical Punch for Beach Picnics
Oregon’s coast isn’t exactly tropical, but there’s something psychologically satisfying about drinking tropical flavors while watching the ocean. This punch reminds me of vacations even when I’m just standing on the cold sand at Cannon Beach.
I blend two cups of frozen pineapple with one cup of frozen mango until smooth. The frozen fruit serves double duty: it creates a thick texture and keeps the punch cold longer. I add two cups of coconut water, not coconut milk, which makes it too heavy and separates unattractively. One can of cold pineapple juice goes in, plus the juice of three limes.
The lime juice is crucial for cutting through the sweetness. Without it, this punch tastes like liquid candy. With it, there’s a tartness that balances the tropical fruit and makes it genuinely refreshing rather than cloying.
I’ve tested this with fresh pineapple versus frozen, and frozen wins for picnics. Fresh pineapple contains enzymes that make the punch slightly fizzy as it sits, which some people find offputting. Frozen pineapple has been blanched before freezing, which deactivates those enzymes. The texture and flavor are essentially identical after blending.
Emma requests this punch specifically whenever we do beach picnics. She has started calling it “vacation juice,” which I find adorable. Liam drinks it too, though he complains if there are any visible fruit fibers, so I strain his portion more thoroughly.
My Testing Methodology for Drink Recipes
People sometimes ask how I know these drinks will work for their picnic. The answer is excessive testing. I am, perhaps, more obsessive about this than necessary, but after that original disaster at Sauvie Island, I refuse to be caught unprepared again.
For each drink recipe in this article, I made at minimum four batches over at least two different weekends. I tested them in different weather conditions, ranging from Portland’s typical 72-degree partly cloudy days to a genuinely hot 91-degree afternoon last August. I packed them in different containers and different cooler setups.
During testing, I use an instant-read thermometer to check temperature at departure, then again at two, four, and six hours. I write down my observations about flavor changes, appearance changes, and any separation or settling. I have a dedicated notebook for this. It lives in my kitchen and is filled with entries like “Watermelon agua fresca, batch 3, 84 degrees ambient, 6-hour mark: still cold but flavor noticeably flatter than 4-hour mark.”
My family participates too, though sometimes reluctantly. Marcus provides feedback on sweetness levels and whether he would drink something voluntarily. Emma gives honest opinions about flavor and is particularly good at identifying when something tastes “weird” in ways I can’t always articulate. Liam is my pickiness barometer. If he drinks it without complaint, I know I’ve achieved something genuinely approachable.
I also do comparison tests. Same recipe in a glass container versus plastic. Same recipe with different sweetener types. Same recipe made the night before versus the morning of. These side-by-side comparisons taught me things I never would have learned from single batches.
What Worked Across All My Tests
After all this testing, certain patterns emerged repeatedly. Drinks with a higher acid content, meaning more citrus juice or vinegar-based shrubs, maintained their flavor better than those relying only on sweetness and fruit. The acid seems to preserve brightness in a way that sugar alone does not.
Pre-chilling everything proved more important than I initially expected. A drink that starts at 38 degrees stays drinkable much longer than one that starts at 50 degrees, even with identical cooler setups. I now refrigerate my pitchers overnight and fill them with drinks that have also been refrigerated overnight.
Straining out solid ingredients created more reliable results than leaving them in. Yes, whole fruit looks pretty. But after four hours, it starts breaking down, releasing excess liquid that dilutes the drink and often creating unpleasant textures. For picnics longer than two hours, strain your drinks.
Glass containers maintain temperature better than plastic but weigh more and risk breaking. For most picnics, I compromise by using thick plastic pitchers with tight-sealing lids. For special occasions where appearance matters, I use glass and pack it carefully.
What Didn’t Work Despite My Best Efforts
Some things I tried repeatedly failed no matter what adjustments I made. Dairy-based drinks like horchata or lassi never transported well. Even with aggressive cooling, they developed off flavors after about two hours and separated unappetizingly by hour four. I’ve given up on bringing these to picnics and reserve them for home consumption only.
Drinks with fresh berries left whole, not blended or pureed, looked beautiful in photos but turned to mush in reality. Blackberries were especially problematic, becoming grainy and leaving purple sediment at the bottom of the container.
Anything carbonated lost its fizz during transport, no matter what I tried. The only solution is adding carbonation at the picnic site, which requires bringing sealed bottles of sparkling water separately. Mildly annoying but workable.
Green smoothie-style drinks oxidized and turned brownish gray within a couple hours. The taste wasn’t affected as dramatically as the appearance, but visual appeal matters, especially when trying to get kids to drink something.
Drinks sweetened with maple syrup developed strange flavors after several hours that I can only describe as “cooked” tasting. Honey and simple syrup both performed better for make-ahead applications.
Transport and Serving Tips From Hard-Won Experience
The leaking punch incident I mentioned earlier happened because I used a container with a flip-top lid that I trusted too much. The container had worked fine for water dozens of times. But punch is stickier than water, and the lid seal apparently couldn’t handle it. I now test any container with the actual drink I plan to transport, not just plain water, before bringing it in the car.
For serving at the picnic site, I bring paper cups rather than asking people to drink directly from shared containers. This isn’t about germophobia; it’s about portion control. When people pour their own cups, the drinks last longer because they take reasonable amounts. When passing a pitcher around, someone inevitably drinks half the contents in one go.
I position drinks in the center of the cooler rather than along the sides. The center stays coldest longest because it’s insulated by everything around it. Drinks along the edges warm up faster, especially if the cooler is opened and closed frequently.
For really hot days, I freeze some of the drink itself into ice cubes and add them to the pitcher. As they melt, they keep the drink cold without diluting the flavor. This works especially well for lemonades and agua frescas that can handle getting slightly more watered down without losing their character.
Make-Ahead Timelines I’ve Actually Tested
These timelines are based on my actual experience, not estimates or guesses.
Lemonades can be made up to three days ahead and stored in the refrigerator. They actually improve over the first 24 hours as flavors meld. After 72 hours, the citrus starts tasting slightly stale, so I wouldn’t push it further.
Infused waters work best when steeped for eight to twelve hours and consumed within 24 hours of straining. I’ve pushed this to 48 hours with cucumber mint, and while it was still drinkable, the flavor had faded noticeably.
Fruit punches vary depending on ingredients. The tea-based punch keeps well for about 48 hours. The tropical punch should be consumed the same day because the frozen fruit texture degrades after thawing completely.
Agua frescas are best consumed within 12 hours of making. The watermelon version in particular tastes dramatically different, and not in a good way, after overnight refrigeration. For Saturday picnics, I blend Saturday morning.
Variations I’ve Tested for Different Preferences
For guests who prefer less sweetness, I make a separate batch using only half the specified sweetener and offer it alongside the standard version. At most picnics, both versions empty at similar rates, suggesting that about half of people prefer things less sweet than typical recipes call for.
For kids who are picky about texture, thorough straining solves most problems. Liam has rejected drinks because of a single visible raspberry seed. I now strain his portions through a fine-mesh sieve lined with cheesecloth, which catches everything.
For hot weather, freezing a portion of the drink into ice cubes that melt slowly works better than simply adding more regular ice, which dilutes flavors quickly. I’ve also successfully made lemonade popsicles from my basic recipe and transported them in a well-insulated container for particularly hot days.
For visual impact at parties, I sometimes freeze edible flowers, berries, or citrus slices into large ice blocks using a bread loaf pan. One of these blocks floating in a punch bowl looks impressive and keeps drinks cold for hours longer than standard ice cubes.
Conclusion: What These Drink Experiments Taught Me
Looking back at nearly two years of obsessive drink testing, I’ve learned something that applies beyond beverages. The difference between “good enough” and “genuinely good” often comes down to details that seem minor until you pay attention to them. Temperature management matters. Timing matters. The right container matters. None of these things are complicated, but they require intention and planning.
My family’s picnics transformed once I started treating drinks as seriously as food. The kids stay better hydrated because they actually want to drink what I bring. Marcus no longer reaches for his phone to order delivery because he’s thirsty and the drinks are undrinkable. And I’ve stopped that particular form of picnic anxiety where you pack everything perfectly but forget that people also need something to drink.
The recipes in this article represent hundreds of hours of testing, dozens of failed batches, and one very memorable incident of punch leaking all over my trunk that I will never fully live down. I hope they save you from some of my mistakes while giving you a foundation to experiment with your own variations.
If you try any of these and discover something that works better, I genuinely want to know. Food writing should be a conversation, not a monologue. And if you bring one of these drinks to your next picnic and someone asks for the recipe, tell them about the testing that went into it. The best compliment I’ve ever received came from a woman at Laurelhurst Park who said, “You can tell someone actually made this more than once.” That’s what I hope all my recipes communicate: they’ve been lived with, not just written down.
Now go fill your cooler with something worth drinking. Your next picnic is waiting.
Frequently Asked Questions About Picnic Drinks
How far in advance can I make these drinks without sacrificing flavor?
Based on my testing, most lemonades and tea-based punches hold up beautifully for 48 to 72 hours in the refrigerator. Infused waters are best within 24 hours after straining, as the flavors continue to develop and can become bitter or fade completely depending on the ingredients. Agua frescas really need to be made within 12 hours of serving because the fresh fruit flavors deteriorate noticeably. I’ve pushed these limits in various experiments, and while the drinks remain safe to consume, the taste quality drops enough that I wouldn’t serve them to guests.
What’s the best way to keep drinks cold for more than four hours at a picnic?
The most effective method I’ve discovered involves triple-layering your cold strategy. First, pre-chill absolutely everything, including the drinks, the container, and the cooler itself if possible. Second, surround your drink container with frozen water bottles rather than loose ice, which can leak and create a mess. Third, use some of the drink itself frozen into ice cubes that melt into the beverage rather than diluting it with plain water ice. Using this approach, I’ve maintained safe temperatures for over seven hours even on days when the ambient temperature exceeded 85 degrees.
Can I substitute honey for sugar in these recipes without affecting the taste?
Yes, but with some caveats. Honey adds its own flavor profile, which works beautifully in citrus-based drinks but can taste strange in berry-focused recipes. Honey also doesn’t dissolve as easily in cold liquid, so you’ll want to dissolve it in a small amount of warm water first, then add to your cold drink base. In my testing, I’ve found that honey requires about 25 percent less volume than granulated sugar to achieve the same sweetness level, so if a recipe calls for one cup of sugar, start with three-quarters cup of honey and adjust from there.
Why do my infused waters taste bitter or bland?
Bitterness usually comes from steeping too long or using too much citrus peel. The white pith on citrus fruits contains bitter compounds that release into water after about eight hours. To avoid this, slice citrus thinly and remove any pith you can see, or simply use the fruit flesh without the peel. Bland infused waters result from insufficient steeping time or using too little fruit. I’ve found that most people under-estimate how much fruit they need; as a general rule, use about one cup of prepared fruit or vegetables per quart of water, and let it steep for at least six hours in the refrigerator.
Is it safe to bring drinks with fresh fruit to outdoor events in summer heat?
Yes, as long as you follow basic food safety practices. Keep drinks at or below 40 degrees Fahrenheit using a well-packed cooler with adequate ice packs. Don’t leave drinks sitting out in the sun for extended periods; instead, keep them in the cooler and pour individual servings as needed. If your drink has been sitting above 40 degrees for more than two hours, particularly on hot days, it’s safest to discard it rather than risk consuming something that may have begun bacterial growth. The thermometer I use cost about twelve dollars and has probably saved me from multiple foodborne illness situations over the years.
Can these recipes be scaled up for large gatherings without losing quality?
Scaling up generally works fine, though you may need to adjust sweetness and acid levels slightly. When I’ve made my lemonade recipe in quadruple batches for school events, I’ve noticed that the sweetness sometimes needs a small reduction because the flavors concentrate differently in larger volumes. I recommend making your first large batch a day or two before your event so you can taste and adjust before you’re committed. Also consider how you’ll transport and serve larger quantities; I’ve found that multiple medium containers work better than one enormous one, both for keeping everything cold and for practical serving logistics.