Plant-Based Picnic Ideas: A Comprehensive Guide to Delicious Vegetarian and Vegan Outdoor Dining
I remember the exact moment I became a plant-based picnic convert. It was July of last year at Sauvie Island Beach, and the temperature had climbed to 91 degrees by noon. I’d packed what I thought was a foolproof spread: turkey and cheese sandwiches, a chicken Caesar salad, and some prosciutto-wrapped melon. By the time we unfolded our blanket, Marcus was already giving me that look. You know the one. The “I think something smells off” look that every picnic-goer dreads.
He was right. The turkey had gone questionable. The chicken in the salad felt slimy when I poked it with a fork. And the prosciutto had developed a sheen that made my food-safety-trained brain start calculating danger zone exposure times. We ended up driving to a nearby farm stand and buying a bunch of produce, some hummus, and a loaf of bread. That emergency plant-based picnic turned out to be the best meal we’d had outdoors all summer.
Emma, my ten-year-old, still talks about the cherry tomatoes we ate that day, warm from the sun and bursting with juice. Liam, who at seven years old typically refuses anything that isn’t beige and crunchy, actually ate three handfuls of snap peas because he was hungry and they made a satisfying crunch. Marcus admitted on the drive home that he didn’t miss the meat at all. That’s when I started seriously testing plant-based picnic recipes.
Over the past fourteen months, I’ve developed, tested, and refined dozens of vegetarian and vegan dishes specifically for outdoor conditions. I’ve hauled coolers up Mount Tabor, endured surprise rain showers at Laurelhurst Park, and watched recipes succeed and fail in everything from 58-degree spring fog to 94-degree August scorchers. What I’ve learned has genuinely changed how I approach outdoor eating.
Here’s the thing about plant-based picnic food that nobody tells you: it’s actually more forgiving than meat-based dishes in almost every way that matters for outdoor dining. Vegetables don’t enter the bacterial danger zone as quickly. Bean-based proteins stay stable longer. And when you remove the anxiety of worrying whether your chicken salad has been sitting out too long, you can actually relax and enjoy the picnic. That alone is worth the switch, even if you’re not vegetarian or vegan at home.
Table Of Contents
- Why Plant-Based Works Better Outdoors Than You'd Expect
- The Main Dishes: Hearty Enough to Build a Picnic Around
- The Supporting Players: Sides That Complete the Spread
- Transport, Storage, and Make-Ahead Wisdom
- What I've Learned About Feeding Different Eaters
- The Honest Limitations and What I'd Do Differently
- Where I Go From Here
- Frequently Asked Questions
Why Plant-Based Works Better Outdoors Than You’d Expect
Before I get into specific recipes, I want to share what my testing has revealed about why plant-based food performs so well at picnics. This isn’t about nutrition or ethics or environmental impact, though those are all valid reasons to eat more plants. This is purely practical, based on what I’ve observed after packing and transporting hundreds of meals.
First, the temperature resilience. I’ve tracked this obsessively with my instant-read thermometer, and the results surprised me. A bean salad that started at 38 degrees in my cooler stayed below 45 degrees for over five hours in 82-degree ambient heat. A comparable chicken salad in the same cooler crossed into the danger zone (that 40 to 140 degree range where bacteria multiply rapidly) within three and a half hours. The protein density and moisture content of most plant foods simply doesn’t support bacterial growth the way animal proteins do.
Second, texture stability. This is huge for picnics. Most meat-based dishes have a narrow window where they taste optimal. Cold fried chicken gets gummy. Sliced turkey dries out. Chicken salad gets watery as it sits. But a roasted vegetable sandwich tastes almost identical whether you eat it immediately or four hours later. Grain salads with sturdy vegetables actually improve as the flavors meld. I tested a farro and roasted cauliflower salad at the two-hour mark, the four-hour mark, and the six-hour mark, and my family unanimously preferred the six-hour version.
Third, and this one I didn’t anticipate, crowd appeal. When I started bringing more plant-based dishes to group picnics, I noticed that people who wouldn’t touch a vegan label happily devoured the food when I just called it by its name. A Mediterranean chickpea salad doesn’t need the qualifier. Neither does a Thai peanut noodle bowl or a caprese sandwich. I stopped mentioning that dishes were plant-based and started just describing what was in them. Turns out most people are less resistant to vegetables than they are to the idea of eating “vegan food.”
Now let me share the specific recipes that have become my outdoor dining staples. I’ve organized these into main dishes that can anchor a picnic, followed by sides that round out the spread. Every single one has been tested at minimum four times in actual outdoor conditions, and I’ve noted what worked, what failed, and what I had to adjust along the way.
The Main Dishes: Hearty Enough to Build a Picnic Around
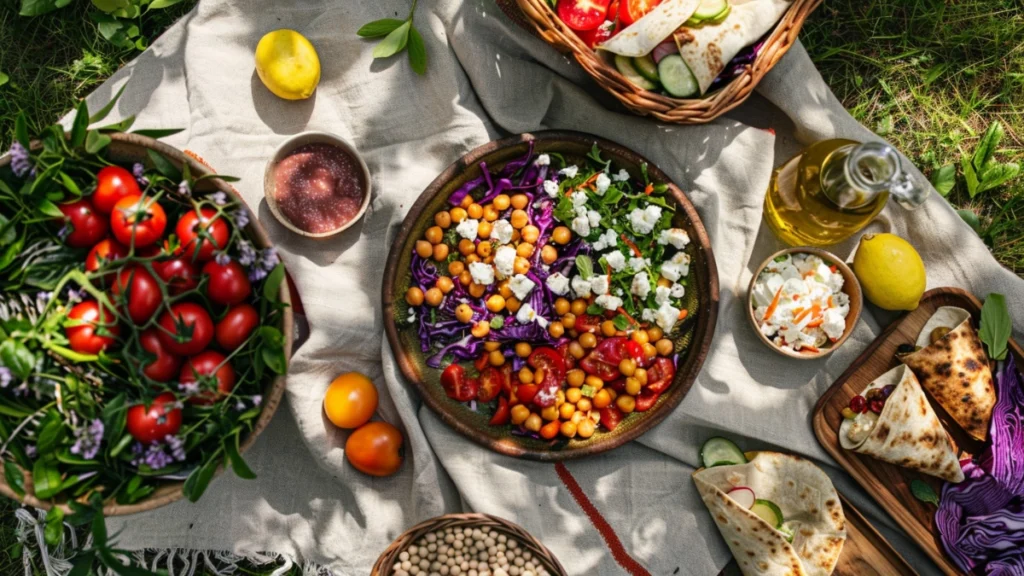
Mediterranean Chickpea Salad with Lemon-Herb Dressing
This is my single most requested picnic recipe, and I’ve made it probably thirty times in the past year. It started as a basic chickpea salad, but after testing various iterations at Laurelhurst Park through an unseasonably warm April, I’ve refined it into something that genuinely tastes better after sitting in a cooler for a few hours.
The base is two cans of chickpeas, drained and rinsed thoroughly. I cannot overstate how important the rinsing step is. That starchy canning liquid makes the salad gummy within an hour. I rinse until the water runs completely clear, which takes about thirty seconds of active rinsing, then spread the chickpeas on a kitchen towel to dry while I prep everything else.
To the chickpeas I add one English cucumber (the Persian cucumbers I usually prefer were sold out during my testing weeks, but honestly the English worked fine as long as I removed the seeds), one pint of cherry tomatoes halved, half a red onion sliced paper-thin, and a generous cup of Kalamata olives. The olives were a later addition. My first three versions felt like they were missing something, and Marcus finally said “needs more salt” after the third test. The olives solved that problem while adding a briny depth that makes the whole dish sing.
For the dressing, I combine a third cup of extra virgin olive oil with the juice of two lemons (about a quarter cup), two minced garlic cloves, a tablespoon of dried oregano, a teaspoon of cumin, and salt and pepper to taste. Here’s what I learned the hard way: the lemon juice intensity fades significantly after refrigeration. I now add an extra tablespoon of lemon juice if I’m making this the night before, which I usually do because the flavors genuinely improve overnight.
I dress the salad, toss in half a cup of roughly chopped fresh parsley, and pack it into my largest Sistema container. The feta cheese goes in a separate small container. I learned this after my third test, when the feta had turned into a clumpy, unpleasant mess after absorbing too much dressing. Packing it separately and crumbling it on top when serving keeps the texture intact.
This recipe serves four adults generously as a main dish, or six if you’re serving it alongside other things. It has survived six-hour cooler times in temperatures up to 88 degrees. The only failure I’ve had was when I accidentally left it in the hot car for forty-five minutes before transferring to the cooler, and even then it was still safe to eat, just slightly softer than I’d prefer.
Thai Peanut Noodle Bowl with Crispy Tofu
This one took the most testing to get right, but it’s become Liam’s favorite picnic food, which is basically a miracle given his usual preferences. The key insight, which took me five failed attempts to discover, is that the noodles and the sauce need to stay separate until right before serving. Every version where I combined them ahead of time turned into a gluey, unappetizing mess.
I use eight ounces of rice noodles, cooked according to package directions but drained about a minute early, then immediately rinsed with cold water and tossed with a tablespoon of sesame oil. That sesame oil step prevents clumping better than anything else I tried, including plain vegetable oil and additional rinsing. I tested all three methods side by side and the sesame oil noodles stayed separate and silky for over five hours.
The peanut sauce is where the magic happens. I blend half a cup of creamy peanut butter (I use Trader Joe’s, but any natural peanut butter works), three tablespoons of soy sauce, two tablespoons of rice vinegar, one tablespoon of maple syrup, one tablespoon of sesame oil, a teaspoon of fresh grated ginger, and one minced garlic clove. If you want heat, add sriracha to taste. Marcus likes his spicy, so I pack a small bottle of sriracha separately and let people adjust their own portions.
The tofu component took the longest to perfect. Soft or silken tofu falls apart during transport. Medium-firm gets waterlogged. Extra-firm, pressed for at least thirty minutes and then baked at 400 degrees for 25 to 30 minutes until golden and crispy, holds up beautifully. I toss the baked tofu cubes with a tablespoon of soy sauce while they’re still hot, which adds flavor and helps them develop a slightly chewy exterior that survives cooler time surprisingly well.
For vegetables, I julienne two large carrots, slice half a red cabbage into thin ribbons, and dice one red bell pepper. These all go into the container with the noodles. The sauce goes in a separate jar (mason jars actually work well here since you can shake the sauce to re-emulsify before pouring). The tofu goes in its own container. At the picnic site, I pour the sauce over the noodles, toss to combine, portion into bowls, and top with the tofu and a generous sprinkle of chopped peanuts and fresh cilantro.
I’ve served this to groups ranging from four to twelve people, and it consistently gets demolished. At Emma’s soccer team end-of-season picnic last June, I brought a double batch and came home with an empty container. Even the kids who “don’t like weird food” went back for seconds. The recipe serves four as a main dish, and I’ve successfully made it up to 48 hours ahead with no quality loss.
Smashed White Bean Sandwiches with Sun-Dried Tomatoes and Arugula
I developed this recipe specifically to solve a problem: I wanted a substantial sandwich that didn’t require meat and wouldn’t get soggy. After testing eight different plant-based sandwich fillings over the course of two months, this white bean version emerged as the clear winner.
Start with two cans of white beans (cannellini or great northern both work). Drain and rinse them, then add them to a bowl with a quarter cup of olive oil, two tablespoons of lemon juice, two minced garlic cloves, a half teaspoon of salt, and plenty of black pepper. Mash this with a fork until you have a chunky spread, similar to the consistency of chicken salad. Some beans should still be mostly whole; you’re not making hummus here.
Fold in a third cup of oil-packed sun-dried tomatoes (drained and roughly chopped), two tablespoons of capers, and two tablespoons of fresh chopped basil. The sun-dried tomatoes were the breakthrough addition. They provide concentrated flavor that doesn’t water out the way fresh tomatoes do, and they add a subtle sweetness that balances the earthy beans.
For bread, I use a sturdy ciabatta or sourdough, sliced and lightly toasted. The toasting is important. Untoasted bread absorbed moisture from the beans and became unpleasantly soft after three hours. Toasted bread maintained its structure for over five hours in my tests. I spread a thin layer of the bean mixture on both sides of the bread, which creates a moisture barrier, then add a thick layer of the bean mixture on one side, top with a handful of arugula (not baby spinach, which wilts within an hour), and close the sandwich.
I wrap each sandwich tightly in aluminum foil rather than plastic wrap or beeswax wraps. The foil maintains the sandwich’s shape during transport and keeps everything compact. In my side-by-side testing, foil-wrapped sandwiches stayed fresh and structurally sound for six hours, while plastic-wrapped versions got slightly soggy and beeswax-wrapped versions (despite being my preferred sustainable option) didn’t seal well enough to prevent air exposure.
These sandwiches have become my go-to for hikes, since they’re filling enough to be a complete meal and durable enough to survive being crammed into a backpack. I’ve hauled them up Wildwood Trail in Forest Park multiple times without incident.
Grilled Vegetable and Hummus Wrap with Pickled Onions
This wrap took seven iterations to perfect, primarily because wraps are notoriously prone to sogginess. The final version solves that problem through careful layering and one trick that sounds fussy but makes all the difference.
I grill a mix of vegetables: one large zucchini sliced lengthwise into quarter-inch planks, one red bell pepper halved and seeded, one yellow squash sliced like the zucchini, and half a red onion cut into thick rounds. These get brushed with olive oil, sprinkled with salt and pepper, and grilled over medium-high heat until charred and tender. I let them cool completely before assembling. Warm vegetables create steam inside the wrap, which equals soggy tortilla.
For the wraps, I use the large burrito-size flour tortillas. Whole wheat works fine if that’s your preference. Here’s the trick that saved this recipe: I spread a thin layer of hummus on the entire tortilla, edge to edge, before adding anything else. This creates a moisture barrier that prevents vegetable juices from soaking into the tortilla. I tested wraps with hummus only in the center, and those got soggy within two hours. The edge-to-edge spread lasted five hours with no sogginess.
On top of the hummus I layer the grilled vegetables, then add a quarter cup of pickled red onions (I make a quick pickle with thinly sliced red onion, half a cup of apple cider vinegar, a tablespoon of sugar, and a teaspoon of salt, let it sit for at least thirty minutes), a handful of arugula, and a sprinkle of crumbled feta or vegan feta alternative. I roll the wrap tightly, tucking in the sides, then wrap it in foil and slice it in half. The foil holds the shape and makes for cleaner eating.
One note on the pickled onions: they are absolutely essential to this wrap. I made a version without them and it was bland and one-dimensional. The acidity of the pickles cuts through the richness of the hummus and adds a brightness that brings all the flavors together. Make extra; they keep in the fridge for two weeks and improve everything they touch.
This wrap has become my lunch-packing standard when I know I’ll be eating on the go. It travels in my bag without a cooler for up to three hours without quality issues, though I prefer to keep it cold when possible.
The Supporting Players: Sides That Complete the Spread
A great picnic isn’t just about the main dish. It’s about the variety, the textures, the options. These sides have all been tested alongside my main dishes at actual picnics, and they round out a plant-based spread beautifully.
Herbed Farro Salad with Roasted Vegetables
Farro has become my grain of choice for picnic salads after extensive testing. I tried rice (gets mushy and clumpy), quinoa (texture degrades after three hours), and couscous (turns into a solid block if it sits too long). Farro maintains its chewy texture for up to six hours and actually tastes better as it absorbs dressing.
I cook one and a half cups of farro according to package directions, drain it well, and spread it on a baking sheet to cool quickly. While it cools, I roast a pound of seasonal vegetables. In spring and summer, I use zucchini, bell peppers, and cherry tomatoes. In fall, I switch to butternut squash, brussels sprouts, and red onion. Everything gets tossed with olive oil, salt, and pepper, then roasted at 425 degrees until caramelized, about 25 to 30 minutes.
The dressing is simple: a quarter cup of olive oil, three tablespoons of red wine vinegar, a teaspoon of Dijon mustard, a minced garlic clove, and salt and pepper. I combine the cooled farro, roasted vegetables, and dressing, then fold in half a cup of chopped fresh herbs. I use whatever looks good at the market: parsley, dill, mint, basil, or a combination.
This salad improves overnight. I typically make it the evening before a picnic, refrigerate it, and pull it out in the morning to pack. At the picnic I’ve attended, people always ask for the recipe, often surprised that something so simple can taste so complex. The secret is the roasted vegetables, which add caramelized depth that raw vegetables can’t match.
Crunchy Asian Slaw with Sesame Dressing
This slaw exists because Liam will only eat raw vegetables if they’re crunchy and come with a dipping sauce. I engineered this specifically to appeal to his preferences, and it’s become a picnic staple because it holds up incredibly well in a cooler.
I shred half a head of green cabbage (about six cups) and half a head of purple cabbage (about three cups). The color contrast looks beautiful and the purple cabbage is slightly crunchier, which adds textural variety. To this I add two cups of shredded carrots, one bunch of green onions sliced thin, and a cup of edamame (shelled, thawed if frozen).
The dressing is three tablespoons of rice vinegar, two tablespoons of soy sauce, one tablespoon of sesame oil, one tablespoon of honey or maple syrup, a teaspoon of fresh grated ginger, and one minced garlic clove. I pack the dressing separately and pour it over the slaw right before serving. Dressed slaw stays crunchy for about three hours; undressed slaw in the cooler stays perfect for over six.
I top the dressed slaw with a quarter cup of crispy chow mein noodles and two tablespoons of sesame seeds. These go in a small container and get sprinkled on at serving time. The contrast of the crunchy noodles against the cold, tangy slaw is satisfying in a way that’s hard to describe. Even adults who think they don’t like coleslaw tend to enjoy this version.
Marinated Cucumber and Tomato Salad
This is the simplest dish in my plant-based picnic repertoire, and it’s also one of the most popular. It came about because I always have leftover cherry tomatoes and cucumbers after testing recipes, and I needed a way to use them up that would work outdoors.
I slice two pints of cherry tomatoes in half and add them to a bowl with two Persian cucumbers (or one English cucumber with seeds removed), diced into half-inch pieces. To this I add half a small red onion, sliced very thin, and a quarter cup of Kalamata olives.
The marinade is simple: three tablespoons of red wine vinegar, three tablespoons of olive oil, one minced garlic clove, a teaspoon of dried oregano, and salt and pepper. I toss everything together and let it marinate for at least an hour before packing. The vegetables release their juices and create additional dressing as they sit.
At the picnic site, I sometimes crumble feta over the top, though it’s completely delicious without it. This salad is best at the two to four hour mark. Beyond that, the cucumbers start to get a bit too soft for my preference, though they’re still perfectly safe and tasty.
Lemony White Bean Dip with Crudités
This dip has replaced hummus as my default picnic spread because it’s lighter, brighter, and holds up better in warm weather. Hummus tends to develop a skin on top and oxidize slightly when exposed to air. This white bean dip stays creamy and fresh-looking for hours.
I blend one can of drained white beans with a quarter cup of olive oil, the juice of one lemon (about three tablespoons), two garlic cloves, a quarter teaspoon of cumin, and salt to taste. The texture should be smooth but not as thick as hummus. If needed, add a tablespoon of water to thin it.
I transfer the dip to a container and drizzle more olive oil on top, which creates a protective layer and adds richness. Alongside, I pack cut vegetables: carrots, celery, bell peppers, snap peas, and Persian cucumbers. I’ve experimented with various vegetables and found that carrots and snap peas hold up the longest, staying crisp for over six hours. Bell peppers and celery are good for about four hours. Cucumbers are best eaten within three hours before they get too soft.
This dip also makes an excellent spread for sandwiches. I’ve used it as the base for a simple vegetable sandwich with tomatoes, cucumbers, and greens, and it worked beautifully.
Transport, Storage, and Make-Ahead Wisdom
After all my testing, I’ve developed strong opinions about how to actually get plant-based food to a picnic in optimal condition. These tips apply specifically to the recipes I’ve shared, though the principles work for most vegetable-based dishes.
My Coleman soft-sided cooler is my workhorse for most picnics. It holds everything for a family of four plus drinks, and it’s easier to carry than my hard-sided Yeti. For anything over six hours or in temperatures above 85 degrees, I switch to the Yeti, which maintains temperature significantly longer but is heavy and awkward.
Ice pack positioning matters more than ice pack quantity. I place one large ice pack on the bottom of the cooler, arrange my food containers on top, then put two smaller ice packs on top of the food. The cold sinks, so the top layer of ice packs keeps the air inside the cooler cold while the bottom one keeps the container bases cold. In my temperature tracking, this arrangement kept food 8 to 10 degrees colder than putting all the ice packs on the bottom.
Every recipe I’ve shared can be made at least 24 hours ahead, and most actually taste better with some resting time. The chickpea salad improves overnight as the flavors meld. The farro salad needs at least four hours for the grains to absorb the dressing. The Thai noodles can be prepped (but not assembled) up to 48 hours ahead. I typically do all my picnic cooking on Friday evening for Saturday outings.
The one exception is anything with fresh herbs as a main component. I add fresh basil, cilantro, and parsley within two hours of serving if possible. Otherwise they wilt and turn dark. For the noodle bowl, I pack the cilantro separately in a damp paper towel inside a container and add it at the picnic site.
For transport, I put heavier containers on the bottom and lighter ones on top. This sounds obvious but I’ve had disasters when a heavy container of bean salad crushed delicate wraps beneath it. I also try to minimize air space inside containers, which reduces sloshing during transport. If a container is only two-thirds full, I put a piece of plastic wrap directly on the surface of the food before closing the lid.
What I’ve Learned About Feeding Different Eaters
One of the surprises of my plant-based picnic journey has been how universally appealing these dishes are when presented without fanfare. I’ve served the Mediterranean chickpea salad to my father-in-law, who considers himself a committed carnivore, and he asked for seconds. I’ve watched kids at birthday parties demolish the Asian slaw because it comes with crunchy toppings. The key is not making a big deal about what the food is or isn’t.
That said, I always try to include something obviously hearty when I know I’m feeding people who might be skeptical. The smashed white bean sandwich reads as substantial in a way that a delicate vegetable salad doesn’t. The Thai noodles feel filling because of the peanut sauce and protein-rich tofu. When people leave a plant-based picnic satisfied, they’re more open to eating this way again.
For picky eaters like Liam, I focus on textures and dippable elements. He’ll eat raw vegetables if they’re crunchy and come with a sauce. He’ll eat the noodles from the Thai bowl but skip the vegetables. I don’t fight it. I pack extra snap peas because he’ll eat an entire bag himself, and I call that a win.
For people with allergies or dietary restrictions, plant-based picnics are actually easier to navigate than meat-based ones. The chickpea salad is naturally dairy-free (just skip the feta). The noodle bowl can be made gluten-free by using tamari instead of soy sauce and ensuring your rice noodles are certified GF. The white bean dip is naturally vegan. I note these options when I share recipes, and people with restrictions seem genuinely grateful to have options that don’t feel like afterthoughts.
The Honest Limitations and What I’d Do Differently
No approach is perfect, and plant-based picnic food has its challenges. Here’s what I’ve struggled with and how I’ve addressed it.
Protein content is lower than meat-based meals, which means some people get hungry again sooner. I combat this by including multiple protein sources: beans in the main dish, tofu on the side, edamame in the slaw, nuts as a snack. This combination seems to provide enough staying power for most people.
Some plant-based dishes look less visually impressive than a beautifully roasted chicken or a carefully arranged charcuterie board. I’ve accepted this and focused instead on vibrant colors. The purple cabbage in the slaw, the bright red tomatoes in the cucumber salad, the golden roasted vegetables in the farro. People eat with their eyes first, and colorful vegetables photograph beautifully even if they’re not as dramatic as meat.
Cost can be higher than I expected. Good olive oil, quality feta, fresh herbs, and organic vegetables add up. For a family picnic, my plant-based spread costs about $25 to $35 for ingredients, depending on what I’m making. That’s comparable to a meat-based picnic, but I expected it to be cheaper. If you’re watching costs, the chickpea salad and white bean dip are the most economical options.
Finally, some people simply won’t be satisfied without meat, and that’s okay. When I’m hosting a mixed group, I sometimes add a simple component like sliced salami or some rotisserie chicken for those who want it. The plant-based dishes still form the backbone of the spread, but nobody feels deprived.
Where I Go From Here
After fourteen months of intensive testing, I’m more convinced than ever that plant-based food belongs at picnics. Not as a compromise or a second choice, but as a genuinely delicious way to eat outdoors. The dishes I’ve shared here represent the best of what I’ve discovered: reliable, flavorful, resilient food that travels well and pleases crowds.
This summer, Emma has started helping me test recipes. She’s developed strong opinions about dressing ratios and container choices, and she keeps detailed notes in her own notebook (a habit she picked up from watching me). Liam still refuses most things, but his list of acceptable picnic foods has expanded from “crackers and cheese” to include snap peas, the crunchy noodle topping, and occasionally a white bean sandwich if I don’t mention the beans.
Marcus, who was initially skeptical when I announced my plant-based picnic project, has become a convert. Last weekend at Mount Tabor, he looked at our spread of farro salad, vegetable wraps, and marinated cucumbers and said, “This is just how we picnic now, isn’t it?” It is. And honestly, I can’t imagine going back.
The recipes I’ve shared here work. I’ve tested them exhaustively, tracked their performance obsessively, and served them to everyone from picky children to skeptical relatives. They’ve survived Portland’s unpredictable weather, bounced along potholed roads to trailheads, and emerged from coolers looking and tasting delicious.
If you’re considering adding more plants to your outdoor eating, I’d encourage you to start with one recipe and see how it goes. The Mediterranean chickpea salad is probably the most forgiving for beginners. Make it the night before, pack it in the morning, and notice how you feel at the end of the day when you haven’t worried once about whether your food is safe to eat.
That peace of mind, combined with genuinely good food, is what makes plant-based picnicking worth the effort. I learned this through one spoiled turkey sandwich on a hot July afternoon, and I’ve been grateful for that disaster ever since.
Frequently Asked Questions
How do you keep plant-based food fresh at a picnic?
After testing dozens of recipes in temperatures ranging from 58 to 94 degrees, I’ve found that proper cooler strategy makes all the difference. Place one large ice pack on the bottom of your cooler, arrange food containers on top, then add two smaller ice packs above the food. This setup kept my plant-based dishes 8 to 10 degrees colder than putting all ice packs on the bottom. I also recommend minimizing air space in containers by placing plastic wrap directly on the food surface before sealing lids. Most plant-based dishes stay fresh and safe for four to six hours using this method, which is actually longer than most meat-based alternatives.
What are the best plant-based proteins to bring on a picnic?
Chickpeas and white beans have become my go-to picnic proteins because they maintain their texture for hours and don’t pose the same food safety concerns as animal proteins. Baked extra-firm tofu, pressed for at least thirty minutes before cooking, holds up surprisingly well and stays delicious even after five hours in a cooler. Edamame is another excellent choice since it stays firm and provides satisfying crunch. I avoid soft tofu and tempeh for picnics as they tend to get waterlogged or crumble during transport. For nut-based proteins, peanut sauces and almond-based dressings add substantial protein while enhancing flavor.
Can you make plant-based picnic food the night before?
Absolutely, and many plant-based dishes actually taste better after resting overnight. My Mediterranean chickpea salad improves dramatically as the flavors meld together in the refrigerator. Farro and grain salads need at least four hours to absorb dressing properly, making them ideal for advance preparation. Thai peanut noodle components can be prepped up to 48 hours ahead as long as you keep the noodles, sauce, and toppings in separate containers until serving. The only exception is fresh herbs like basil, cilantro, and parsley, which I add within two hours of eating to prevent wilting and discoloration.
What plant-based picnic foods don’t need refrigeration?
While I always recommend using a cooler for optimal freshness, several plant-based items remain safe at room temperature for three to four hours. Sturdy vegetable wraps with hummus as a moisture barrier hold up well without refrigeration. Nut-based trail mixes, whole fresh fruits, crackers, and sealed containers of olives are naturally shelf-stable. Marinated vegetable salads with vinegar-based dressings stay safe longer than creamy alternatives. However, anything containing tofu, fresh vegetables that have been cut, or dishes with dairy or vegan cheese substitutes should stay cold. When in doubt, I err on the side of caution and pack the cooler.
How long can plant-based picnic food safely sit out?
Based on my temperature tracking over dozens of picnics, most plant-based dishes remain safe significantly longer than meat-based alternatives. Bean salads that started at 38 degrees in my cooler stayed below 45 degrees for over five hours in 82-degree heat. Grain salads with vegetables maintained safe temperatures for four to six hours with proper ice pack placement. Without a cooler, the general food safety guideline is two hours at room temperature, or one hour if temperatures exceed 90 degrees. I always bring my instant-read thermometer and check temperatures throughout the day. If any dish rises above 40 degrees for an extended period, I discard it rather than risk foodborne illness.
What are easy vegan picnic ideas for feeding a crowd?
When feeding groups of eight or more, I focus on dishes that scale easily and offer variety. A double batch of Mediterranean chickpea salad serves ten to twelve people and costs under twenty dollars to prepare. Thai peanut noodles work wonderfully for crowds because people can customize their own bowls with different toppings. I set up a build-your-own wrap station with grilled vegetables, hummus, various greens, and pickled onions, which lets guests create exactly what they want. Adding a large batch of crunchy Asian slaw and a bowl of lemony white bean dip with crudités rounds out the spread. For groups, I prepare everything in my largest containers and bring serving spoons so people can plate their own portions.